User Guide

Introduction
TimesTable is a tuition management desktop app for tutors who prefer to use a Command Line Interface (CLI) over a
Graphical User Interface (GUI). TimesTable allows you to manage and keep track of your tuition students and classes.
The app stores basic information about your students and classes, such as Name, Email, Address, Class Timing, and more.
You can add the students to classes to organise them.
TimesTable also automatically generates a TimeTable for you based on your created classes so you can visualise your schedule at a glance.
TimesTable uses the CLI to enter commands, which means you control the application by typing in commands into the command box. Other GUI applications are controlled by clicking on buttons and boxes. If you can type fast, TimesTable can get your class management tasks done faster than traditional GUI applications. Using the CLI allows you to control the application quickly while still having the visual benefits of a GUI.
This guide will take you through the commands of TimesTable step by step. For more information about how to use the guide, head to the Reading this User Guide section. To get started with using TimesTable, jump to the Quick Start section. For a full list of commands and detailed instructions on each one, head to the Features section.
Table of Contents
- Introduction
- Table of Contents
- Quick Start
- Reading this User Guide
-
Features
- Student commands
-
Class commands
- Adding a class:
addclass - Editing a class:
editclass - Adding student/students to a class:
addtoclass - Removing students from a class:
removefromclass - Locating class by class timing :
findclass - Locating class by class name:
findclassname - Listing all the classes:
listclass - Selecting of classes:
class - Delete a class:
deleteclass
- Adding a class:
- General commands
- FAQ
- Command summary
Quick Start
Set Up
-
Ensure you have Java
11or above installed in your Computer, if you do not, you can download it from here. - Download the latest
timestable.jarfrom here.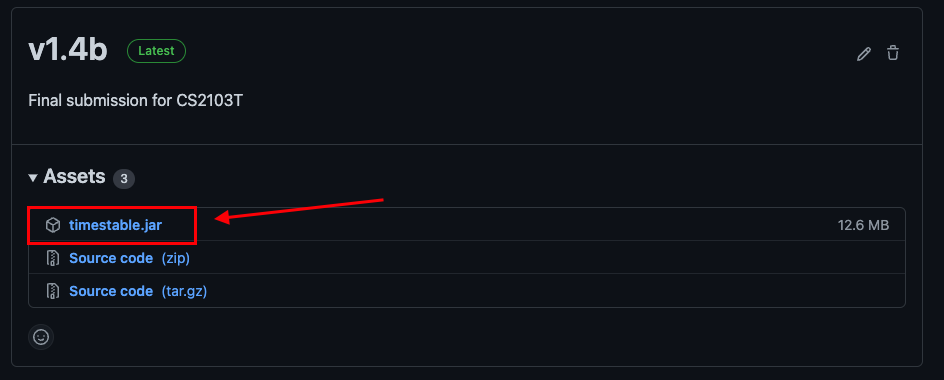
- Copy the file to the folder you want to use as the home folder for your TimesTable.
- For
Windows, double-click the file to start the app. ForMac, you need to openTimesTableusing terminal. You can right-click on the folder and click on New Terminal at Folder to bring up your terminal, and key injava -jar timestable.jar. Press Enter to launch the application.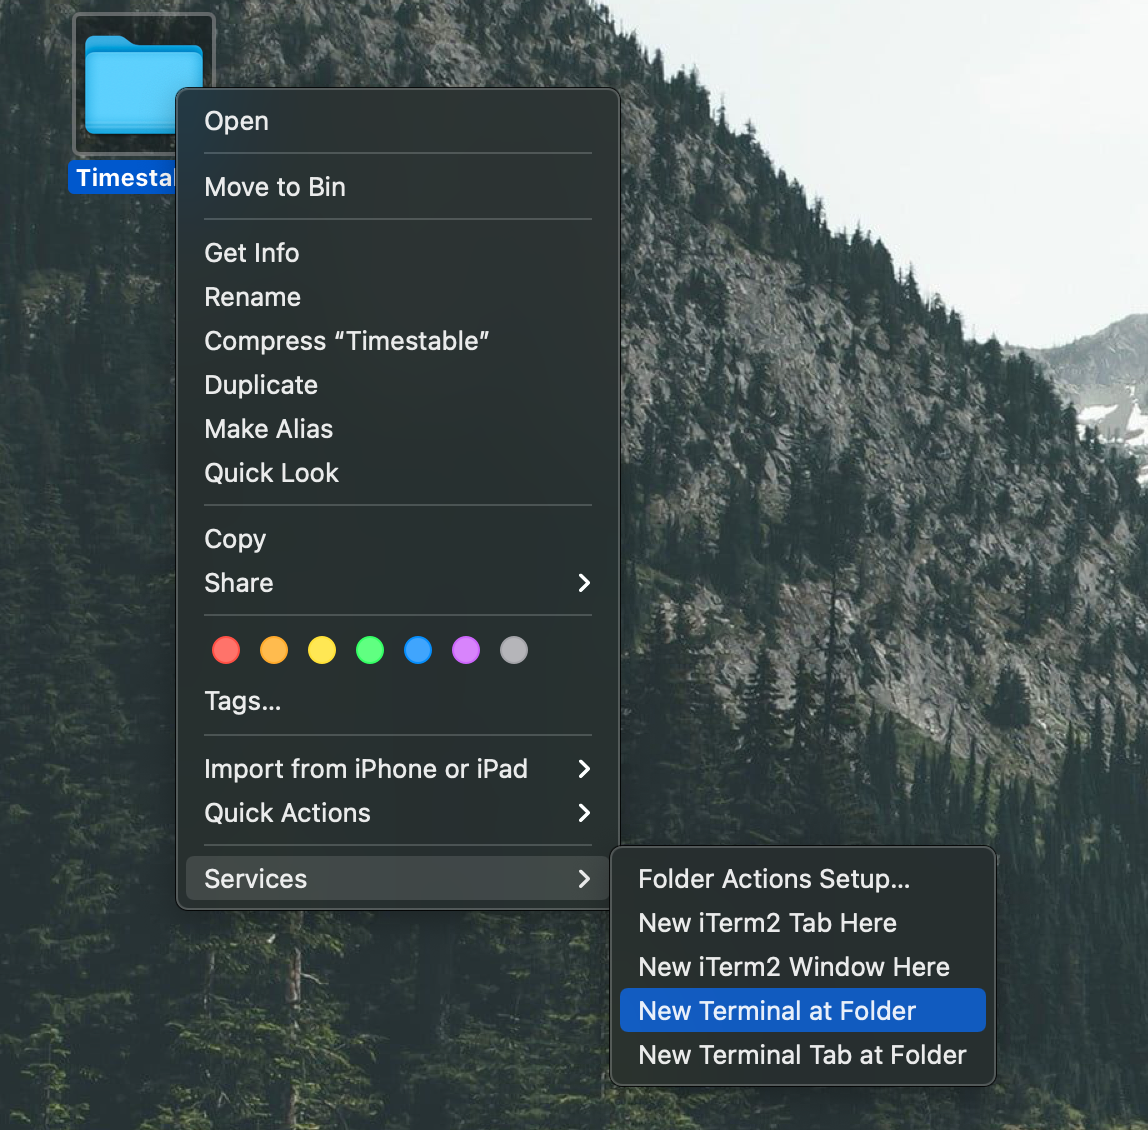
- The GUI similar to the below should appear in a few seconds. Note how the app contains some sample student data.

Tutorial
- Before we begin, note that we are at the Students Tab, where we show all the students that you are teaching. Other tabs will be explained later.
-
To get started, lets add a student using the
addcommand. First typeadd n/John Doe p/98765432 e/johnd@example.com a/John street, block 123, #01-01 nok/ n/Jack Doe p/10987654 e/jackd@example.com a/311, Clementi Ave 2, #02-25into the command box to add ‘John Doe’ using the parametern/, with his specified phone number using thep/parameter, and email using thee/parameter and so on (for more details refer to theaddcommand). If you’re wondering, the text afternok/specifies all the information for his next-of-kin, and uses the similar parameters.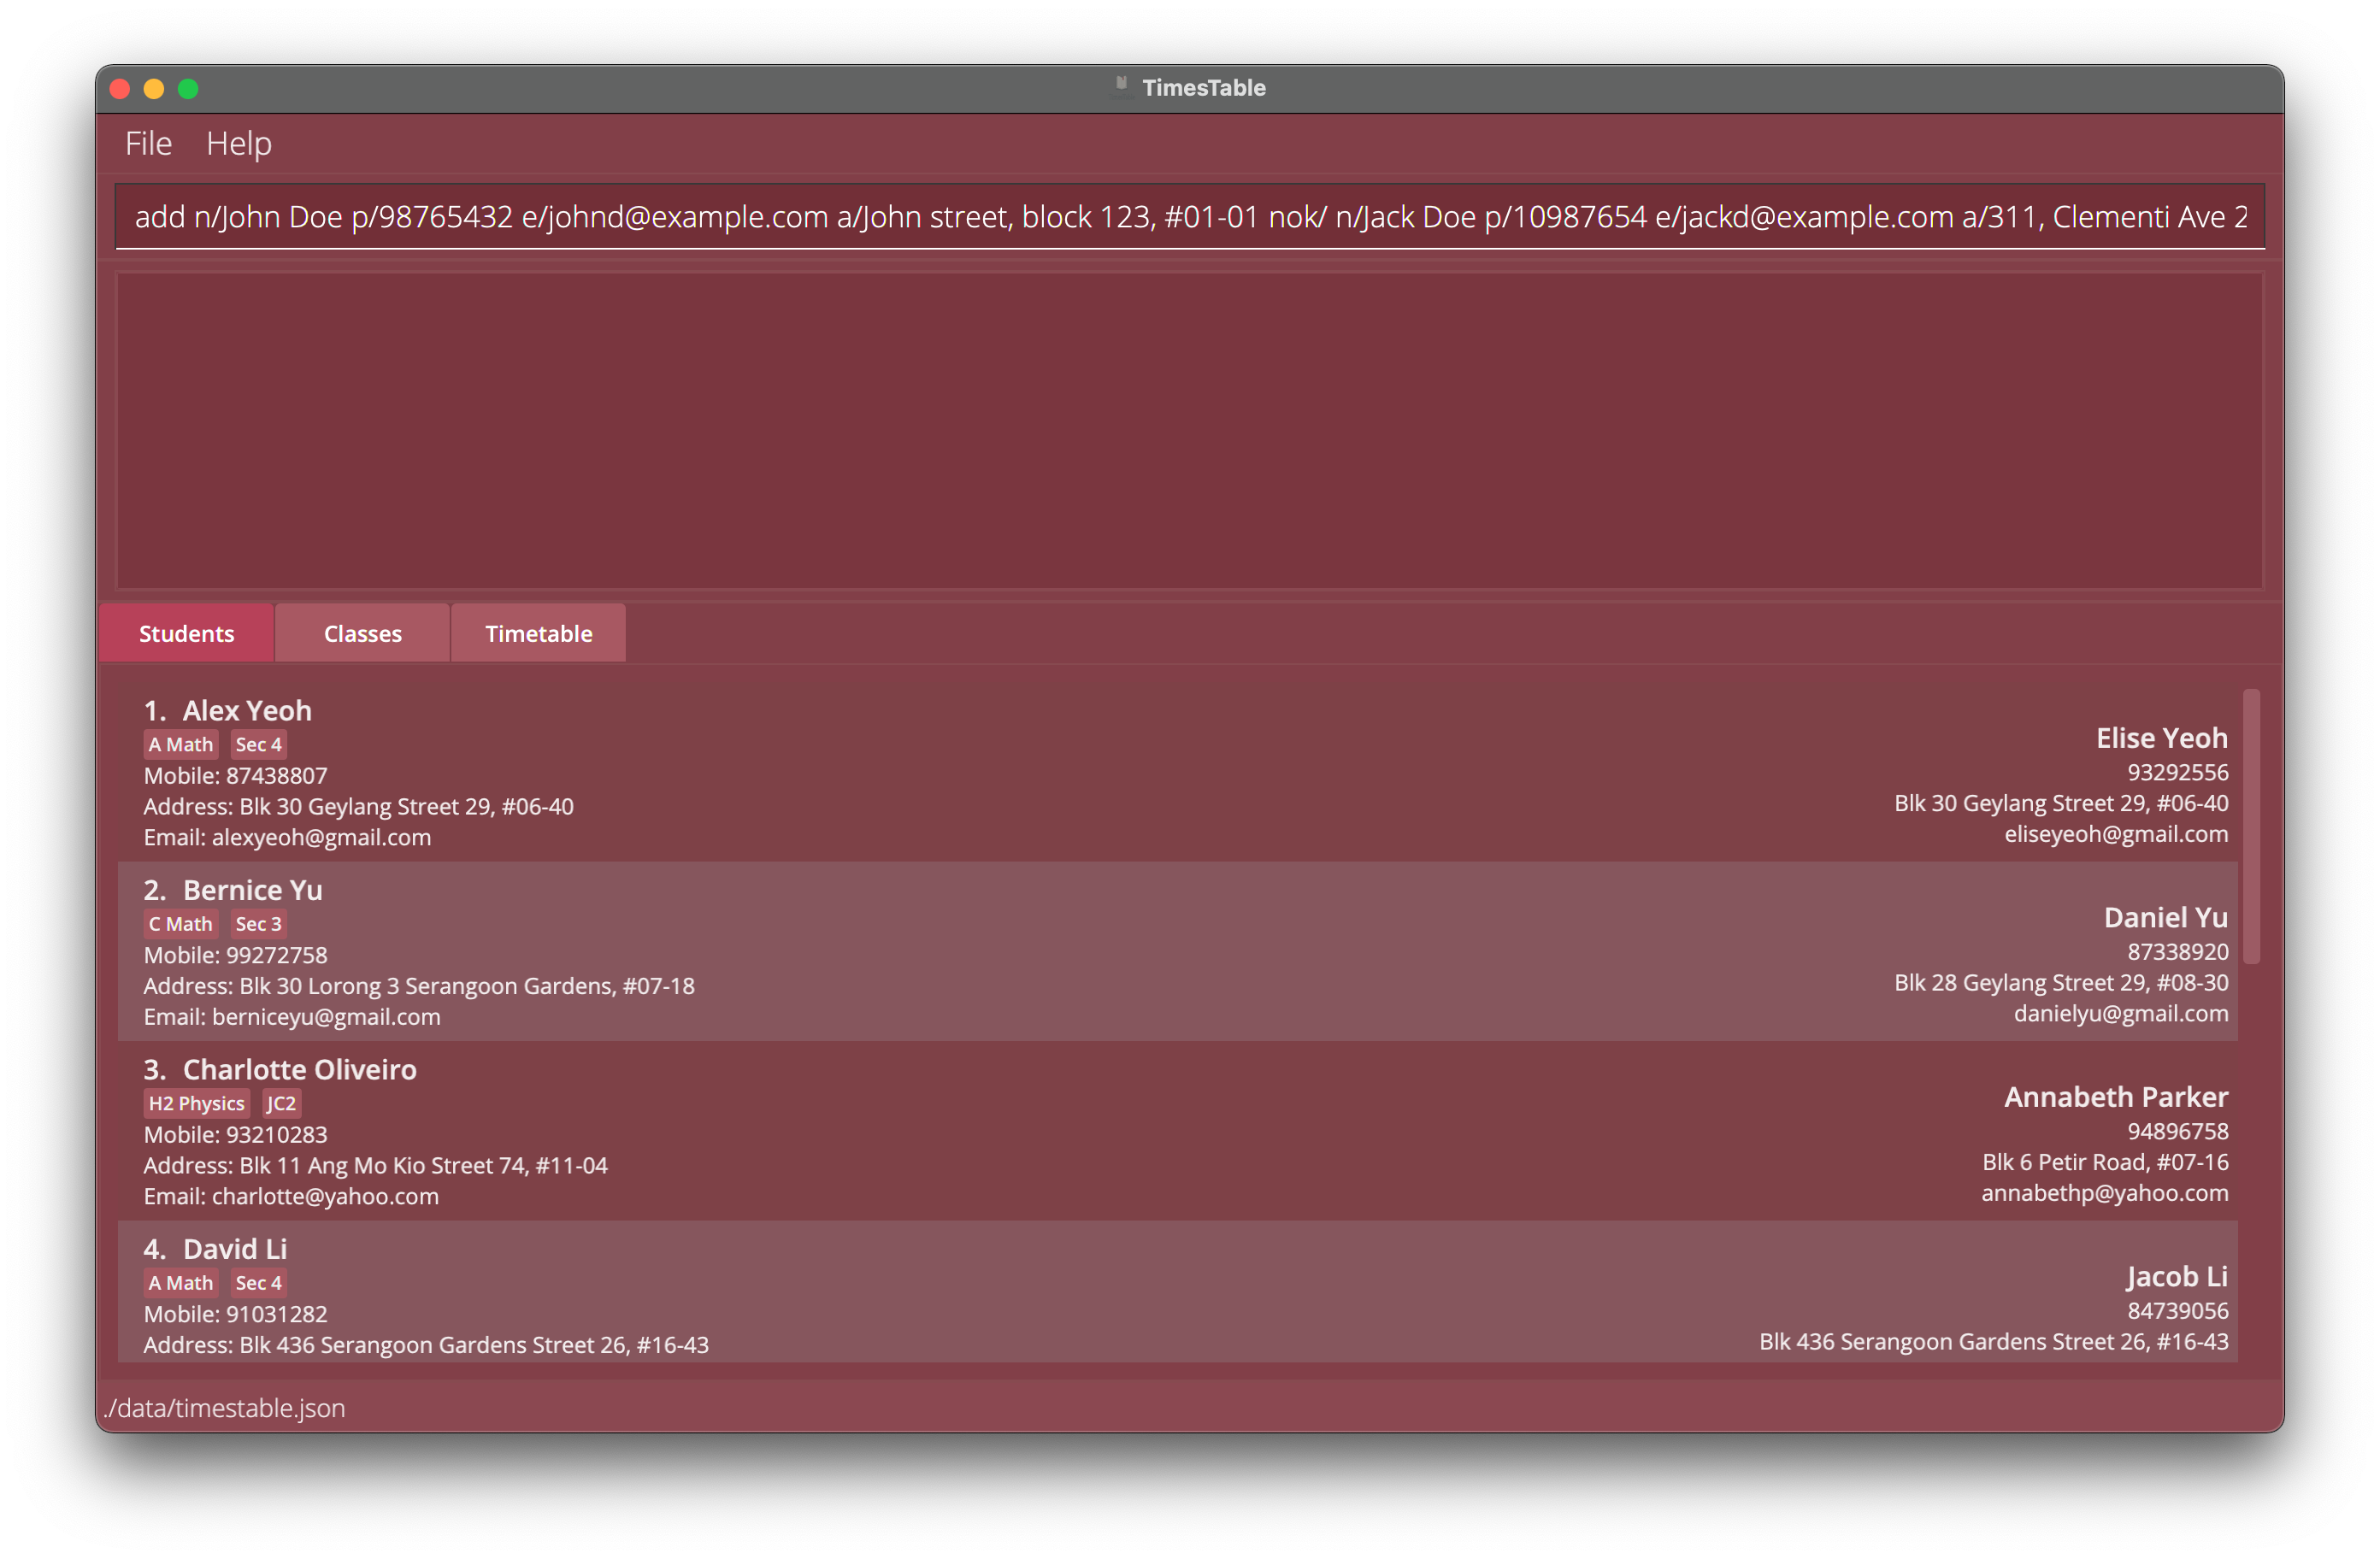
Press enter afterwards to execute the command which adds a student to our TimesTable.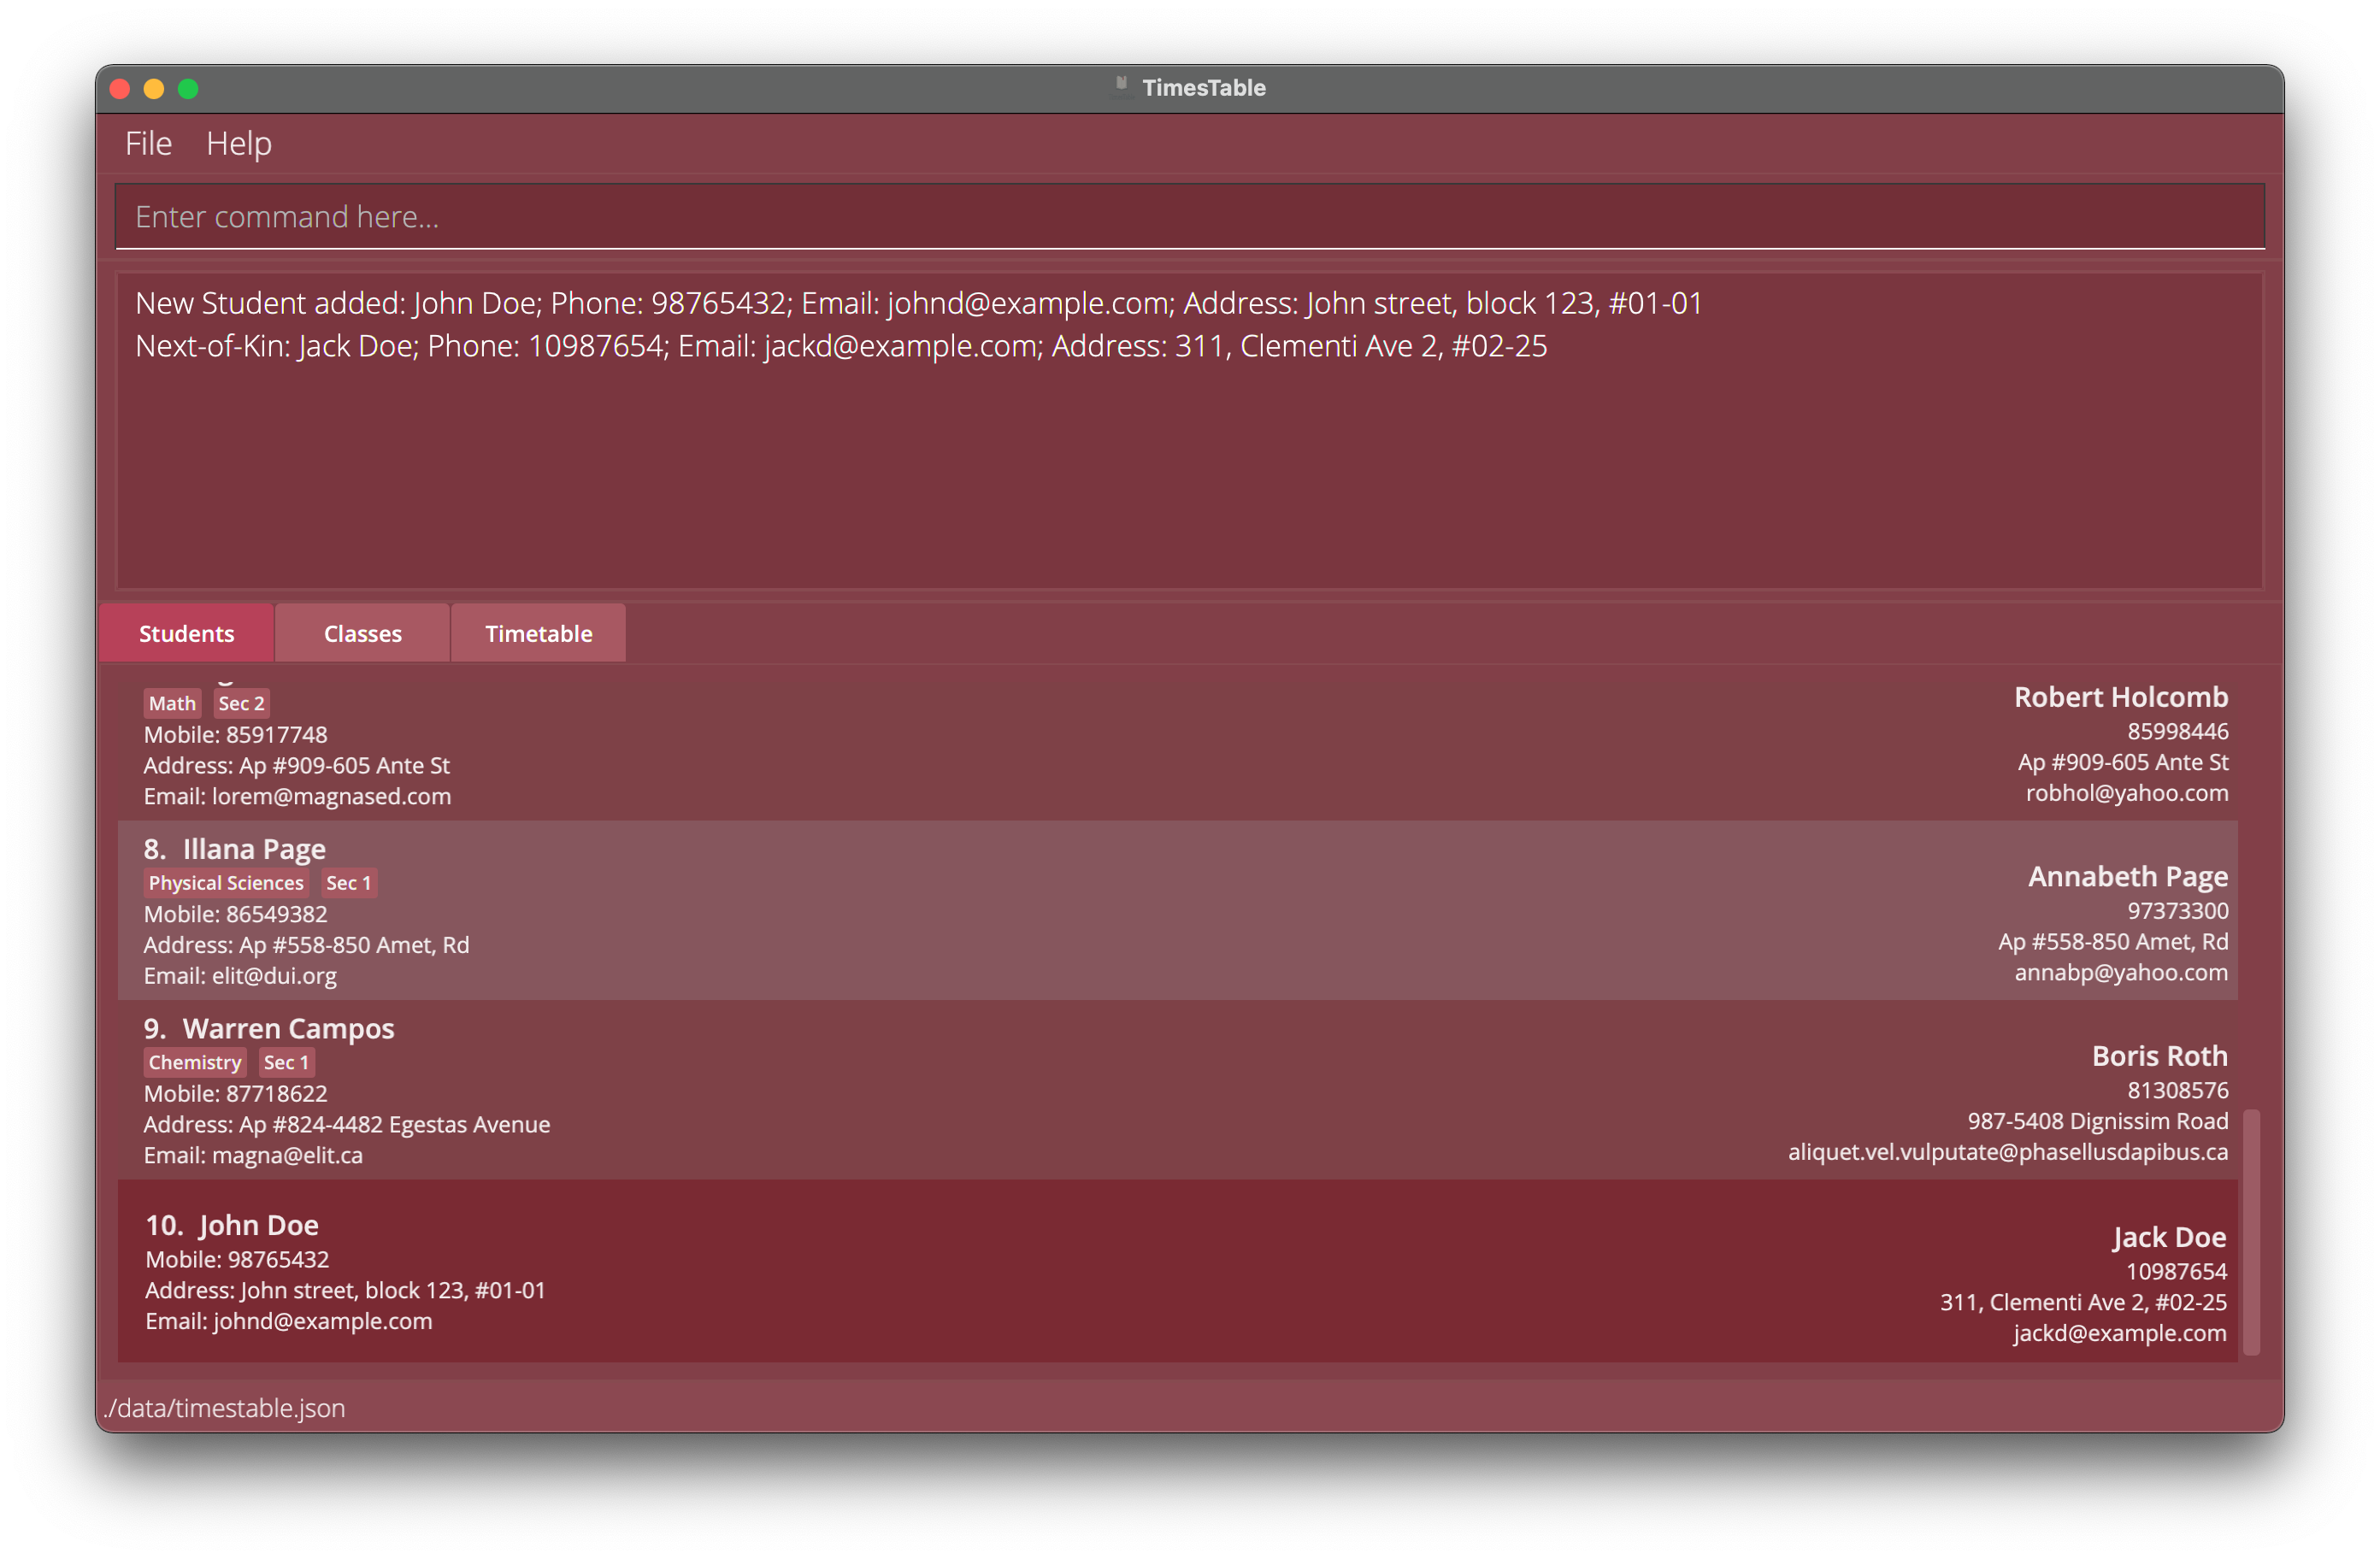
-
Next, we can try creating a class! Similar to before, we run the
addclasscommand.
Typeaddclass cn/Sec 4 A Maths ct/FRI 11:30-13:30 r/70 l/Nex Tuition Centerinto the command box.
We are adding a class ‘Sec 4 A Maths’ using thecn/parameter, at 11:30am to 1:30pm using thect/parameter, together with the rate and the location.
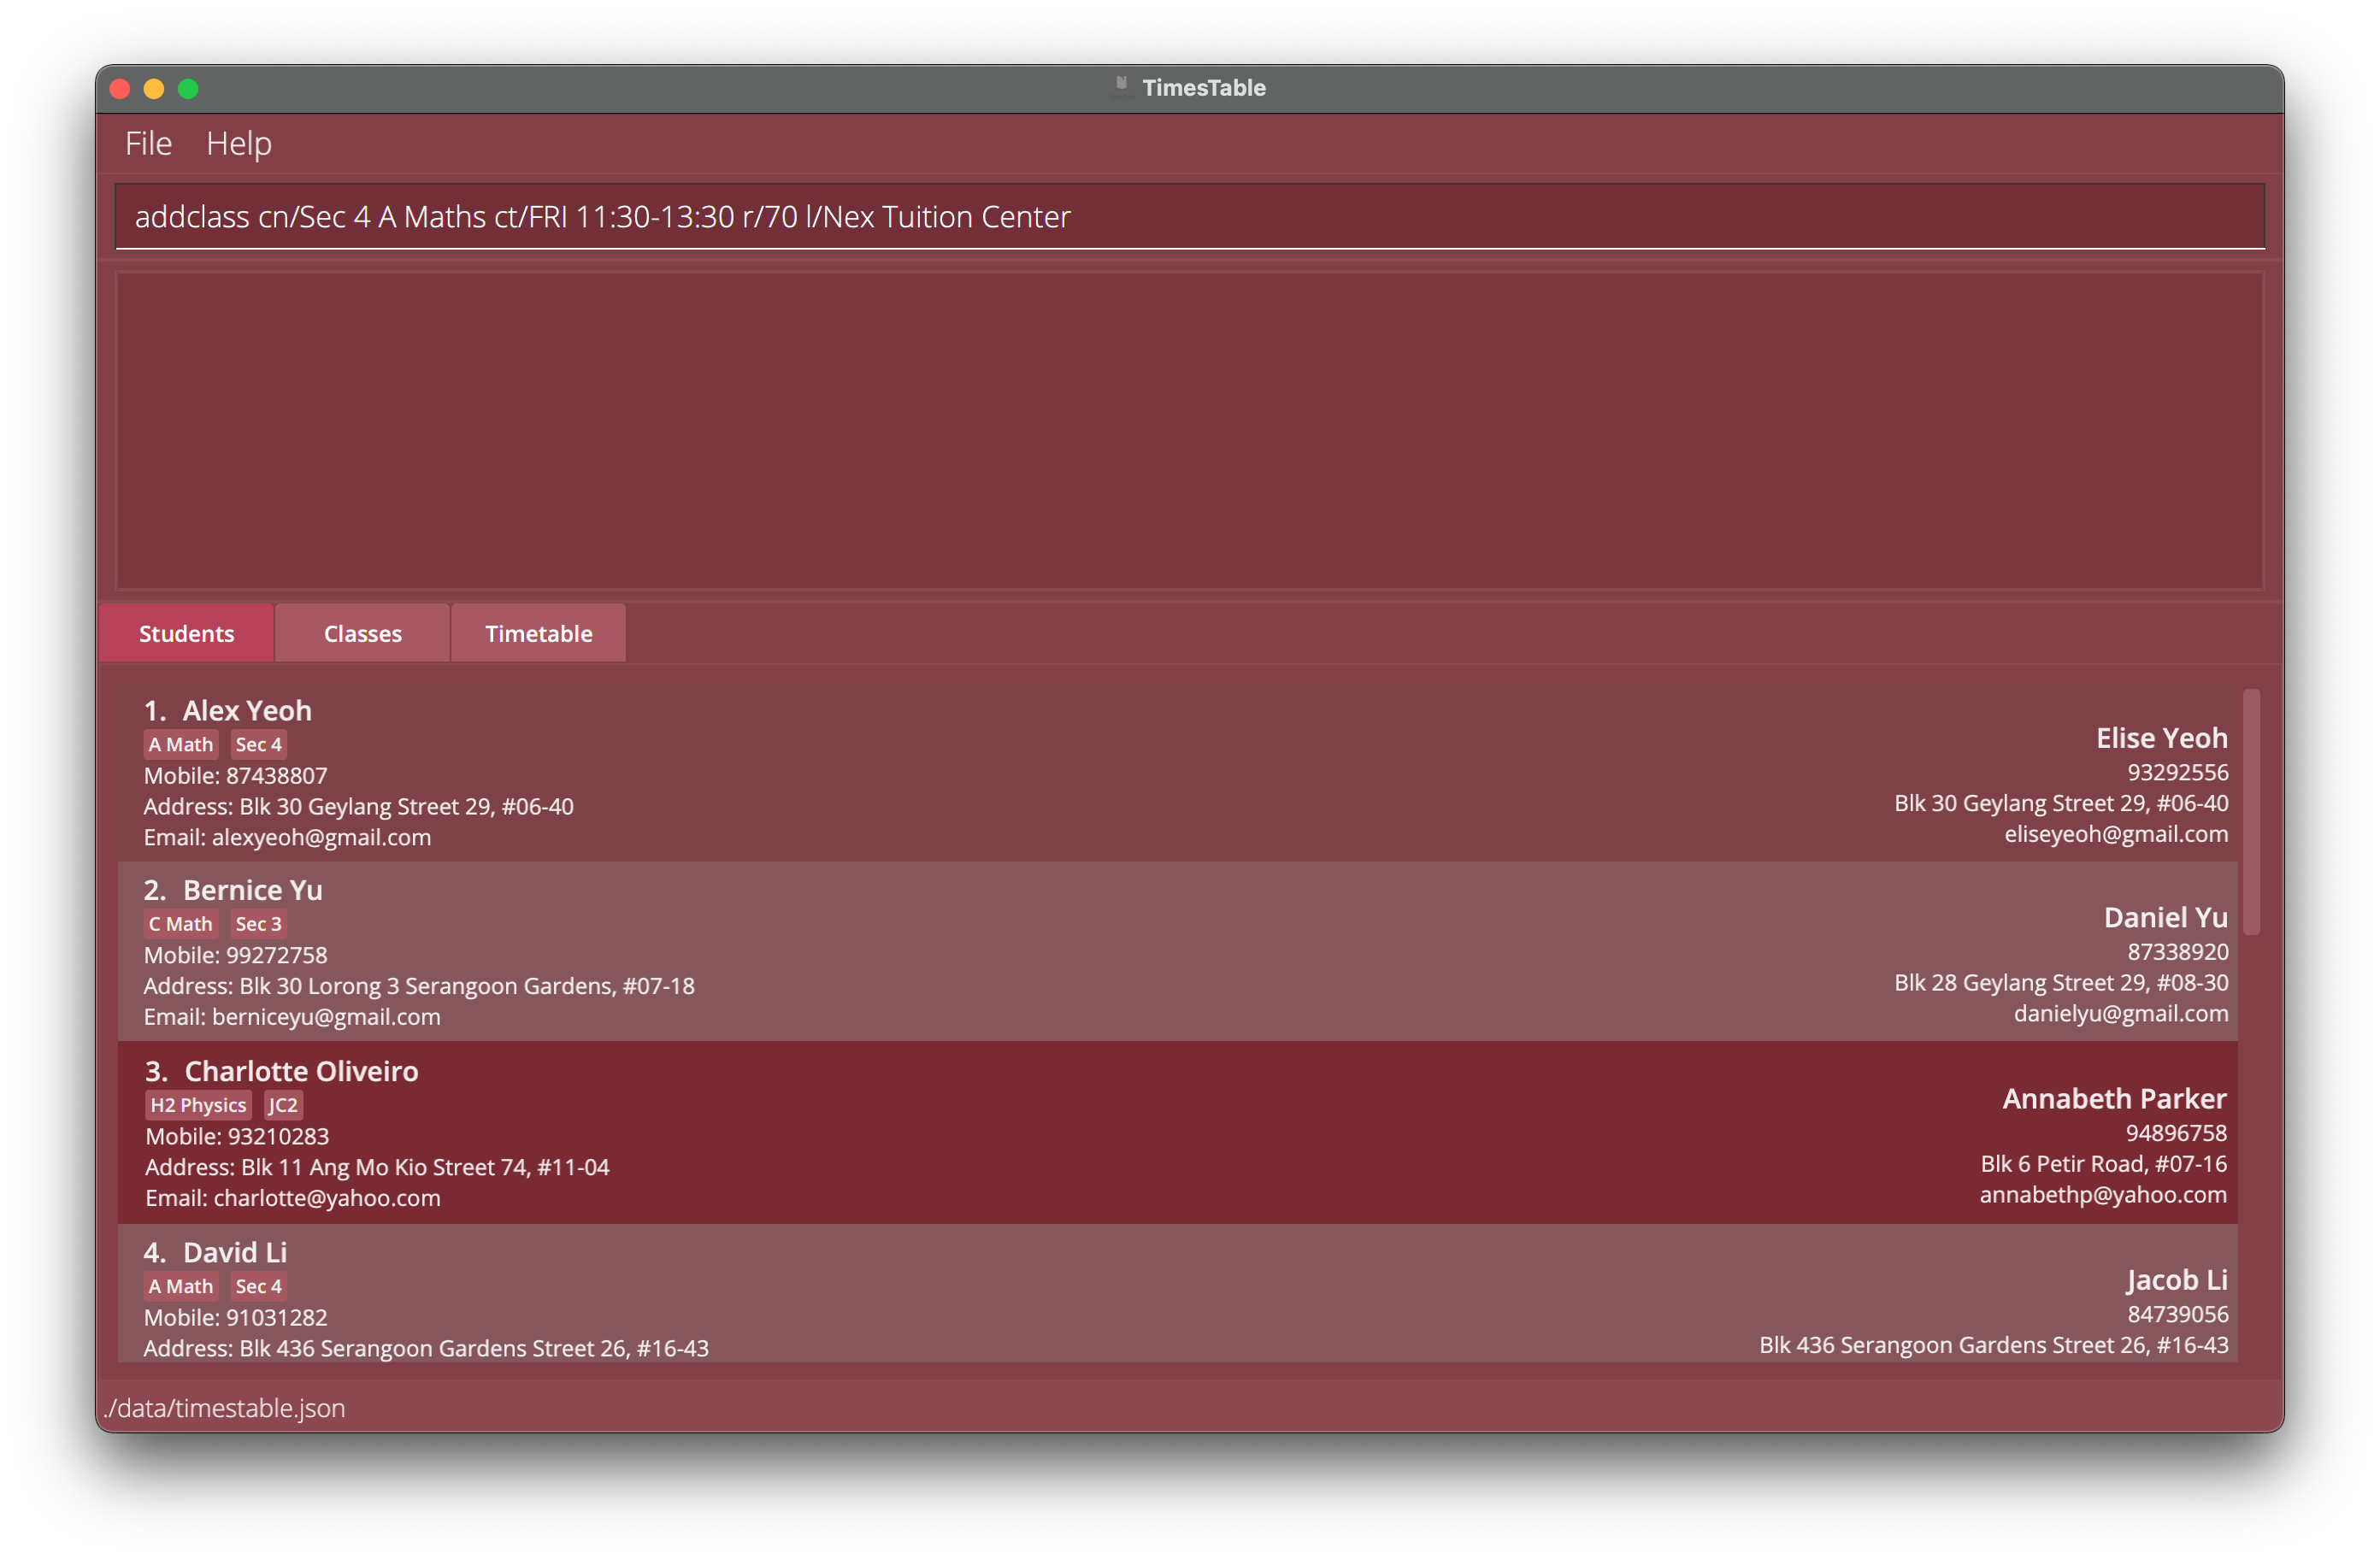 Again, press enter to add the class to our TimesTable.
 -
Oh! Notice that you have been transported to another tab. This is known as the Classes Tab, which shows you all the information about the Classes you are teaching.
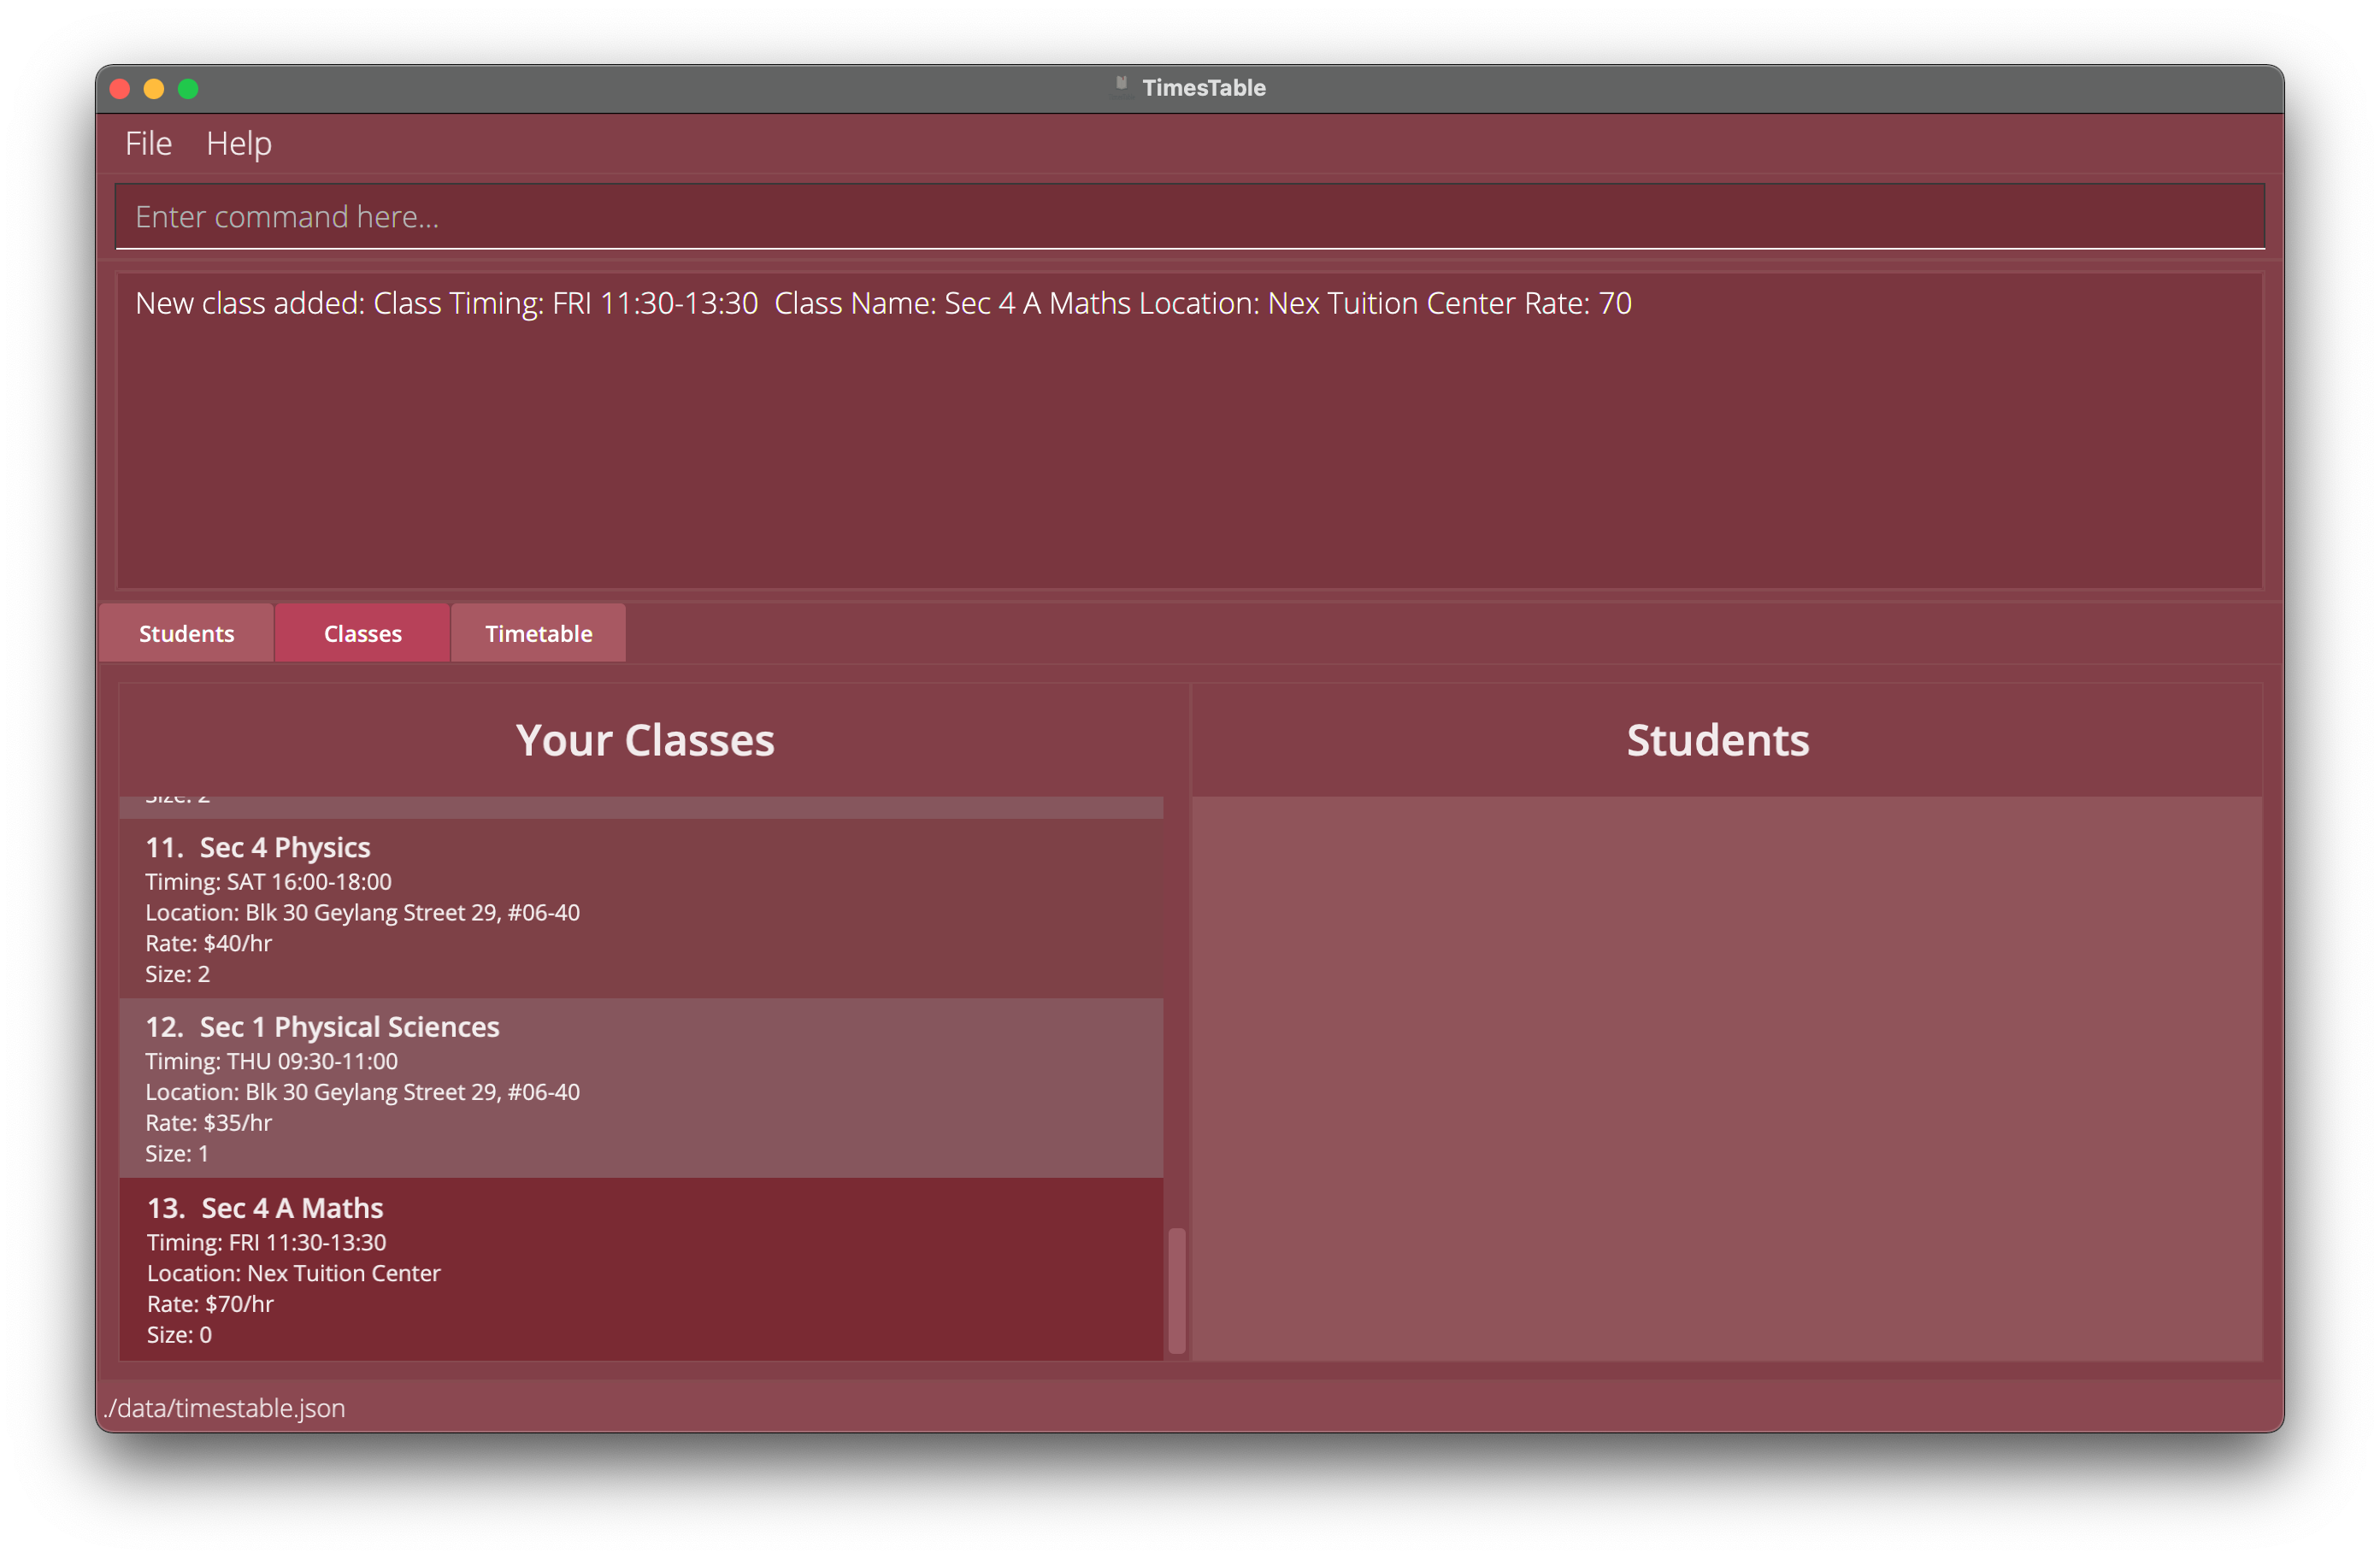 When we scroll down, you can see that ‘Sec 4 A Maths’ is added at the bottom.
 -
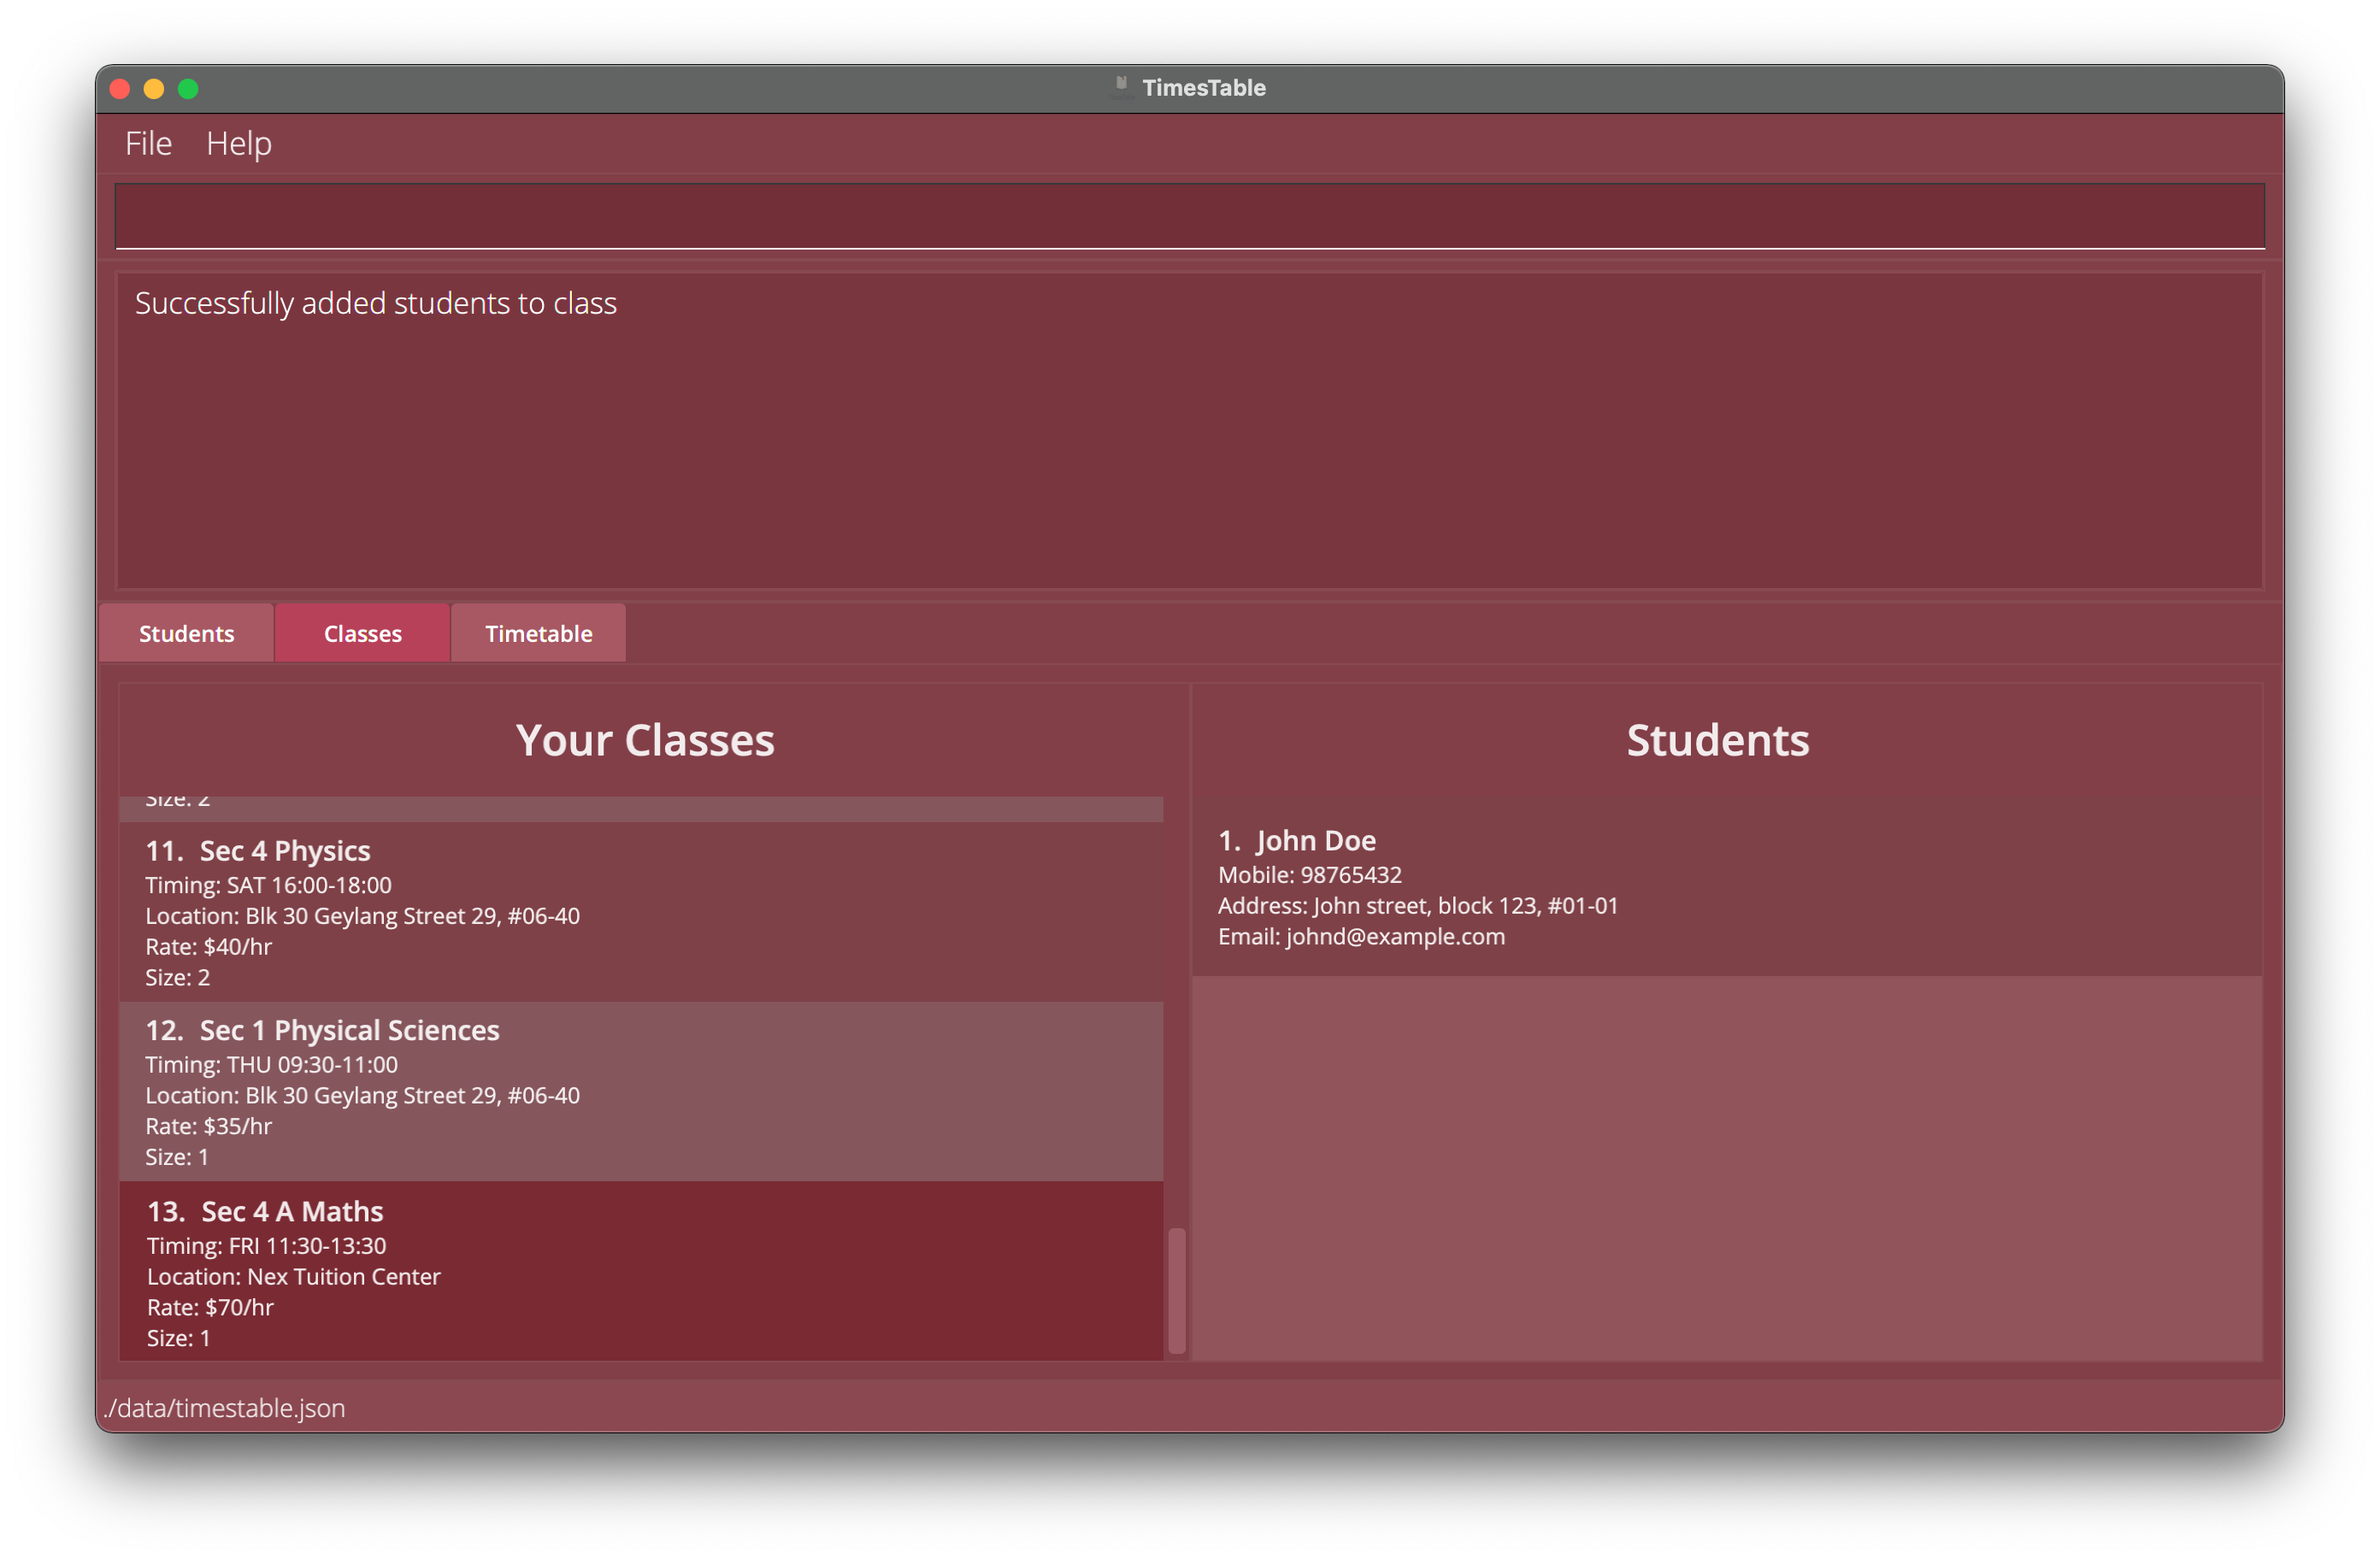
See that blank space on the right? It is where all the students who are under that class go to.
I will now show you how to add students to a class! Here, we are using theaddtoclasscommand, which takes in the index of the class, followed by the indexes of the students.
Typeaddtoclass 13 10to add the student that you just added (in index 10) to the class that you just added (in index 13).
As shown, you can see the students that are added to the class. How cool is that?
-
Continuing on, let me introduce you to the Timetable tab! Here, we are using the
viewcommand.
Typeview timetableand press enter.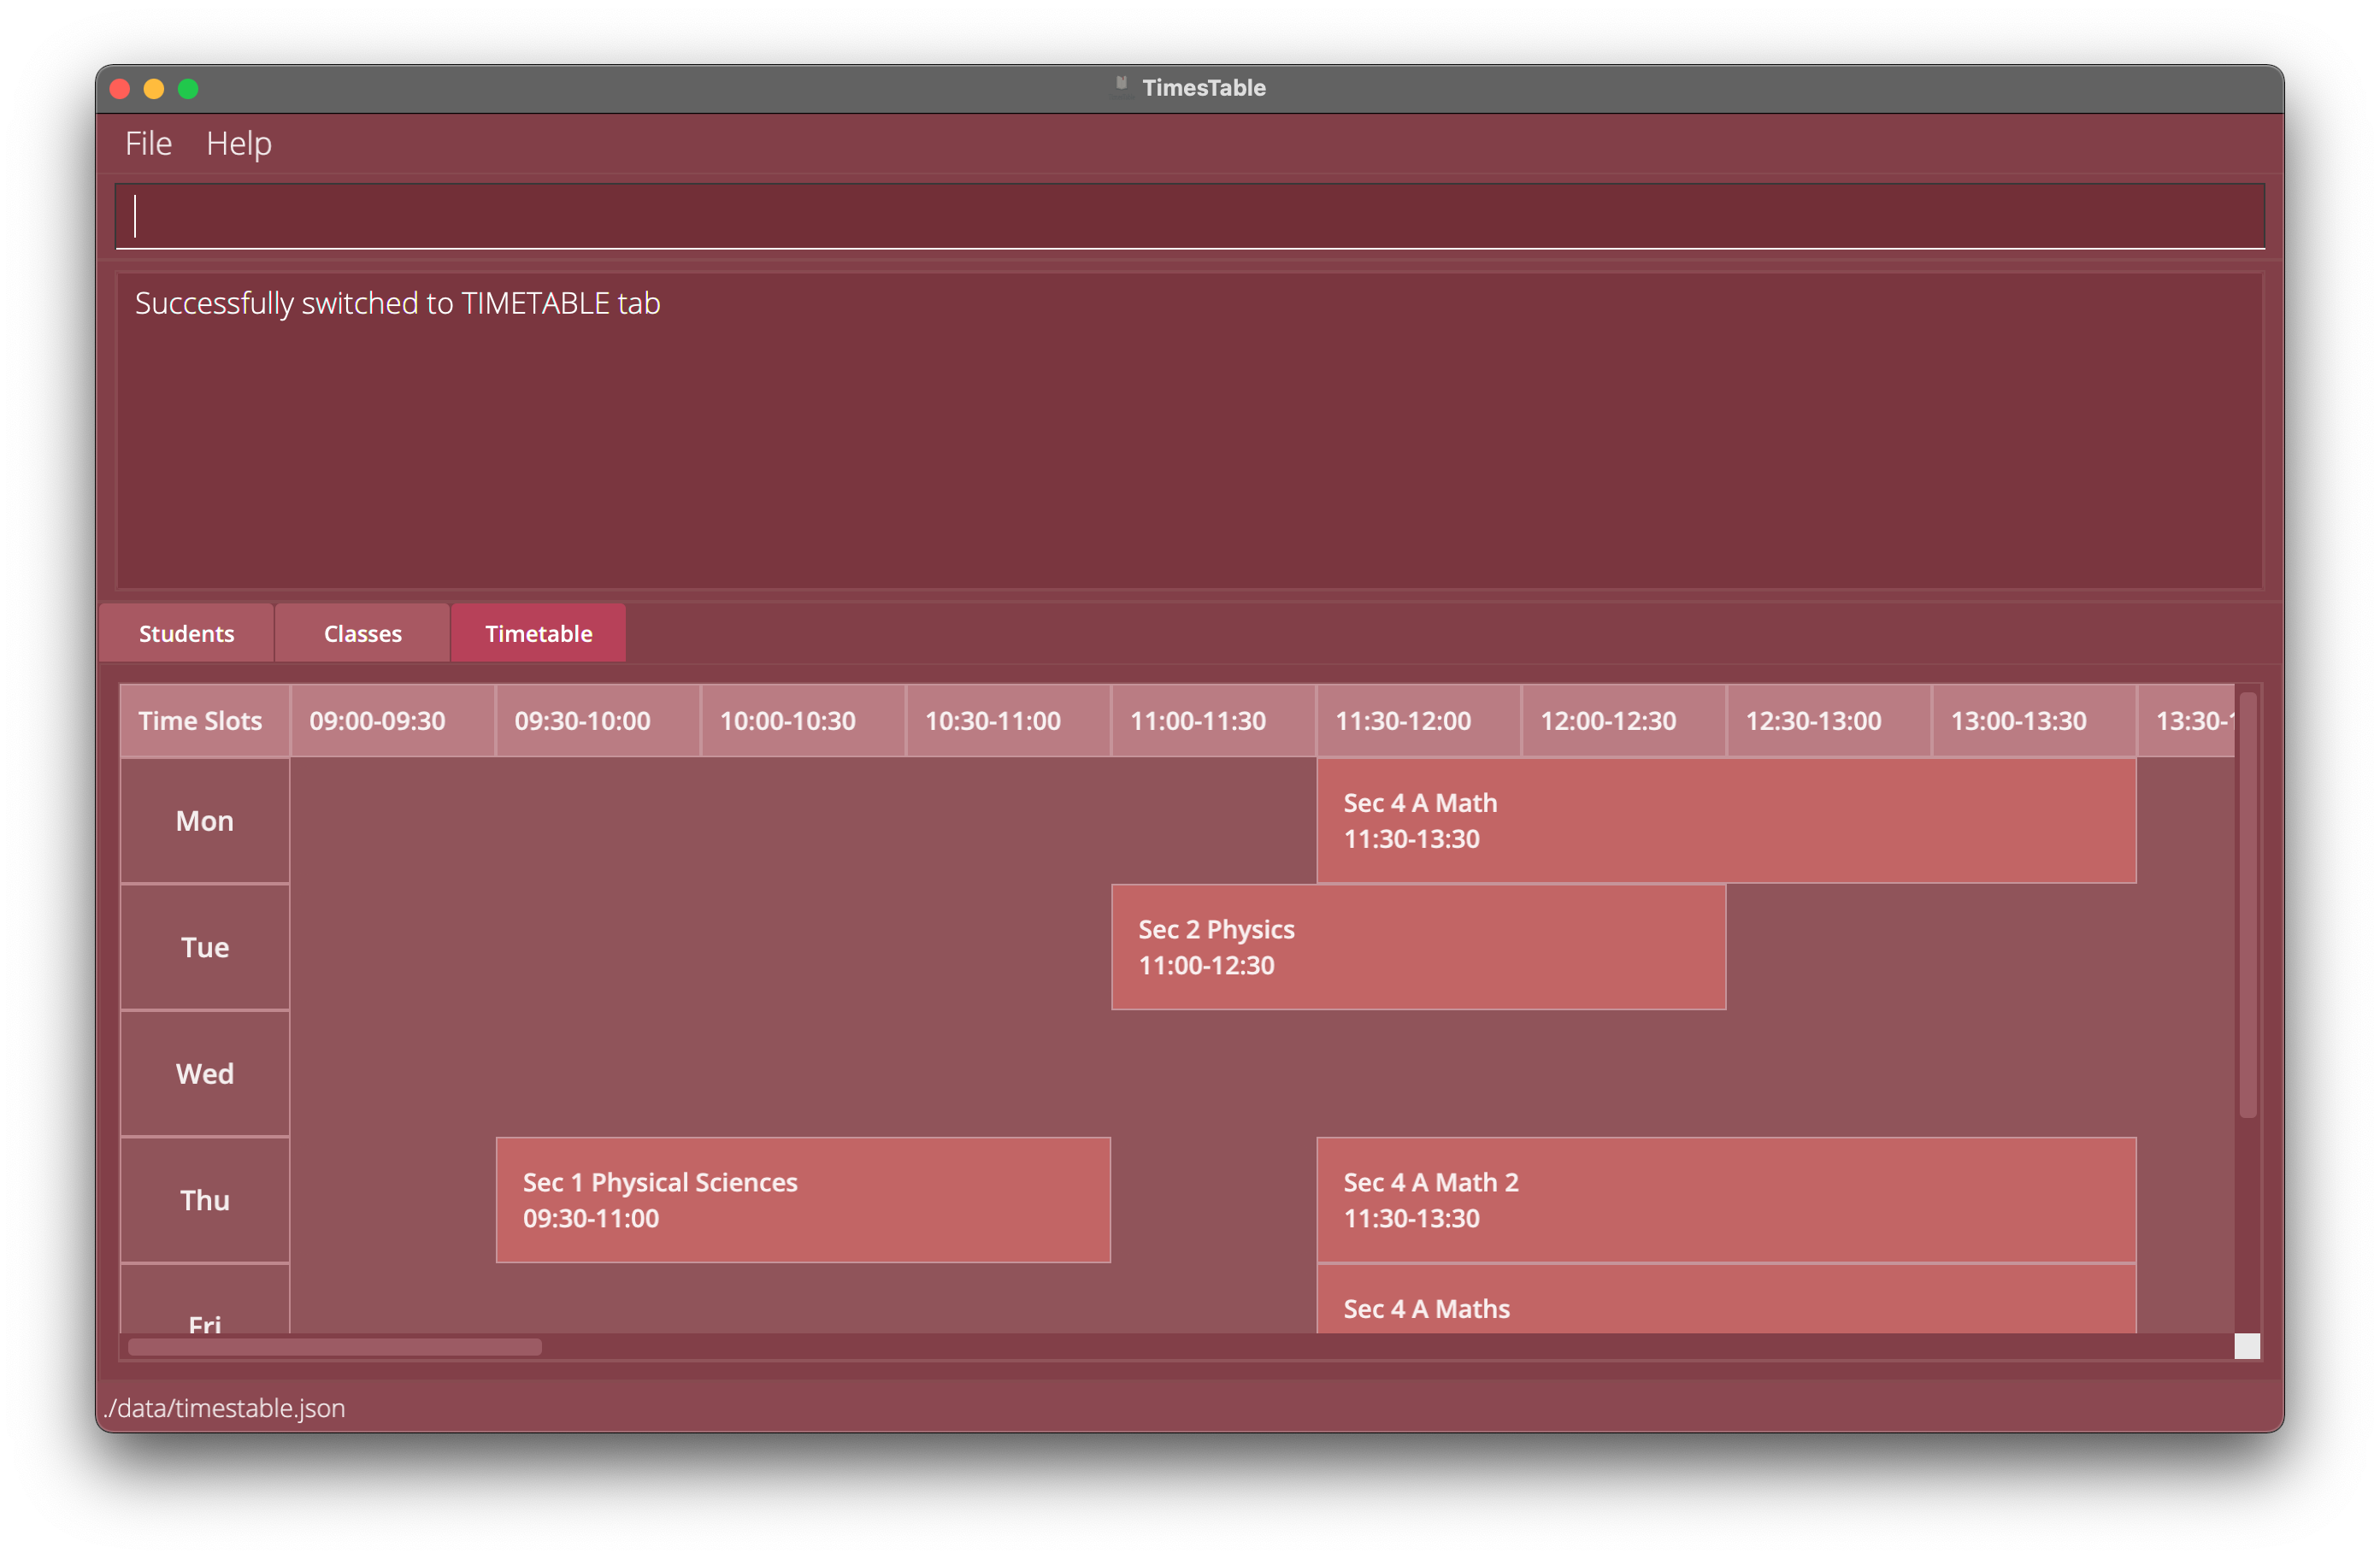
Here, you can see all the classes that you are teaching in a nice, visual, weekly timetable format! On the first row which is Monday, you can see the ‘Sec 4 A Math’ class that you just added, with the correct timing. - Now that you have experienced the core functionality, you are all ready to explore the other commands.
To delete, we have commands likedeleteanddeleteclassfor students and classes respectively, and even commands tofindandsortclasses and students when you have become more familiar with the app, just refer to the Features below for details of each command. Lastly, if you would like to fill in Timestable with your own students, simply use theclearcommand to delete all the sample students and classes.
Reading this User Guide
General Symbols and Syntax
| Syntax | Definition |
|---|---|
UPPER_CASE |
Words in UPPER_CASE are the inputs to be supplied by the user. e.g. in add n/NAME, NAME is an input which can be used as add n/John Doe. |
a/ |
Signifies a field. The user inputs the field after the signifier. Also known as a parameter. (see Glossary) |
[a/UPPER_CASE] |
Items in square brackets refer to optional fields. e.g. n/NAME [t/TAG] can be used as n/John Doe t/friend or just n/John Doe. |
... |
Indicates that the preceding field can be used multiple times. e.g. [t/TAG]… can be used multiple times, such ast/friend or t/friend t/family. |
Glossary
| Term | Definition |
|---|---|
| NOK | Next-of-kin. Refers to the student’s guardian, parent or perhaps close friend to be contacted regarding admin matters like payment. |
| PARAMETERS | The inputs before the / are known as parameters. e.g n/NAME (n/ is the parameter for name). e.g a/ADDRESS (a/ is the parameter for name). |
| INDEX | The number next to the Student/Class that shows its postion on the list. |
Features
e.g. if the command specifies
n/NAME p/PHONE_NUMBER, p/PHONE_NUMBER n/NAME is also acceptable.
Student commands
Adding a student: add
Adds a student to the TimesTable.
Format:
add n/NAME p/PHONE_NUMBER e/EMAIL a/ADDRESS [t/TAG]… nok/ n/NOK_NAME p/NOK_PHONE_NUMBER e/NOK_EMAIL a/NOK_ADDRESS
- This is a command that requires next-of-kin (NOK) information.
- This command is split into two segments (excluding command keyword). The first segment are the inputs before
nok/and the second segment are the inputs afternok/.- Inputs in the first segment are about student information whereas inputs in the second segment are about NOK’s information.
- The order of input within its own segment is swappable, but the segments themselves are not.
- The command does not allow adding duplicate students - as defined as the student having the same name, ignoring case.
-
NAMEcan have a maximum of 120 characters. -
PHONE_NUMBERhas to be between 3-25 numbers. -
TAGcan have a maximum of 15 characters per tag.
Examples:
-
add n/John Doe p/98765432 e/johnd@example.com a/John street, block 123, #01-01 t/ALevels nok/ n/Mary Doe p/93334848 e/mary23@gmail.com a/311, Clementi Ave 2, #02-25
Adds a student withNAMEJohn Doe,PHONE98765432,EMAILjohnd@example.com,ADDRESSJohn street, block 123, #01-01,TAGALevels, with next-of-kin withNAMEMary Doe,PHONE93334848,EMAILmary23@gmail.com,ADDRESS311, Clementi Ave 2, #02-25 -
add n/Betsy Crowe t/friend e/betsycrowe@example.com a/Newgate Prison p/1234567 t/slow learner nok/ n/Karen e/karenSUper@gmail.com p/99994444 a/311, Clementi Ave 2, #02-25
Adds a student withNAMEBetsy Crowe,PHONE1234567,EMAILbetsycrowe@example.com,ADDRESSNewgate Prison,TAGfriend, with next-of-kin withNAMEKaren,PHONE99994444,EMAILkarenSUper@gmail.com,ADDRESS311, Clementi Ave 2, #02-25
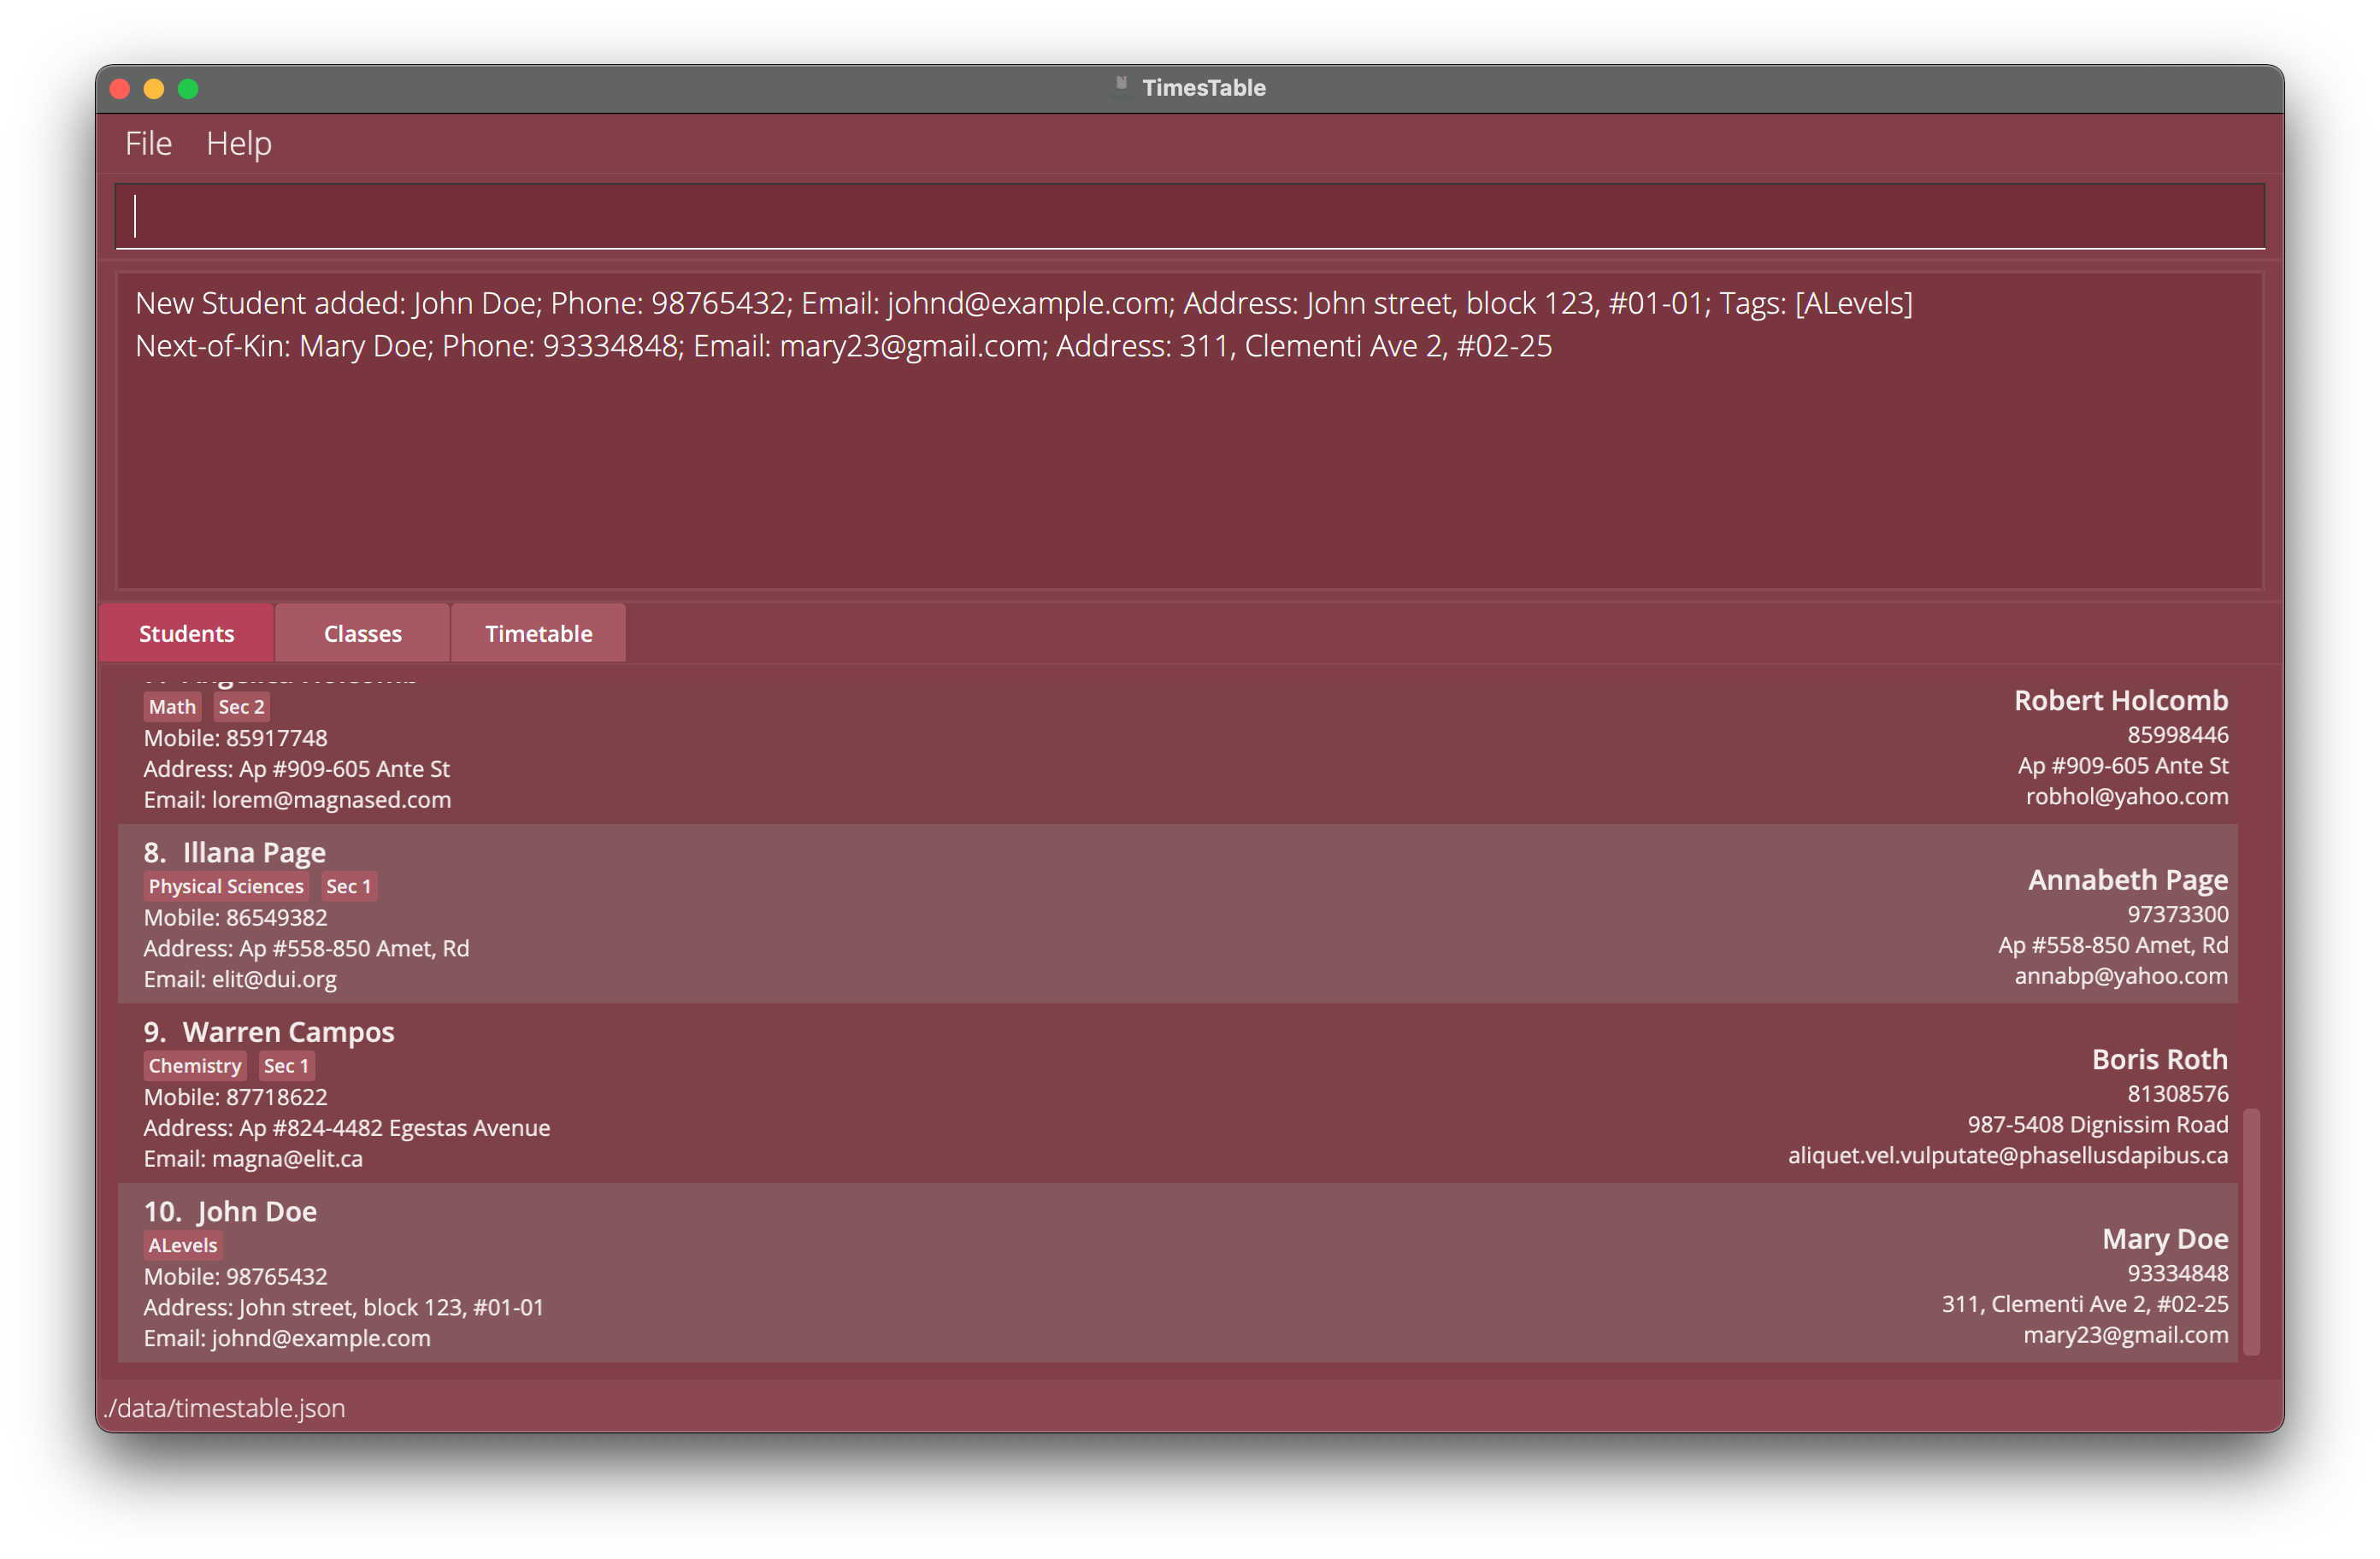
Example 1: Add John Doe
Editing a student : edit
Edits an existing student in the TimesTable.
Format:
edit INDEX [n/NAME] [p/PHONE] [e/EMAIL] [a/ADDRESS] [t/TAG]… [nok/ [n/NOK_NAME] [p/NOK_PHONE] [e/NOK_EMAIL] [a/NOK_ADDRESS]]
`
- Edits the student at the specified
INDEX. The index refers to the index number shown in the displayed student list. The index must be a positive integer 1, 2, 3, … - At least one of the optional fields must be provided.
- An optional
nok/(next-of-kin) field can be provided to edit the student’s next-of-kin (NOK). All fields that come afternok/will be for the student’s next-of-kin. (same rule fromaddcommand applies)- If
nok/is provided, at least one of the optional fields belonging to NOK must be provided. - Inputs in the first segment are about student information whereas inputs in the second segment are about NOK’s information.
- If
- The order of input within its own segment is swappable, but the segments themselves are not.
- When editing tags, the existing tags of the student will be removed i.e adding of tags is not cumulative.
- You can remove all the student’s tags by typing
t/without specifying any tags after it.
- You can remove all the student’s tags by typing
-
NAMEcan have a maximum of 120 characters. -
PHONE_NUMBERhas to be between 3-25 numbers. -
TAGcan have a maximum of 15 characters per tag, with a maximum of 5 tags.
Examples (editing student information only):
-
edit 1 p/91234567 e/johndoe@example.comEdits thePHONEandEMAILof the 1st student to be91234567andjohndoe@example.comrespectively. -
edit 2 n/Betsy Crower t/Edits theNAMEof the 2nd student to beBetsy Crowerand clears all existingTAGs. -
edit 1 n/kevin p/12345678Edits theNAMEandPHONEof student 1 to becomekevinand12345678. -
edit 4 n/John Walker a/4 Petir Road #16-04 Singapore 657891Edits theNAMEandADDRESSof the 4th person to beJohn Walkerand4 Petir Road #16-04 Singapore 657891respectively.
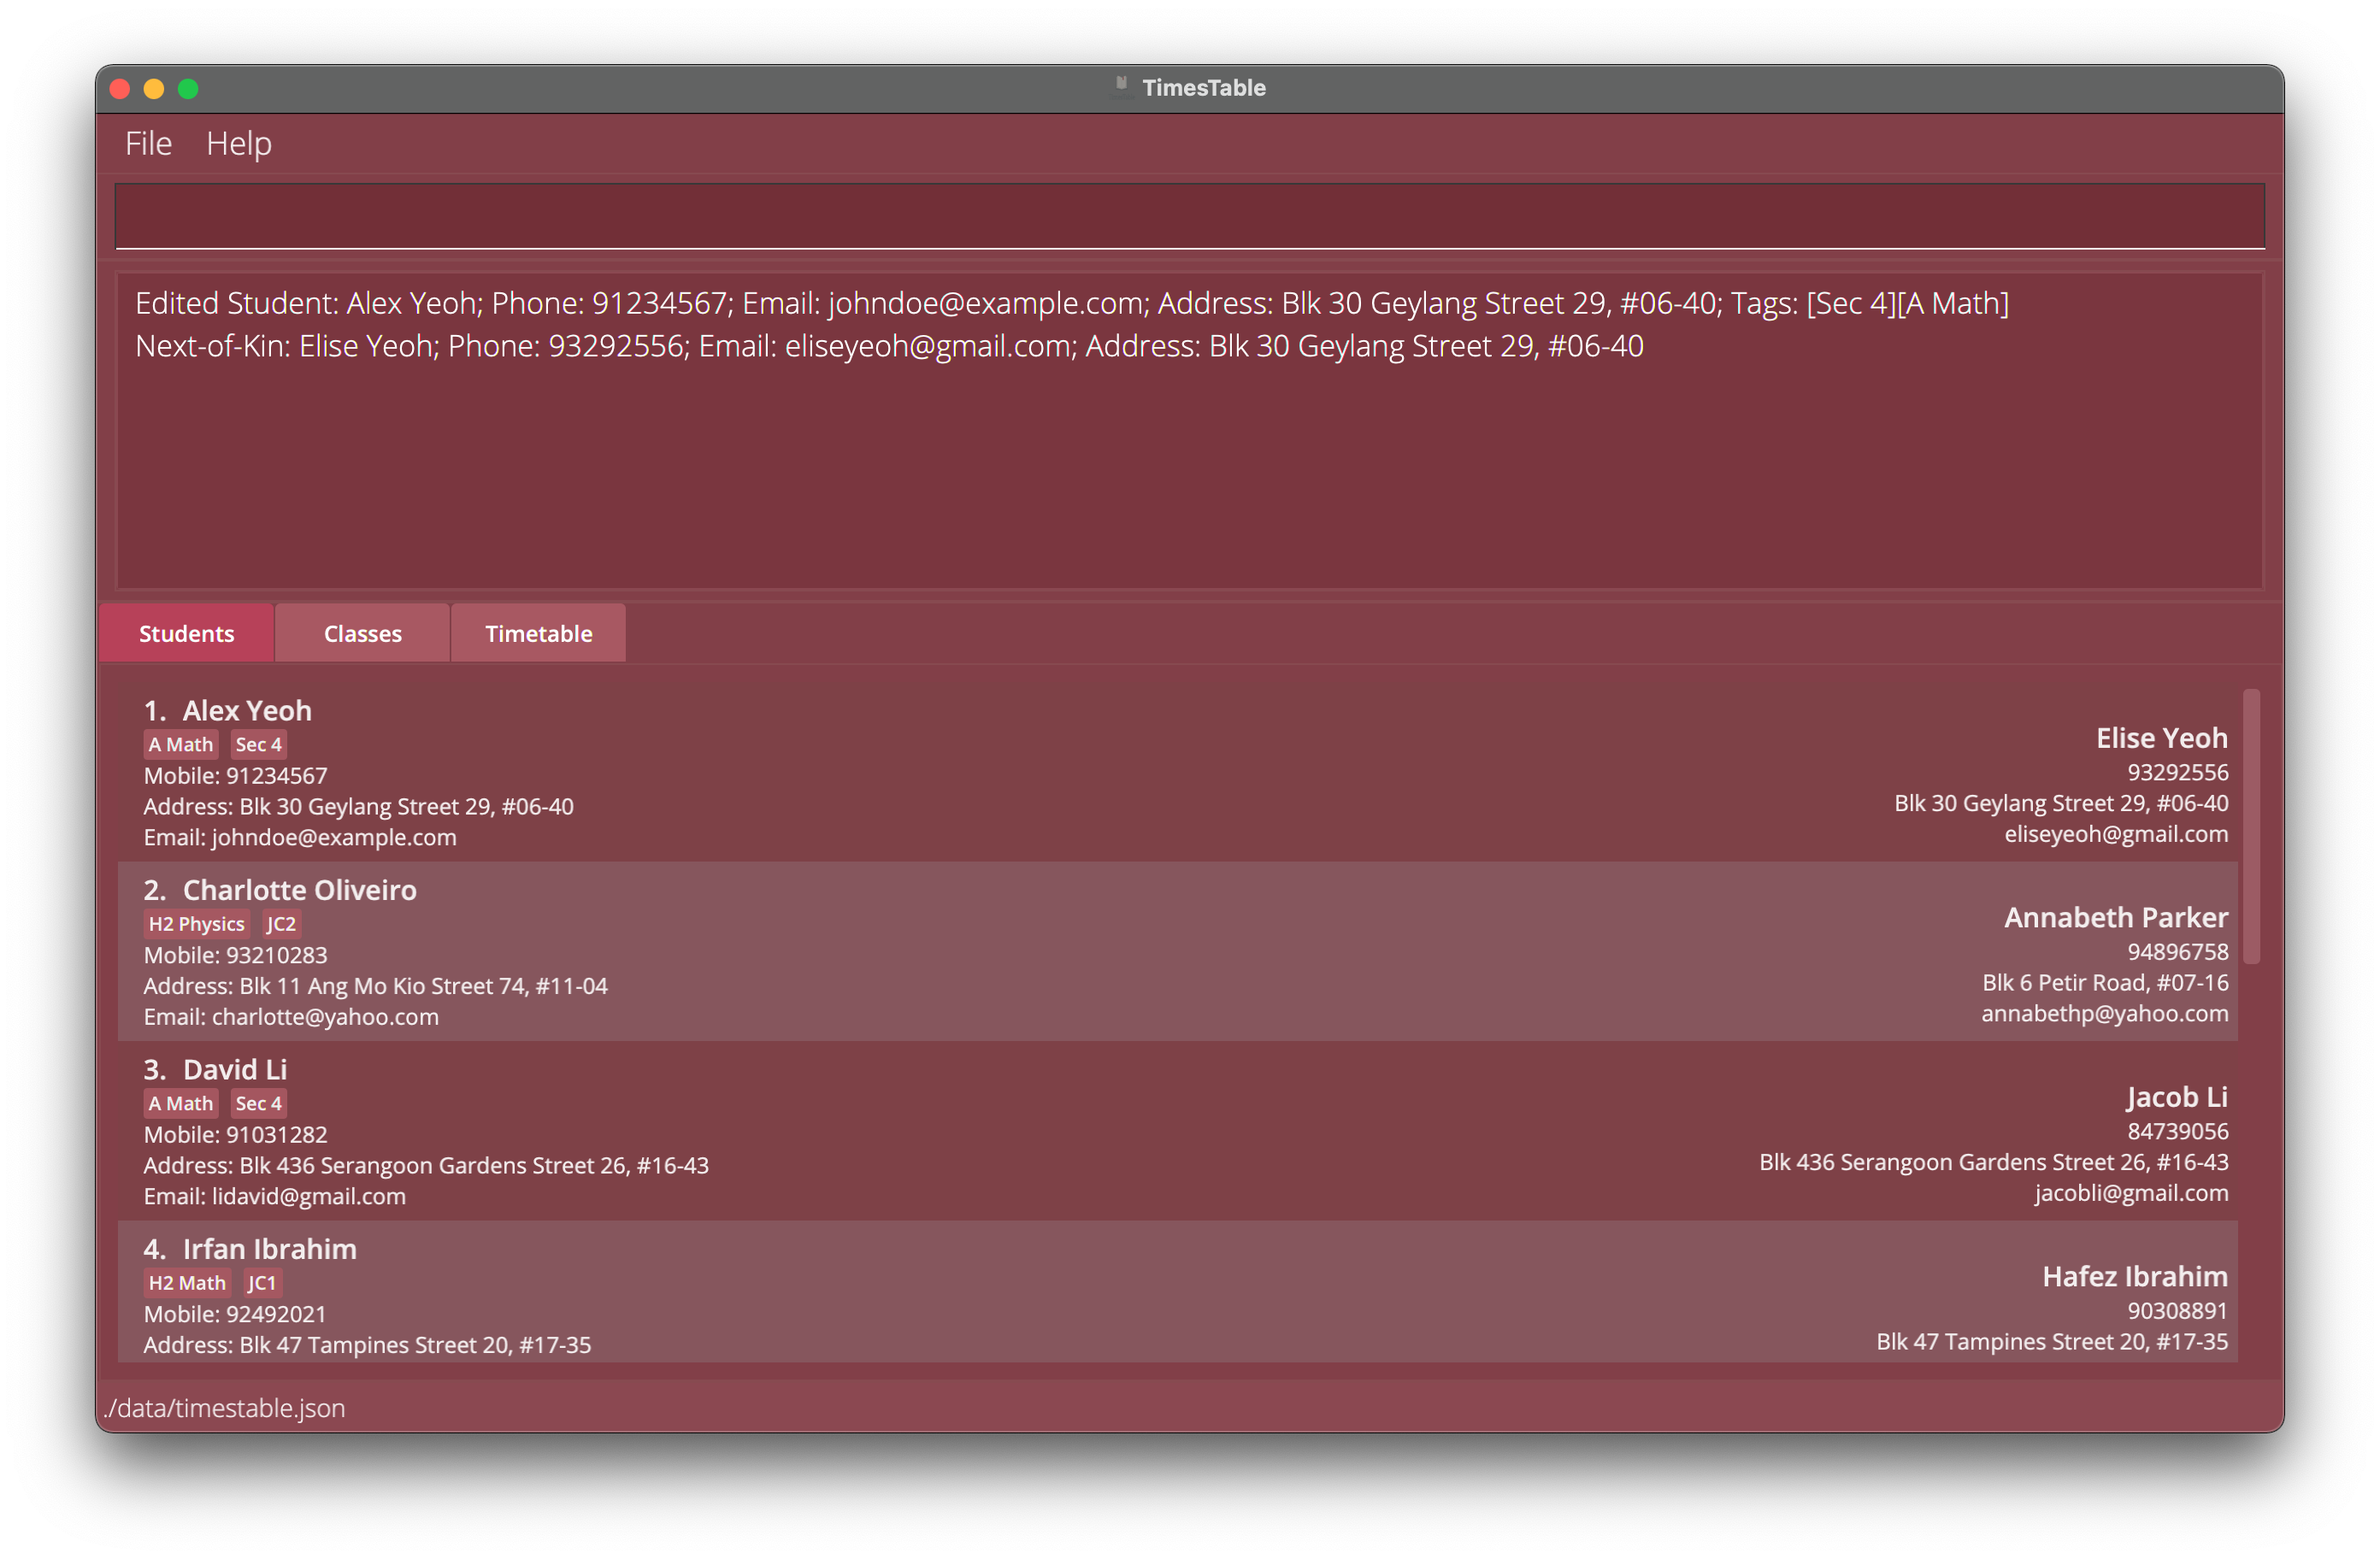
Example 1: Edit Student 1
Examples (also editing nok information):
-
edit 2 nok/ p/98429239Edits 2nd student’s NOK’sPHONEto be98429239. -
edit 3 a/Com2 nok/ p/98429239Edits 3rd student’sADDRESSto beCom2while also editing NOK’sPHONEto be98429239.
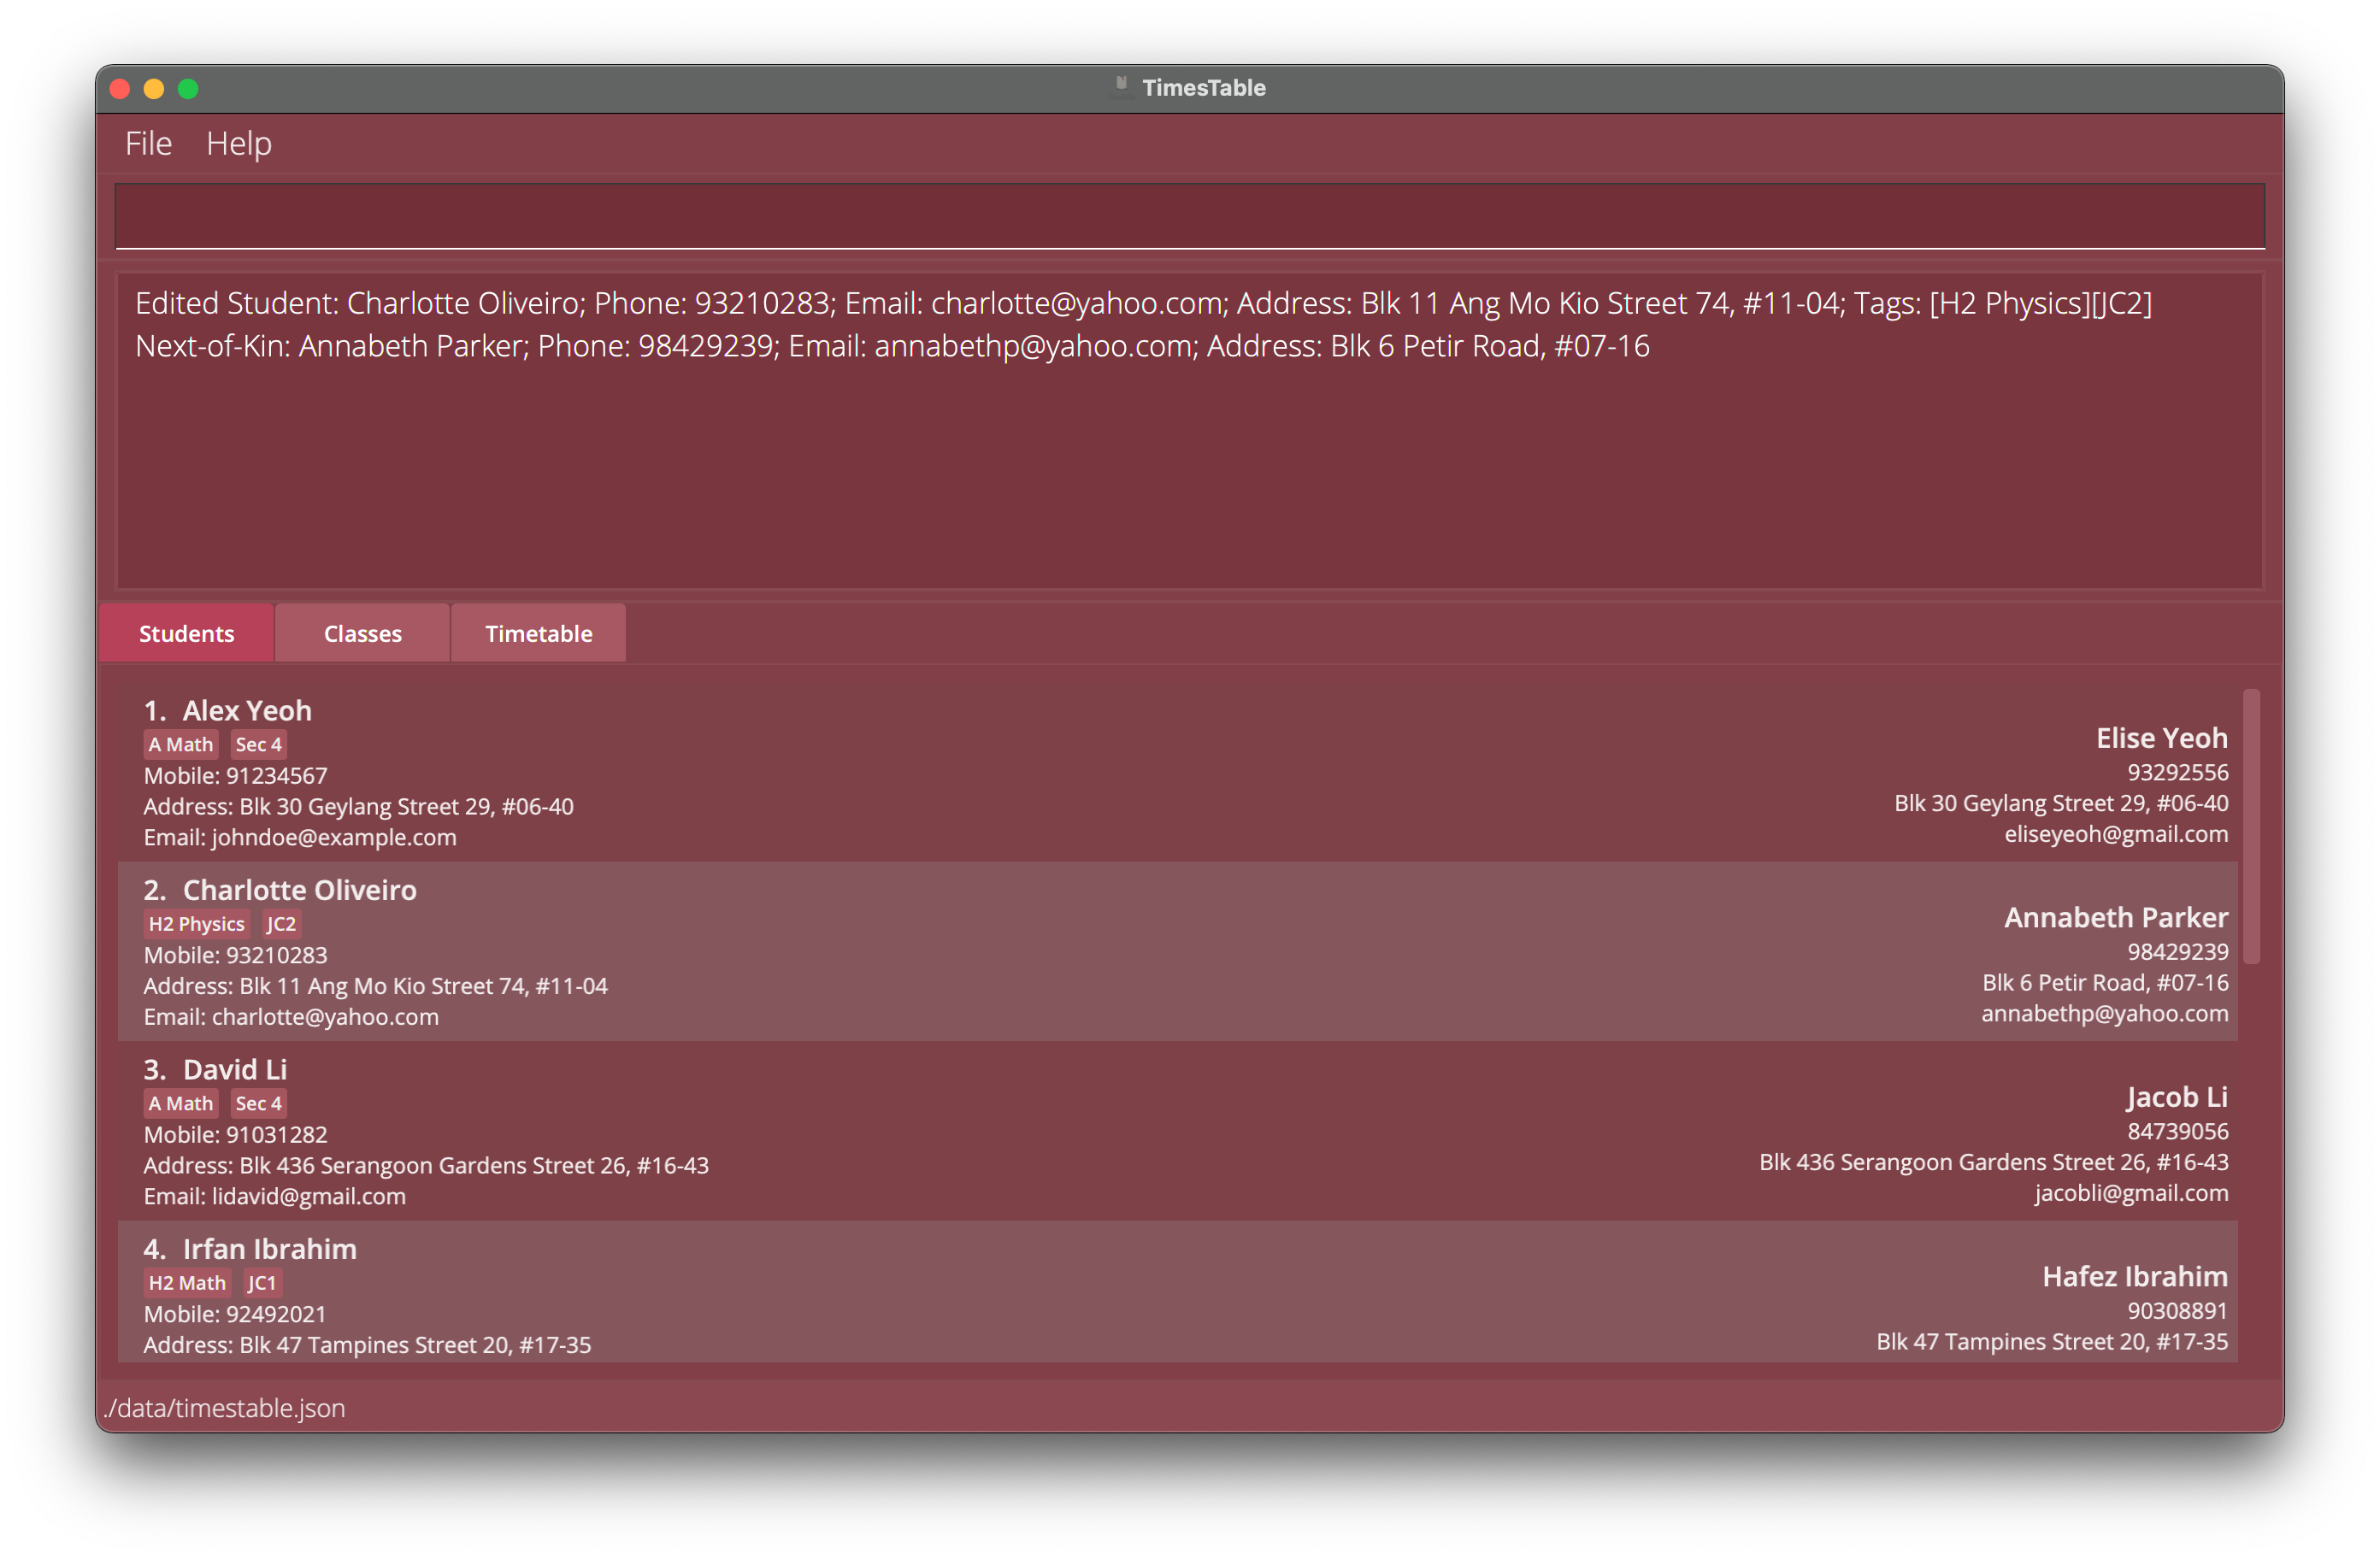
Example 1: Edit Student 2 with next-of-kin information
Locating students by name: findname
Finds students whose NAME contain any of the given keywords.
Note that if you want to display the entire list of students again, run list.
Format:
findname NAME [, [NAME]...]
- The search is case-insensitive. e.g.
hanswill matchHans. - The search terms are split by commas. e.g.
findname alex lim, bernice yu - Only the student’s
NAMEis searched. - Partial matches will still be matched e.g.
Hanwill matchHans. - Persons matching at least one search term will be returned (i.e.
ORsearch). e.g.findname alex lim, bernice yuwill returnAlex Lim,Bernice Yu. - The entire search term is used for matching e.g.
findname Alex Lwill matchAlex Limbut notAlex Yu
Examples:
-
findname JohnreturnsjohnandJohn Doein bothStudentsandClassestab. -
findname alex, davidreturnsAlex Yeoh,David Liin bothStudentsandClassestab.
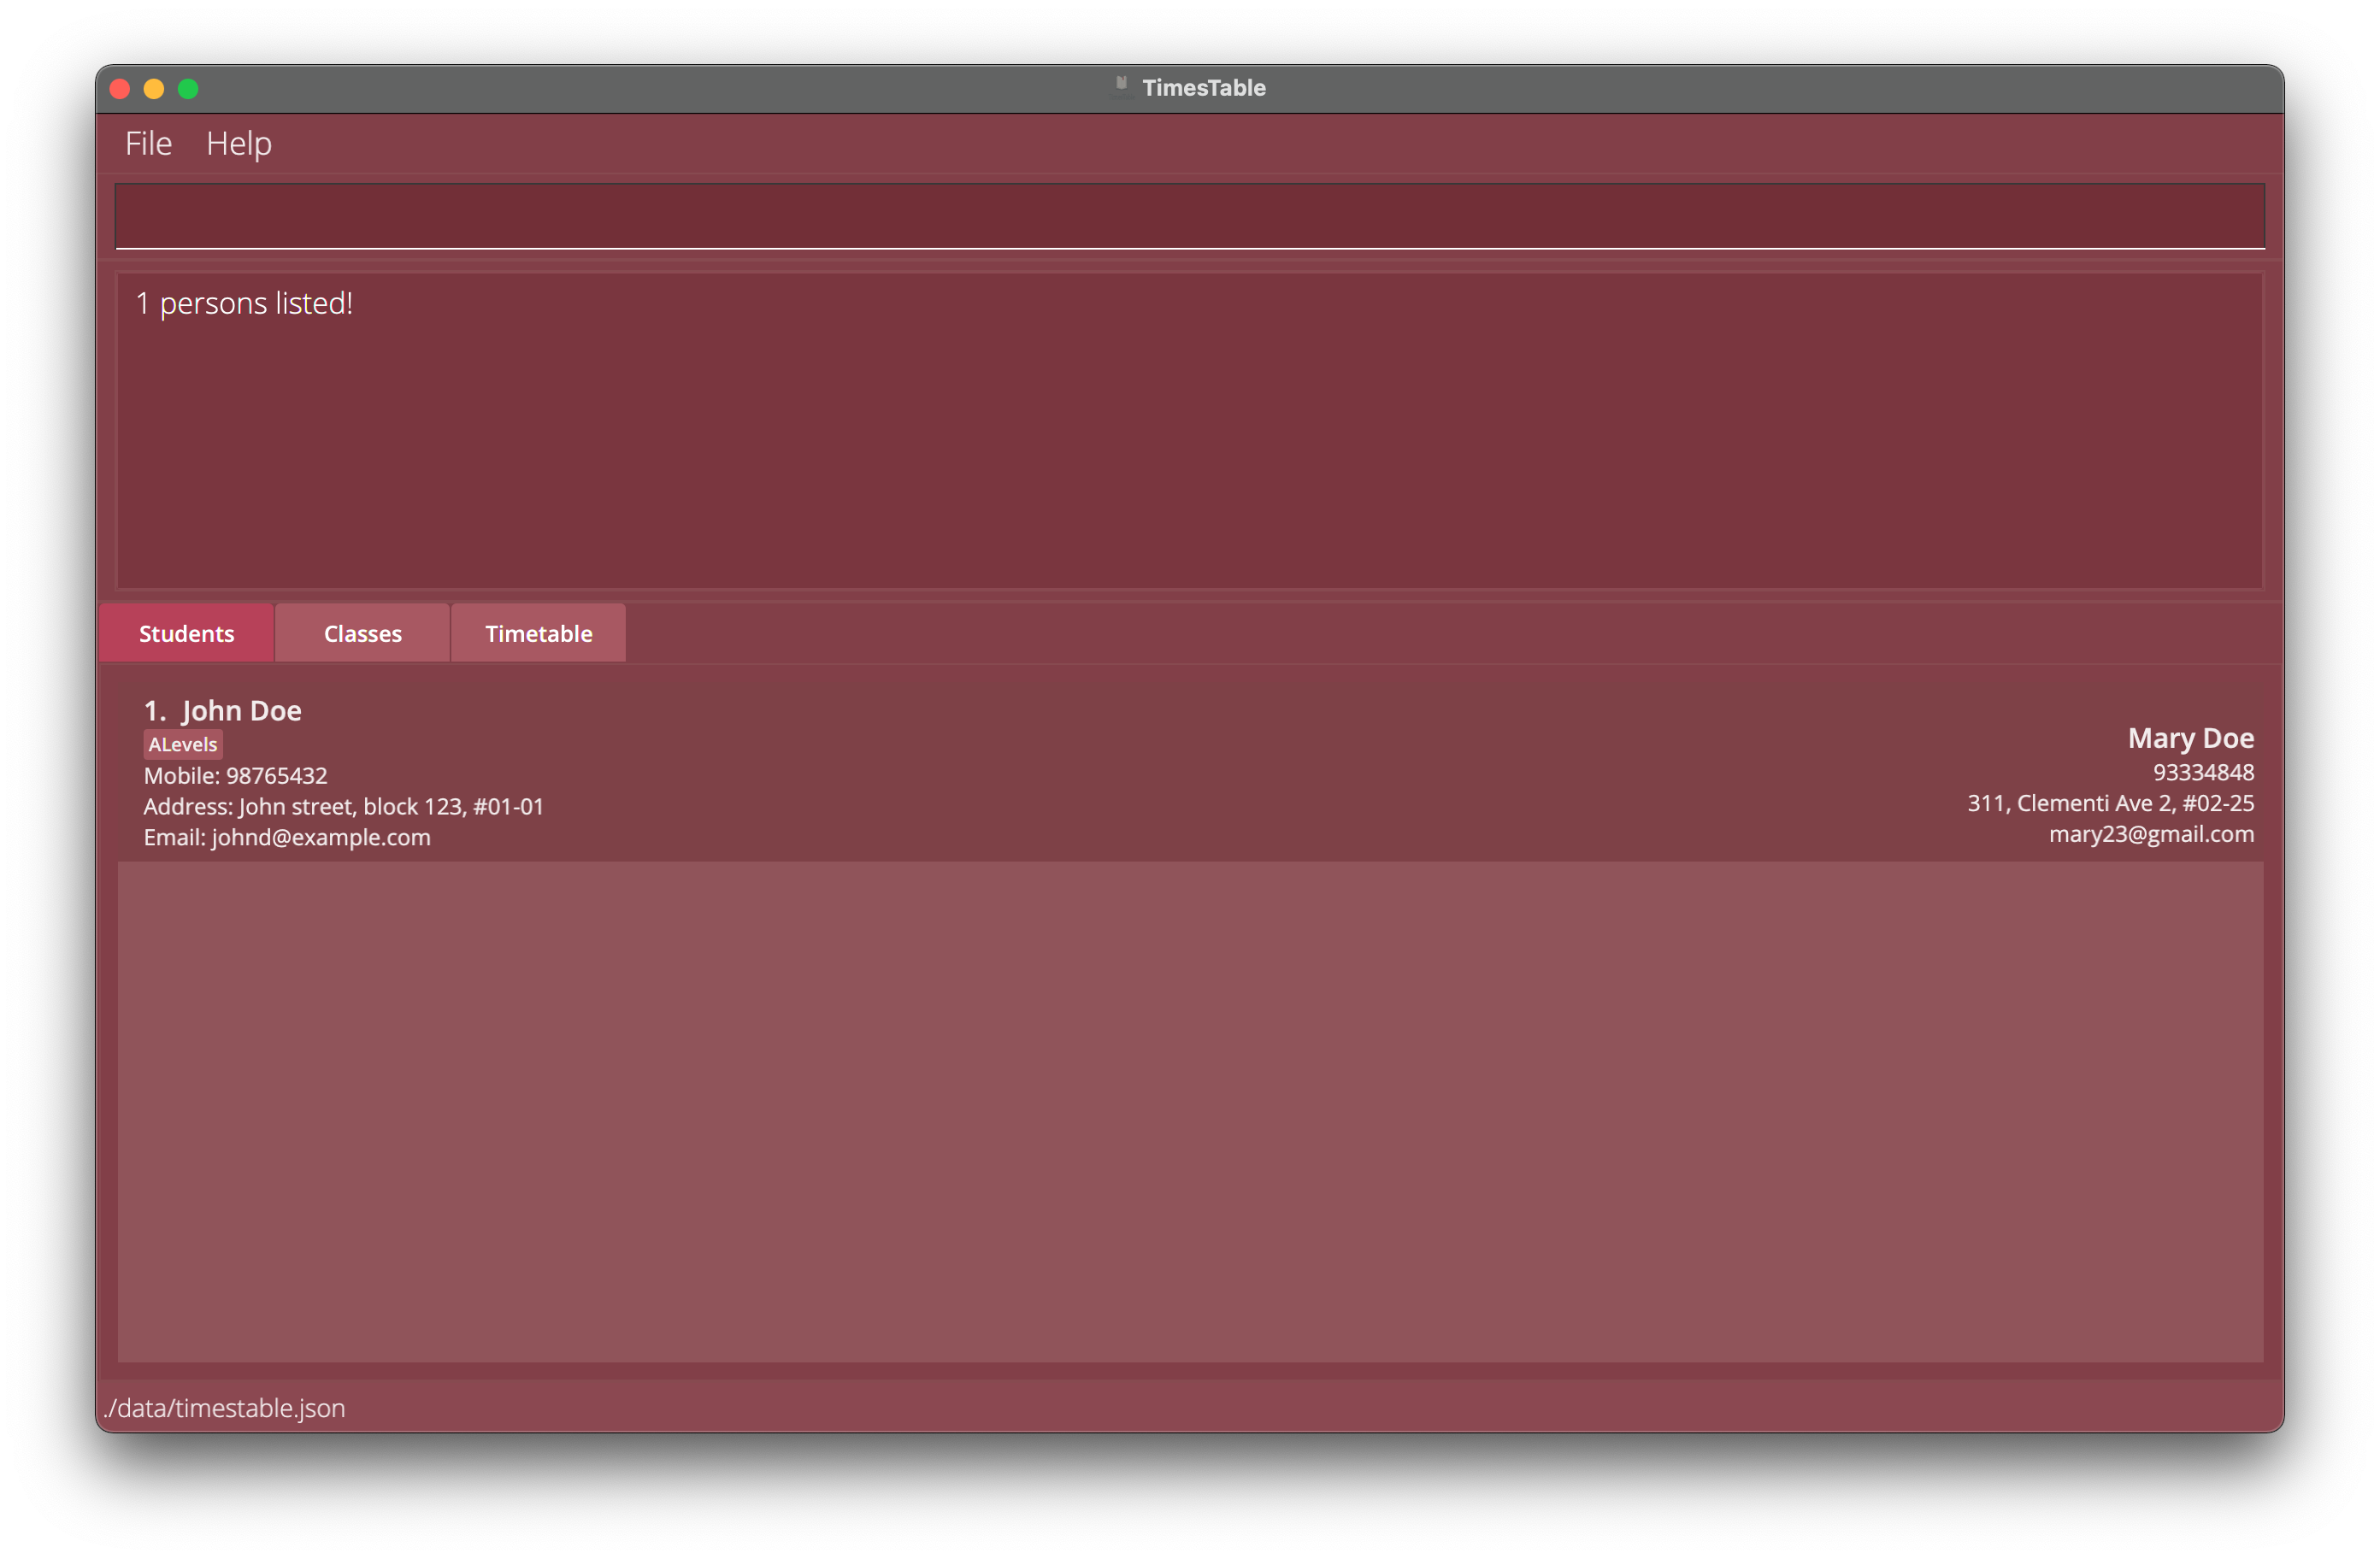
Example 1: Find Students with name John
![]() Note:
Note:
-
For commands that alters the list of students (eg.
findname,findtag,sort name asc), the displayed changes for students will be shown in both theStudentstab as well as theClassestab.
This means that when students are filtered by theirnameandtag, they will be filtered by theirnameandtagin theClassestab as well.
Likewise, when students are sorted by their names, they will be sorted in theClassestab as well. -
The
listandlistclasscommands can be used to show the original lists of students and classes respectively. -
Class size will not be affected by filtering students (using FindName or FindTag).
Locating students by tag: findtag
Finds students whose TAGs contain any of the given keywords.
Note that if you want to display the entire list of students again, run list.
Format:
findtag KEYWORD [, [KEYWORD]...]
- Search terms can partially match the tag, or the entire tag, e.g.
mathfor allA MathandC Mathtags, orA Mathfor theA Mathtag. - Search terms are separated by commas. e.g.
findtag math, physicswill find students with tags containingmathorphysics. - Students matching at least one search term will be returned (i.e.
ORsearch). e.g.findtag math, physicswill return students with theMathTAGbut noPhysicsTAG, students with only thePhysicsTAGbut noMathTAG, and students with bothTAGs. - The search is case-insensitive. e.g
mathwill matchMath.
Examples:
-
findtag mathreturnsAlex Yeohwith theA MathTAGandJohn Doewith theC MathTAGin bothStudentsandClassestab. -
findtag math, physicsreturnsAlex Yeohwith theA MathandBiologyTAGs in bothStudentsandClassestab.
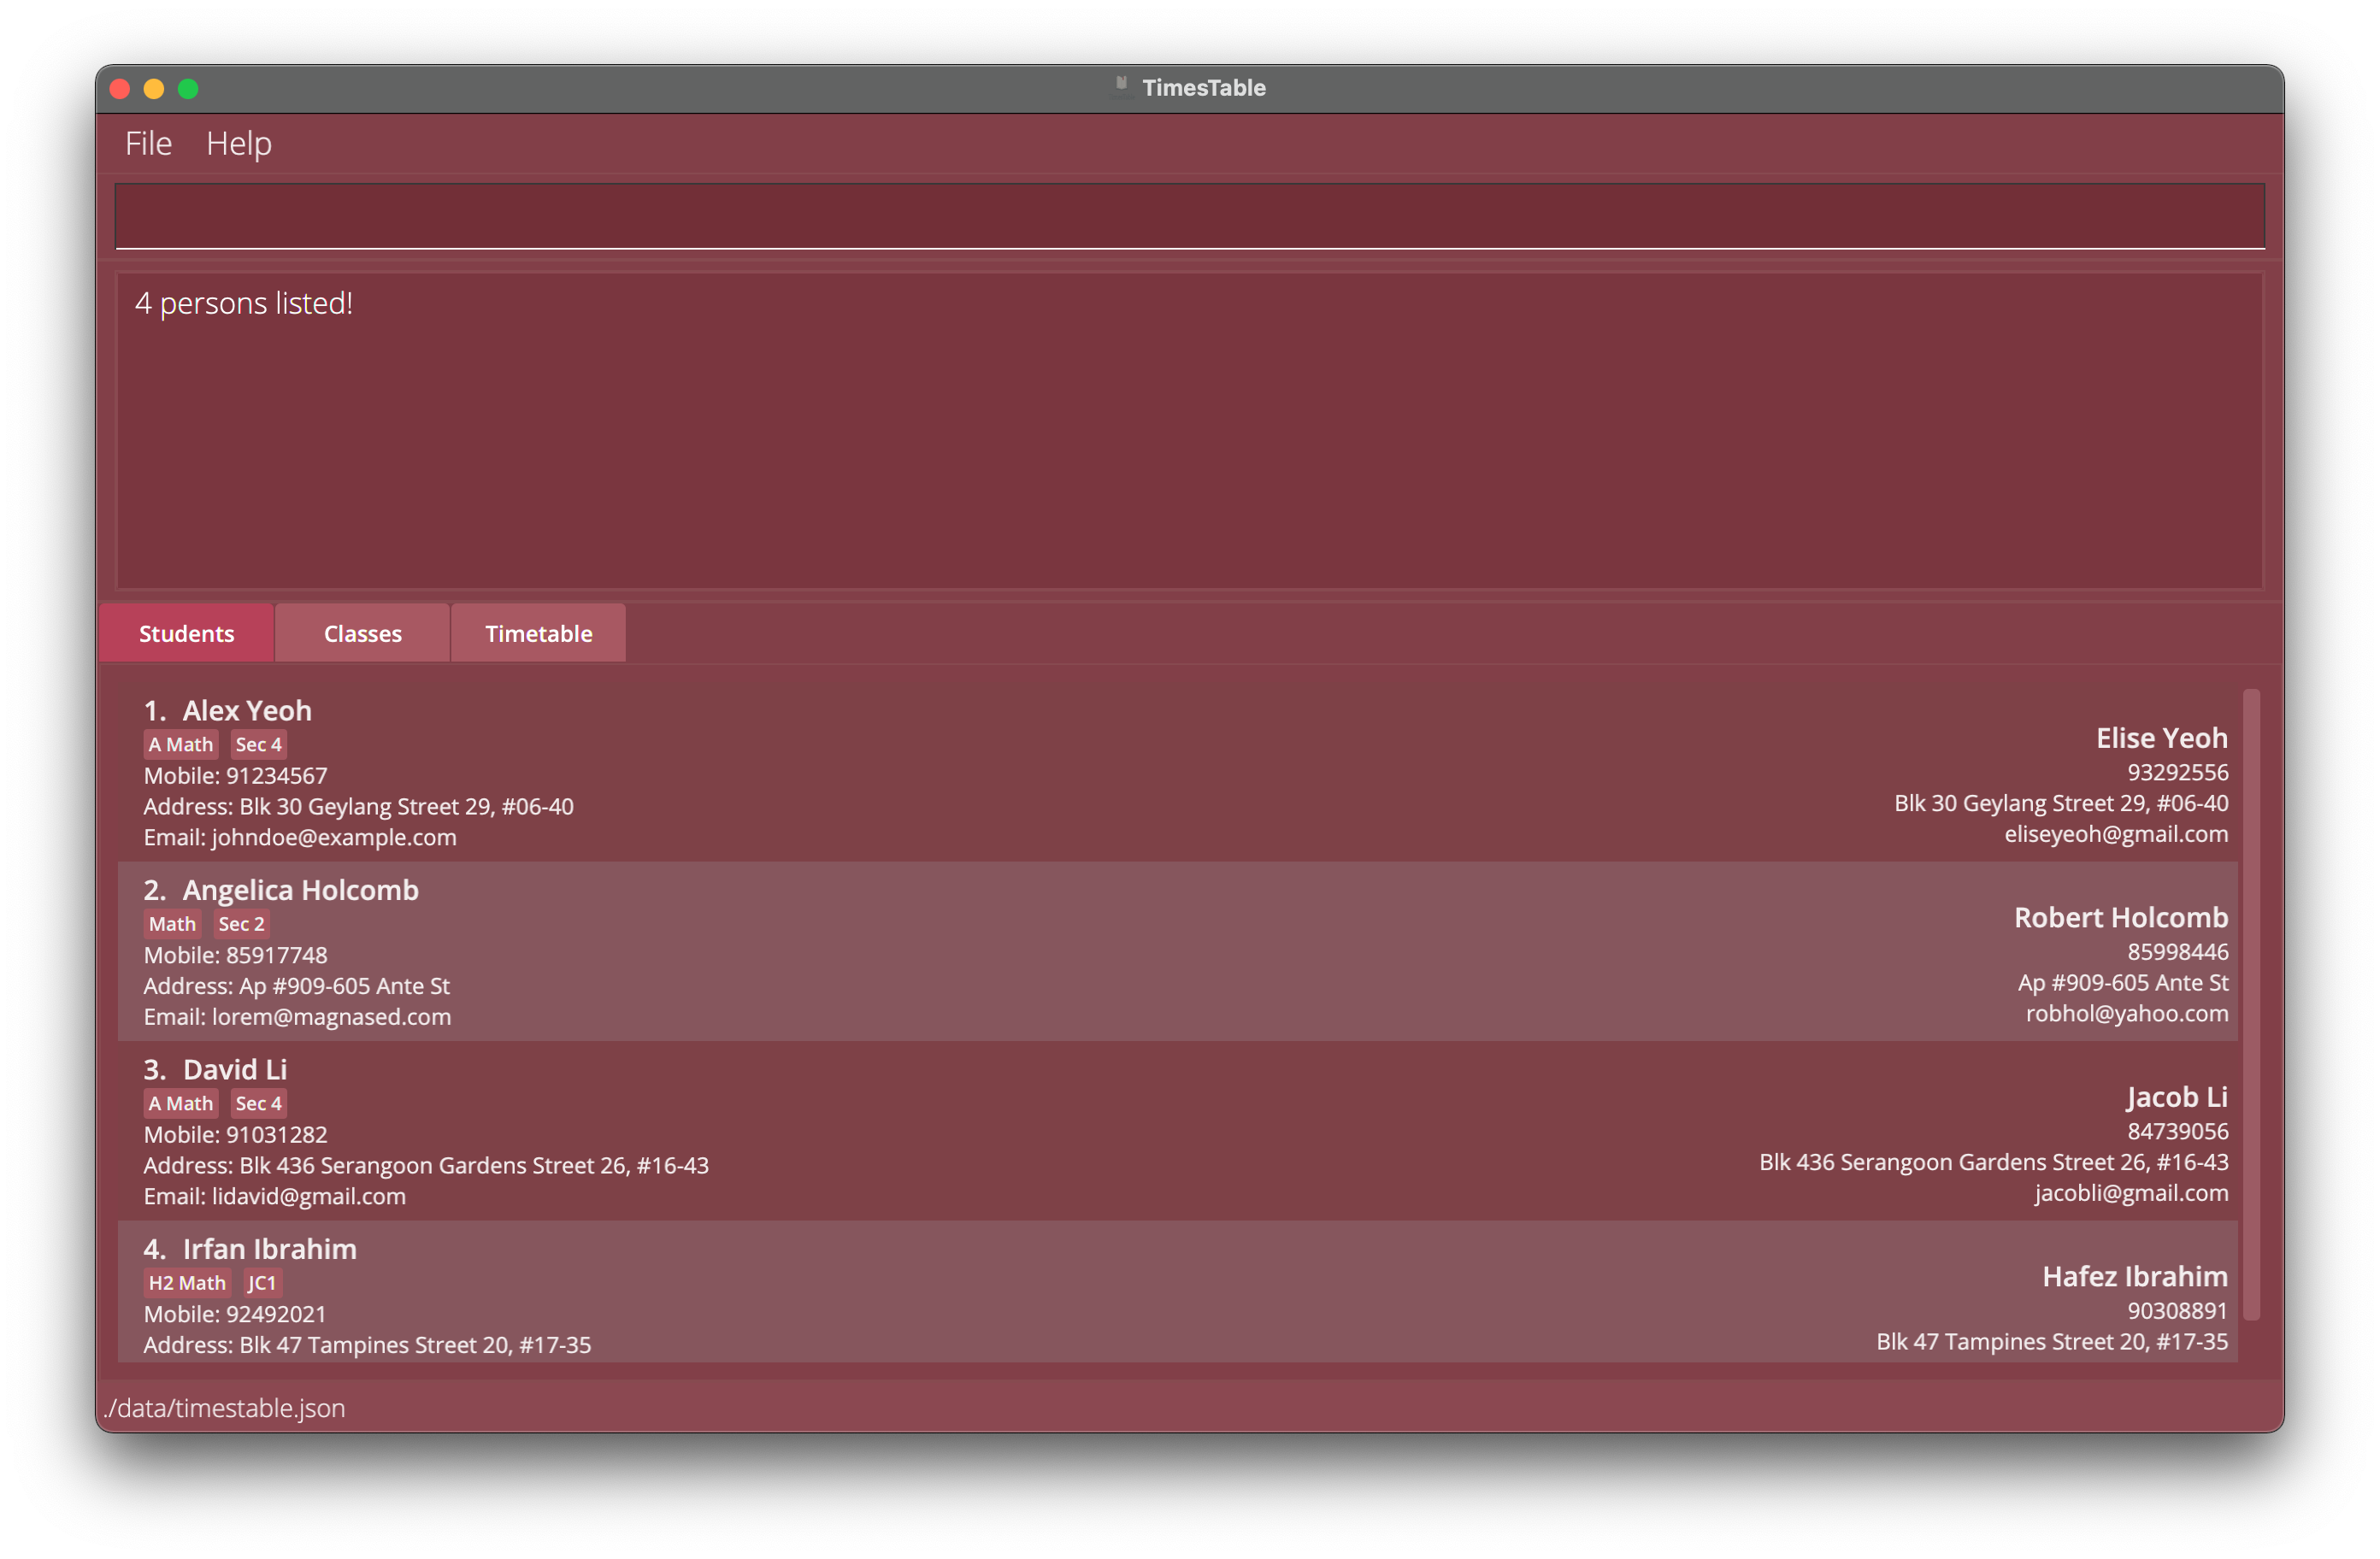
Example 1: Find Students with tag math
![]() Note:
Note:
-
For commands that alters the list of students (eg.
findname,findtag,sort name asc), the displayed changes for students will be shown in both theStudentstab as well as theClassestab.
This means that when students are filtered by theirnameandtag, they will be filtered by theirnameandtagin theClassestab as well.
Likewise, when students are sorted by their names, they will be sorted in theClassestab as well. -
The
listandlistclasscommands can be used to show the original lists of students and classes respectively. -
Class size will not be affected by filtering students (using FindName or FindTag).
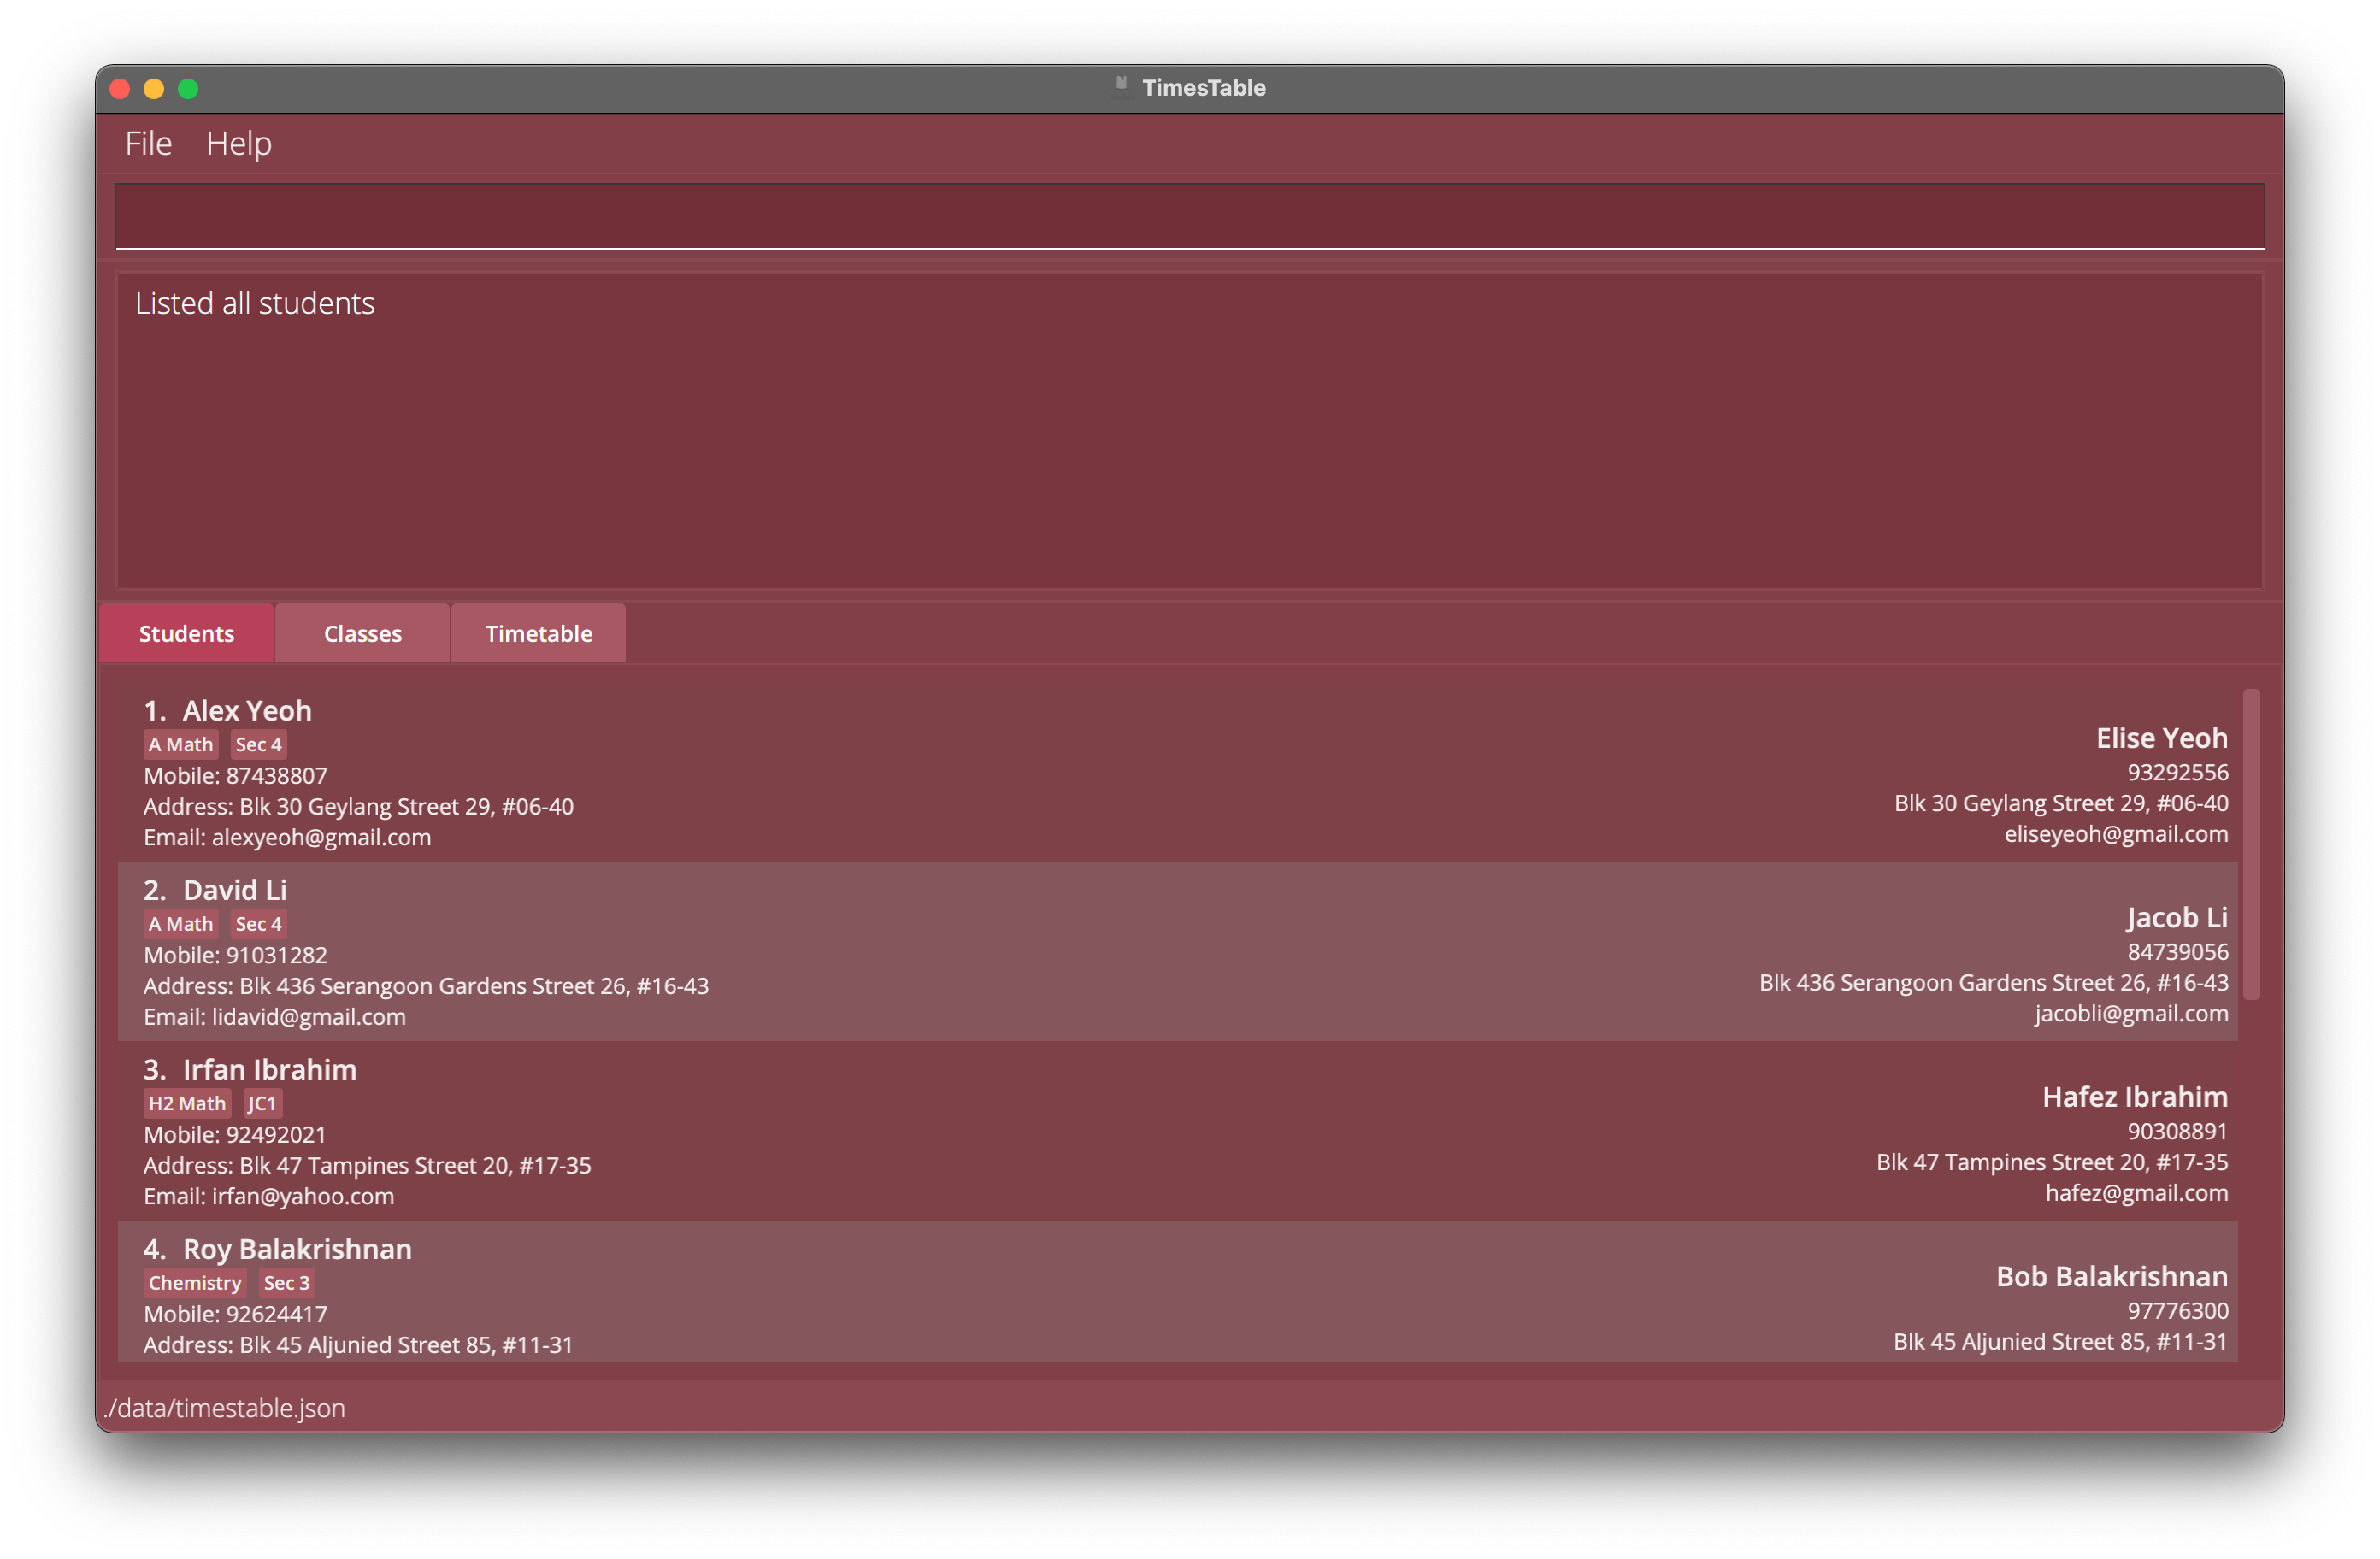
Listing all students : list
Shows a list of all students in the Students tab.
Format: list
Deleting a student : delete
Deletes the specified student from the TimesTable.
Format:
delete INDEX
- Deletes the student at the specified
INDEX. - The index refers to the index number shown in the displayed student list in the
Studentstab.
Examples:
-
listfollowed bydelete 2deletes the 2nd student in the TimesTable. -
findname Betsyfollowed bydelete 1deletes the 1st student in the results of thefindcommand.
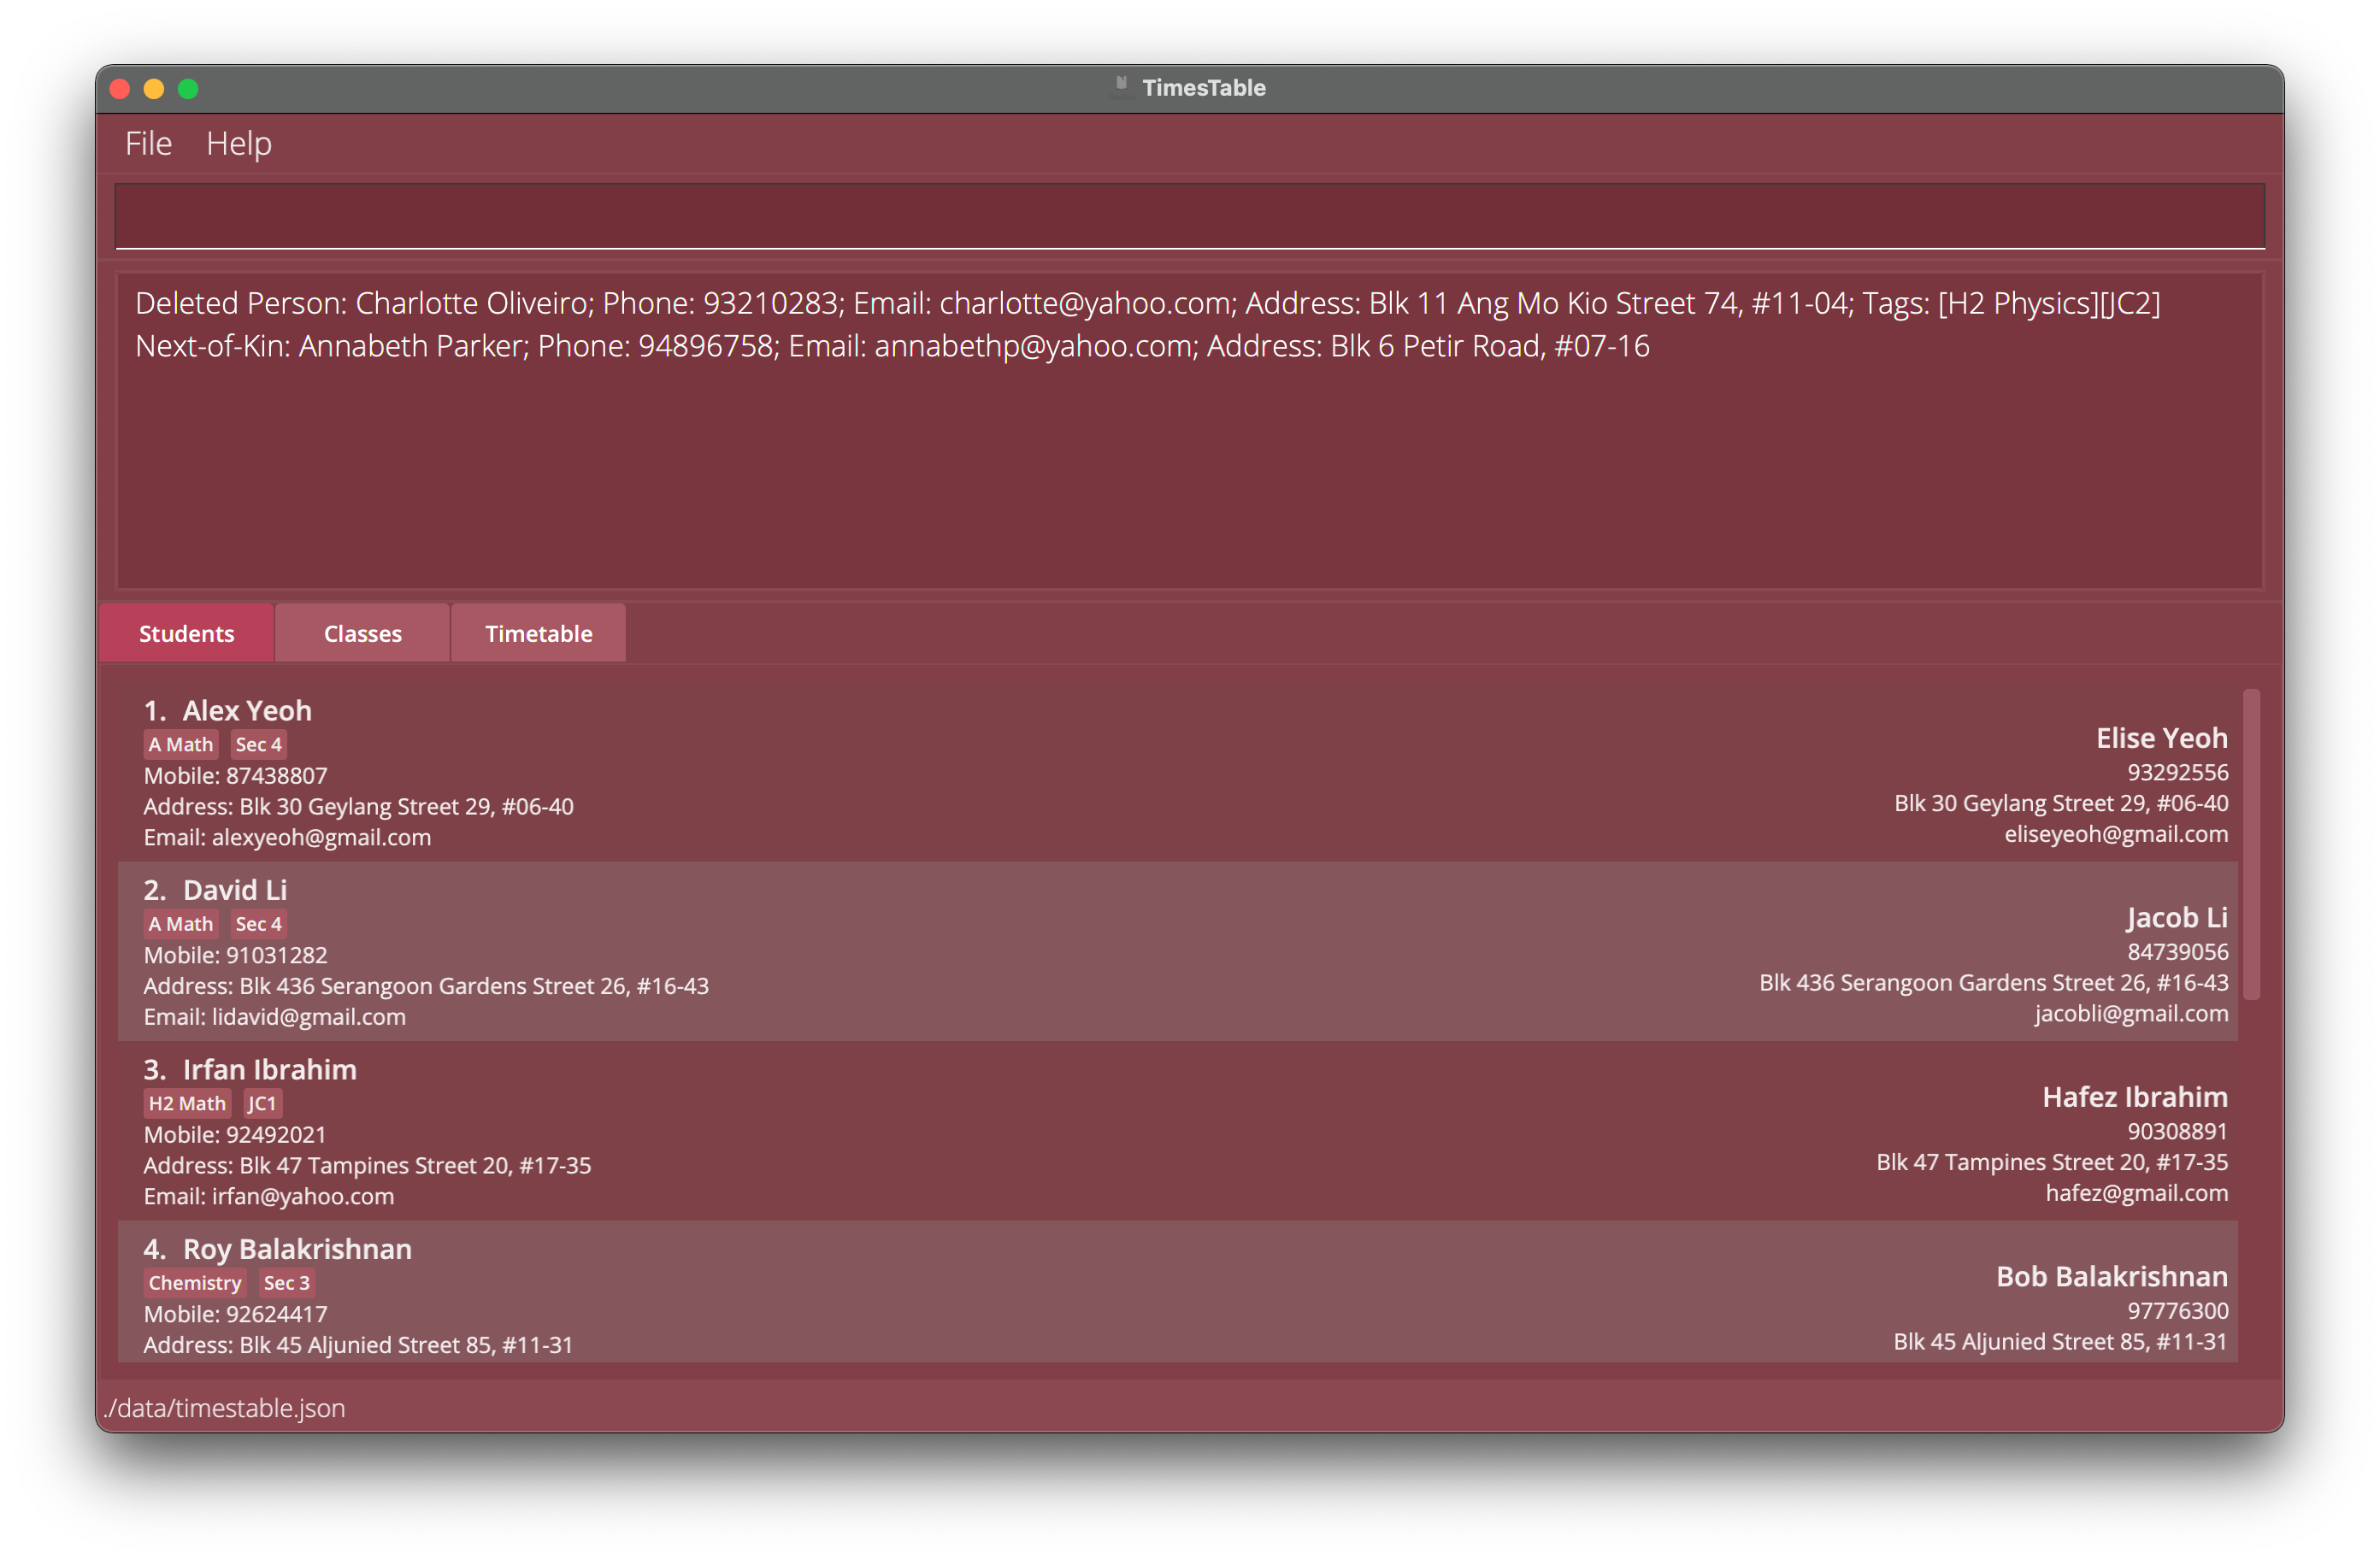
Example 1: Deletes the 2nd student
Class commands
Adding a class: addclass
Add a class to the TimesTable.
Format:
addclass cn/CLASS_NAME ct/CLASS_TIMING r/HOURLY_RATE l/LOCATION
- This command adds a new class to keep track of all classes that the user is teaching.
-
CLASS_TIMINGmust be in the formct/DAY HH:MM-HH:MM -
DAYis case insensitive. -
CLASS_TIMINGcan only start and end at the hour mark or half hour mark, but can also end at 23:59 hours. -
RATEmust be less than $1,000,000/hr
Examples:
-
addclass cn/CS2103T ct/MON 09:30-11:30 r/70 l/Nex Tuition CenterAdds a new class with nameCS2103T, with class timingMON 09:30-11:30, with hourly rate of $70, atNex Tuition Center. -
addclass cn/Sec 4 E Maths ct/TUE 12:30-14:30 r/65 l/Block 123, Clementi Ave 6, #14-41Adds a new class with nameSec 4 E Maths, with class timingTue 12:30-14:30, with hourly rate of $65, atBlock 123, Clementi Ave 6, #14-41.
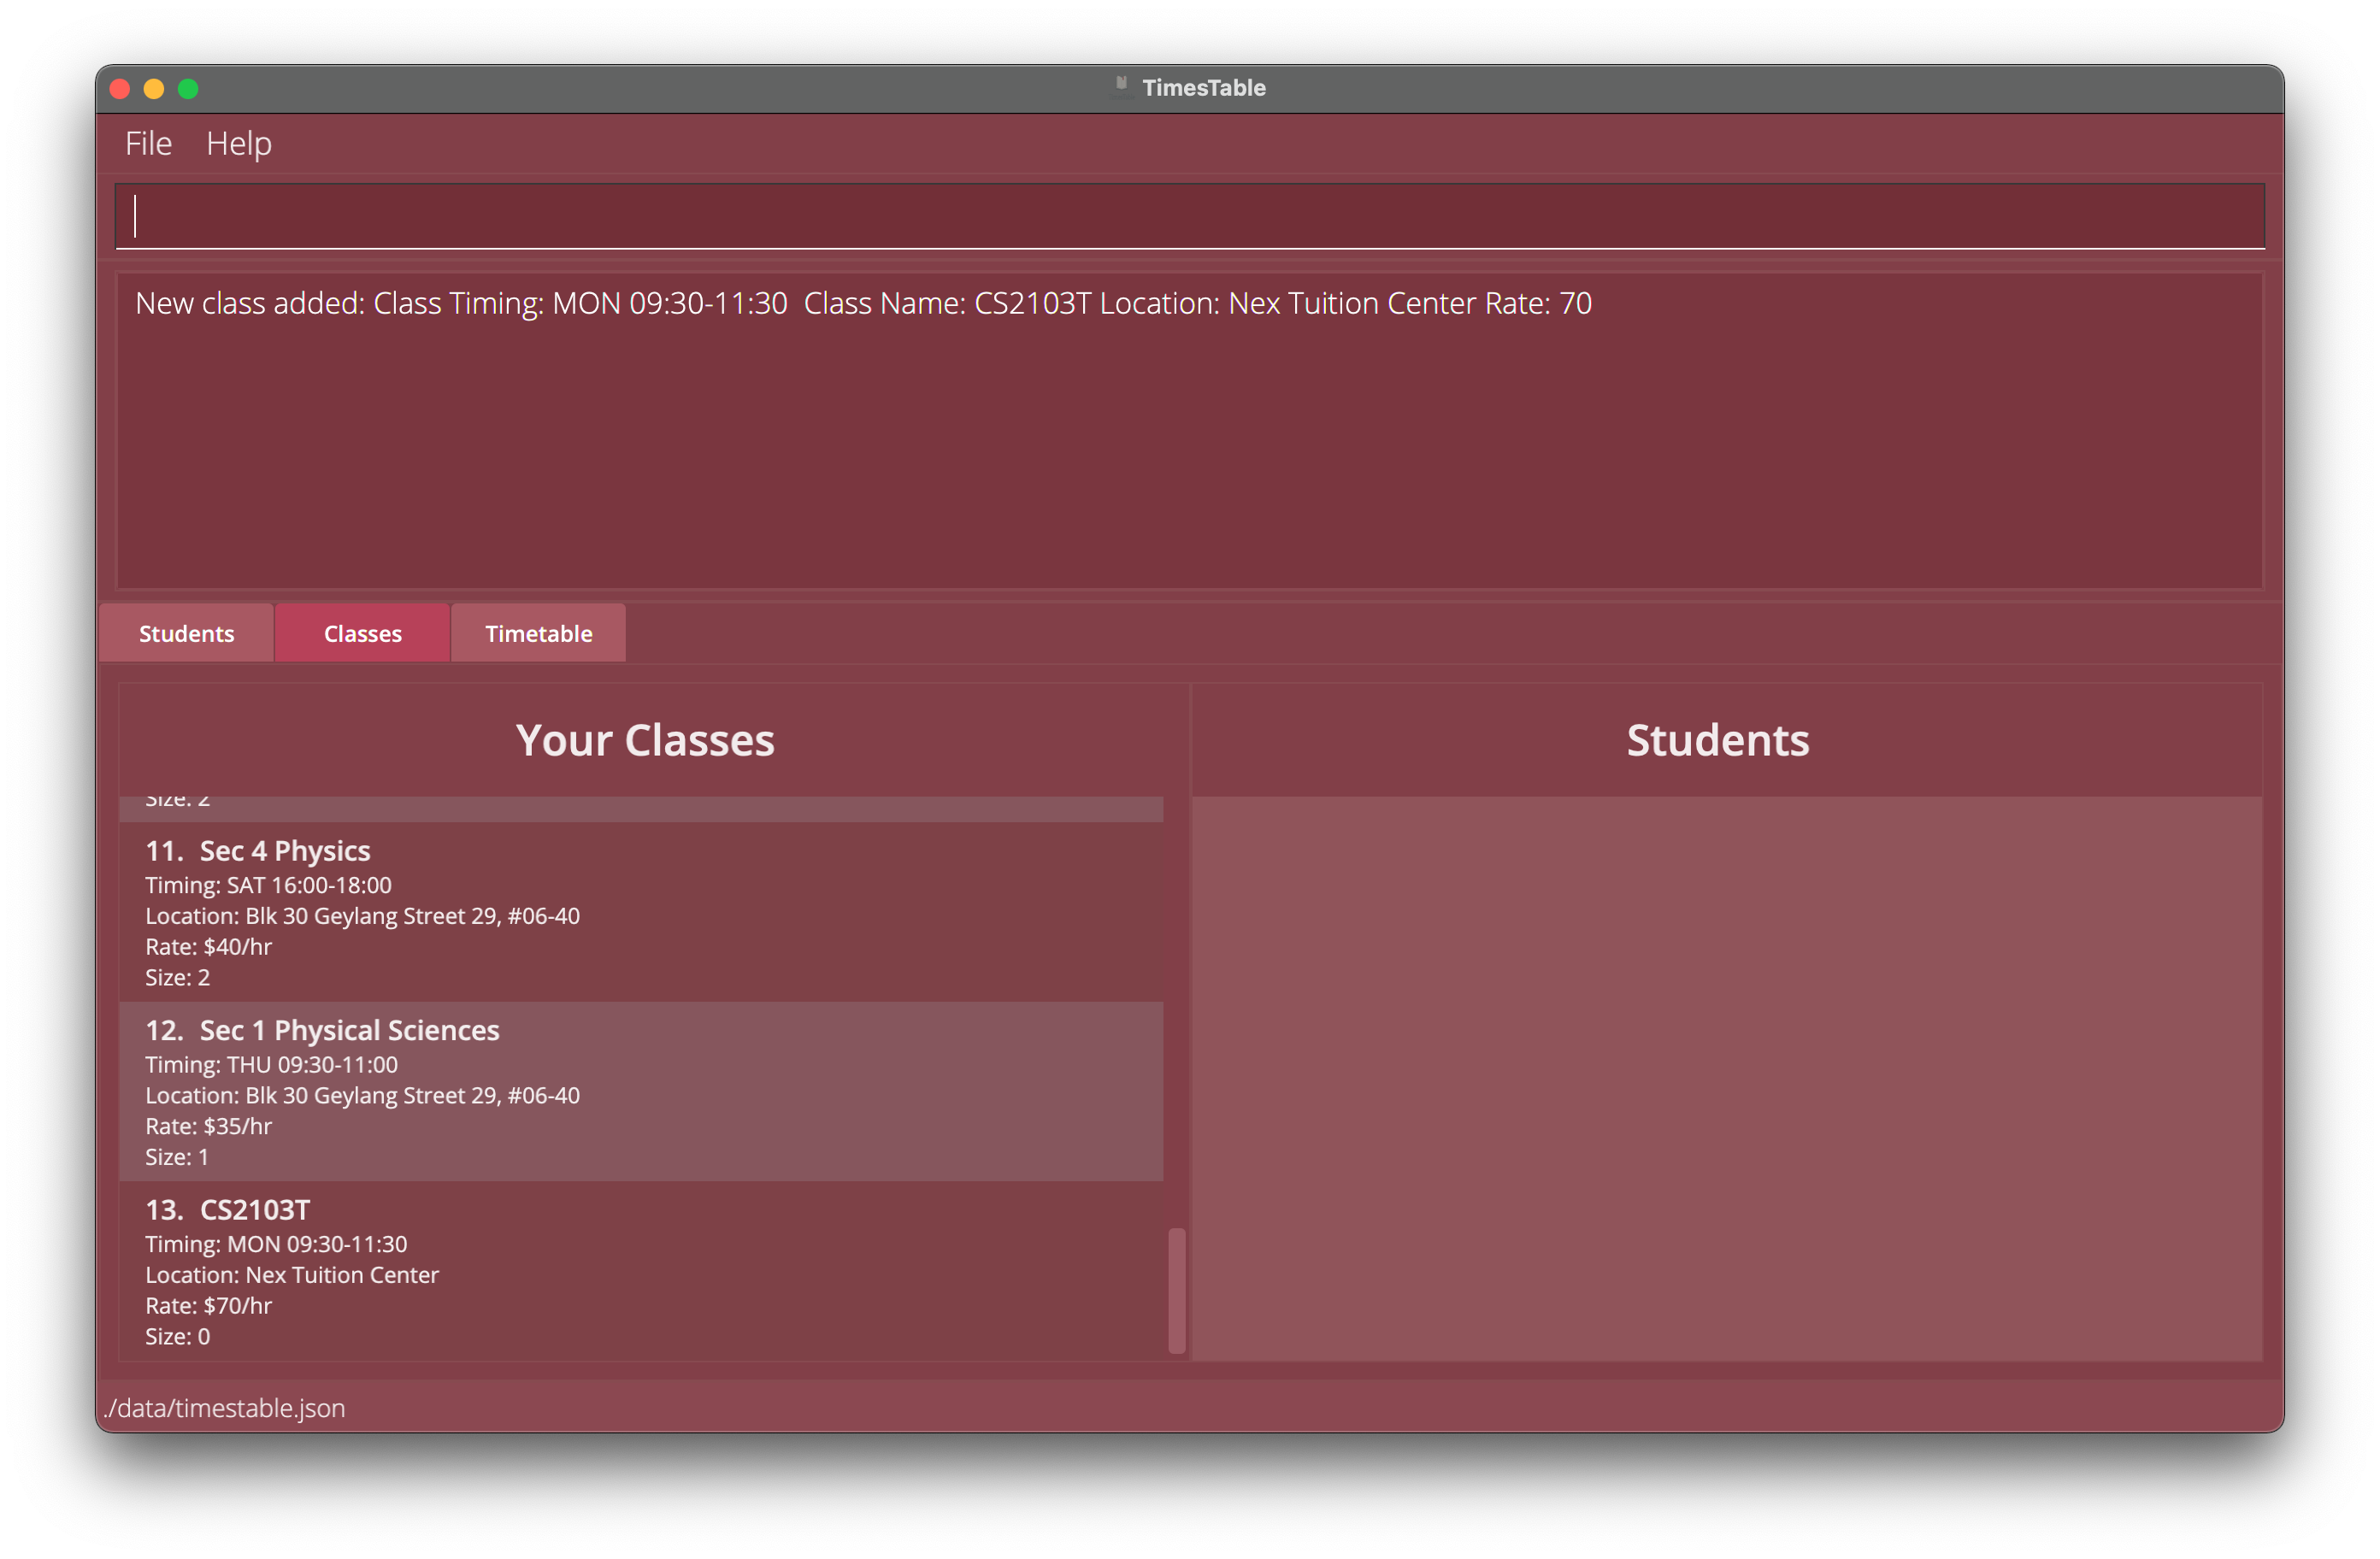
Example 1: Adding CS2103T class
Editing a class: editclass
Edits an existing class in the class list in the classes tab.
Format:
editclass 1 [cn/CLASS_NAME] [ct/CLASS_TIMING] [r/RATE] [l/LOCATION]
- Edits the class at the specified
INDEX. The index refers to the index number shown in the displayed class list in theclassestab.- The index must be a positive integer 1, 2, 3, …
- The index must belong to a class.
- At least one of the optional fields must be provided.
-
CLASS_TIMINGcan only start and end at the hour mark or half hour mark, but can also end at 23:59 hours. - Edit commands that will create a clash of
CLASS_TIMINGwith other classes is not accepted. -
RATEmust be less than $1,000,000/hr
Examples:
-
editclass 1 ct/wed 15:00-17:00Edits the first class in the class list’sCLASS_TIMIMGto be on Wednesday from 3pm to 5pm.
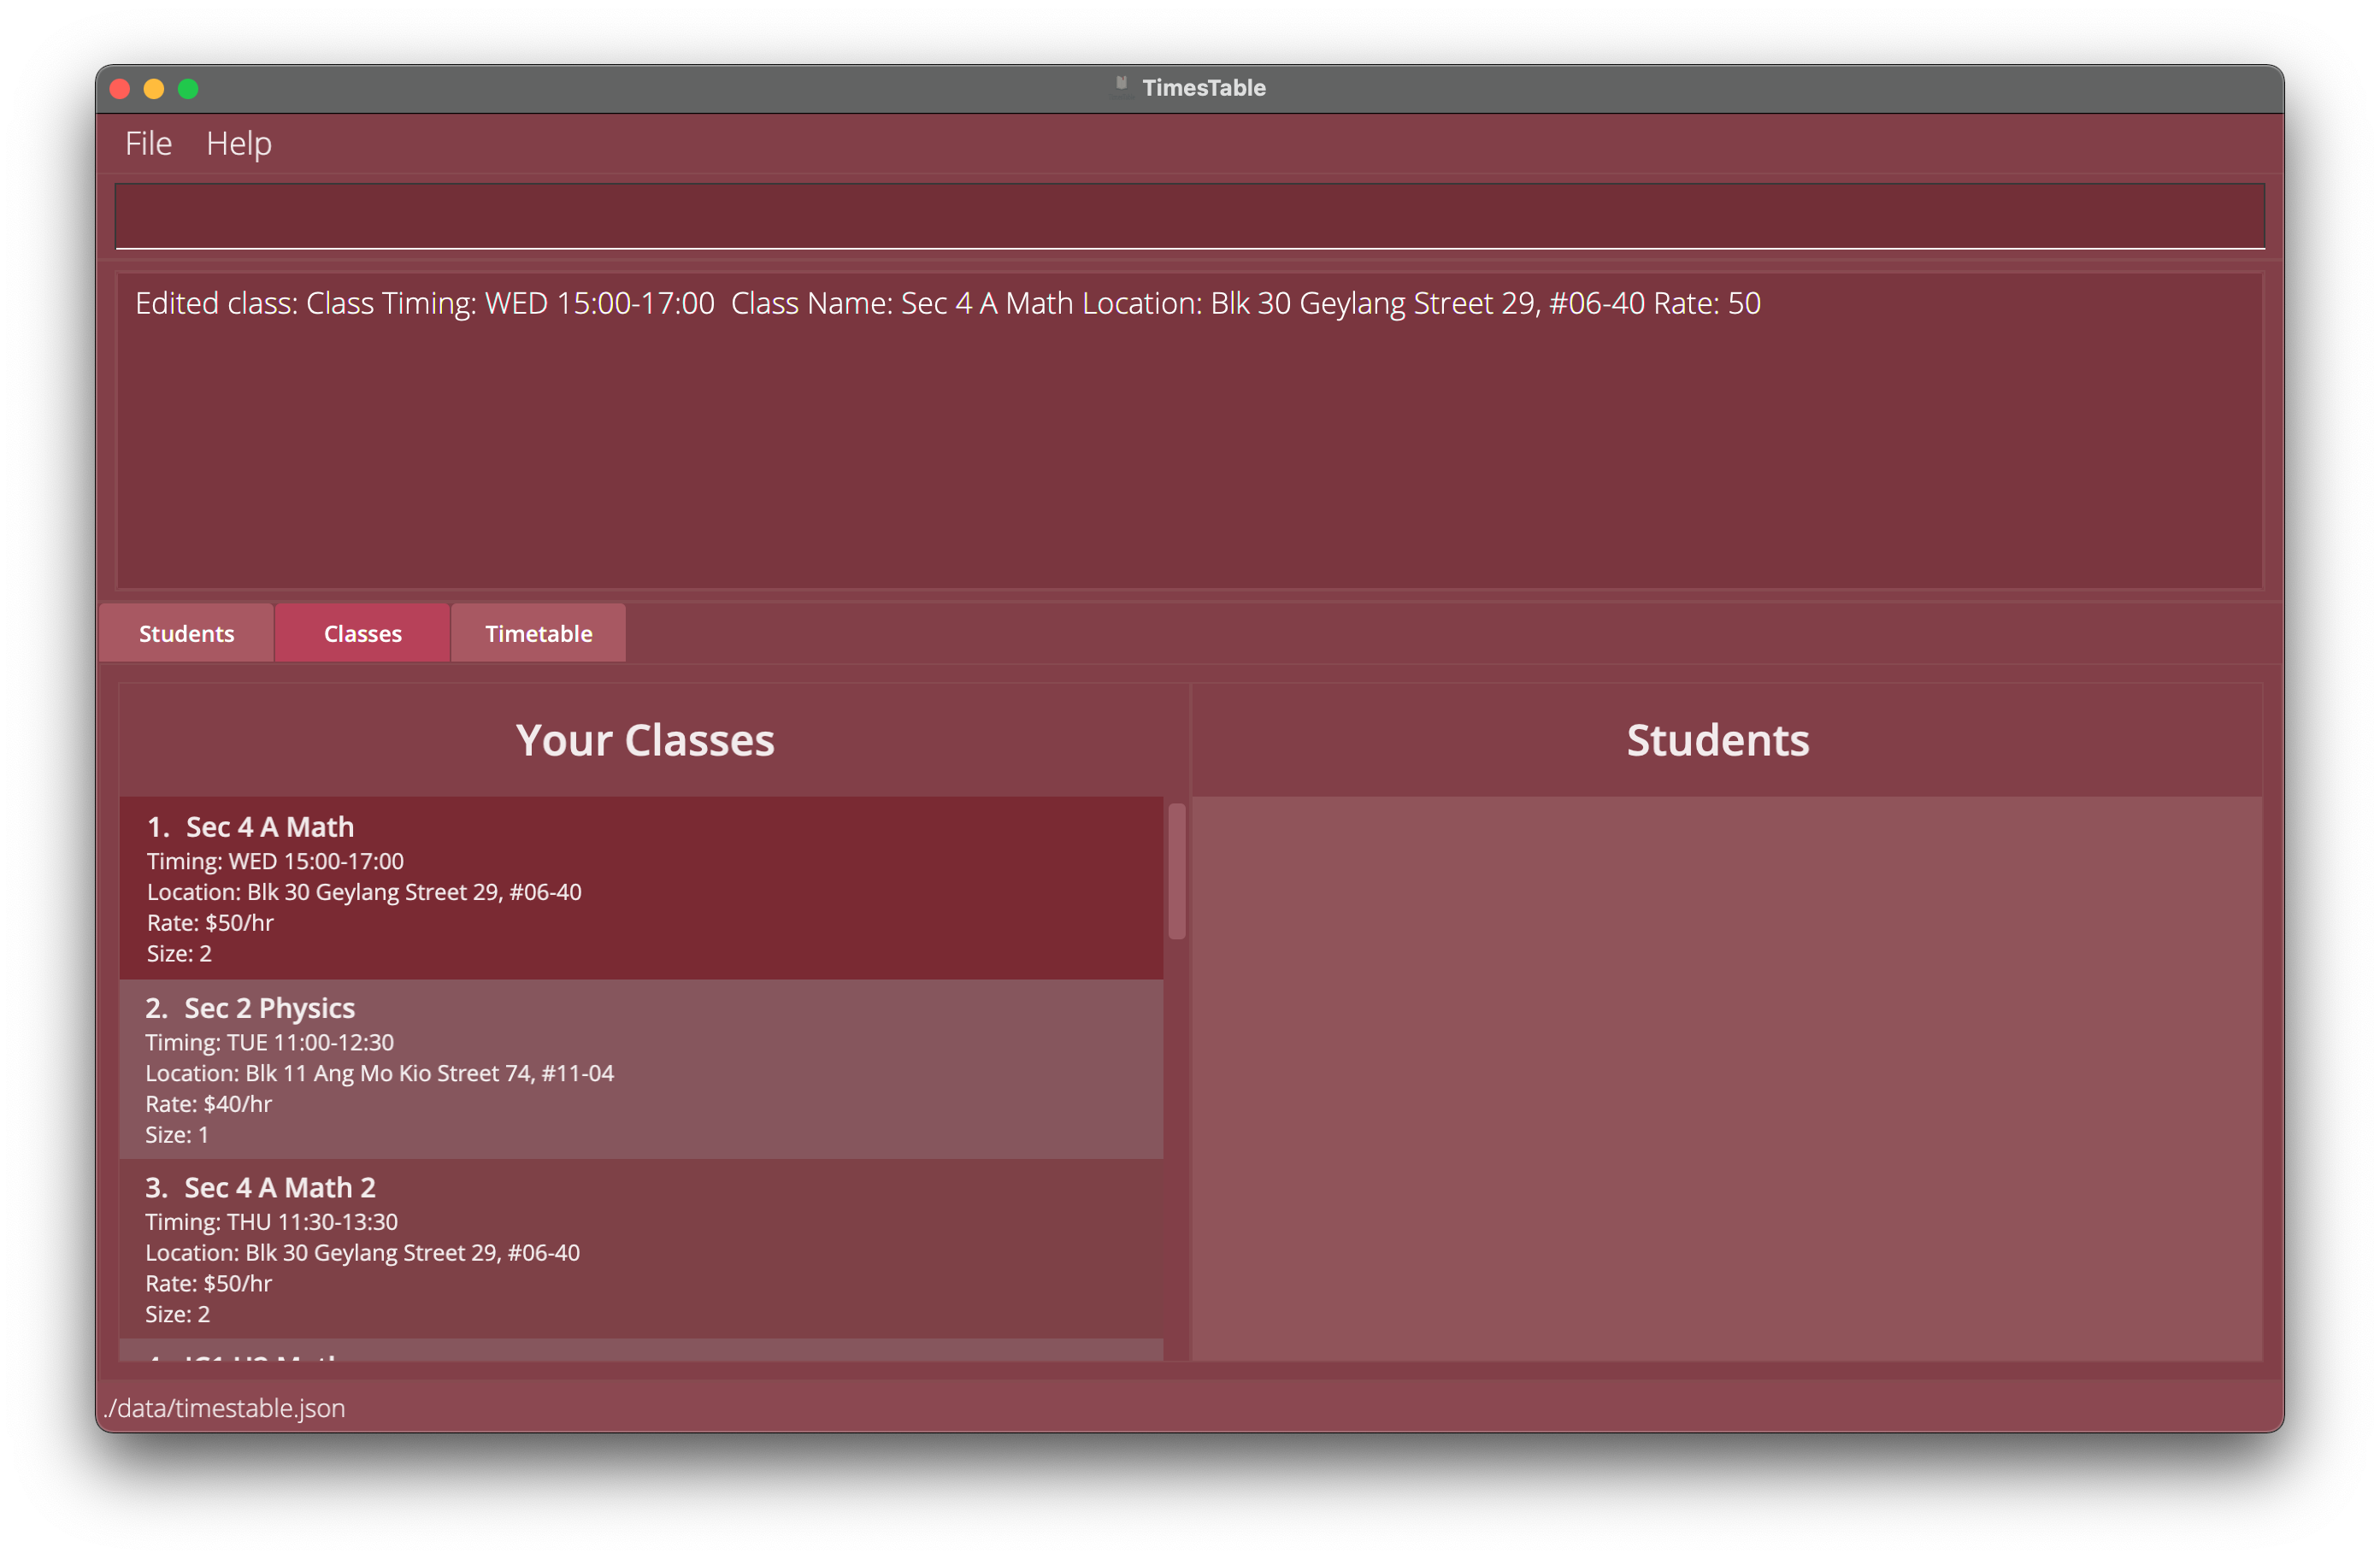
Example 1: Editing class indexed 1
Adding student/students to a class: addtoclass
Add a single or multiple students to an existing class.
Format:
addtoclass CLASS_INDEX STUDENT_INDEX...
- This command adds any number of existing students into an existing class.
-
CLASS_INDEXis the index number of the class in the displayed class list in theClassestab, which will be receiving the new students. -
STUDENT_INDEX...are the index number/s of the students shown in the displayed student list in theStudentstab, these students are to be added into the class. - Exactly one class index must be provided and at least one student index must be provided.
- Students that already exist in the class can’t be added to the same class.
- If you enter duplicate student indices in one command, Timestable will only add the student once.
- Size of the class will change to reflect the number of students in the class.
Example:
-
addtoclass 13 1 2 3Adds the 1st, 2nd and 3rd student in the displayed student list in theStudentstab into the 13th class in the displayed class list in theClassestab,sizeof the class will increase by 3.
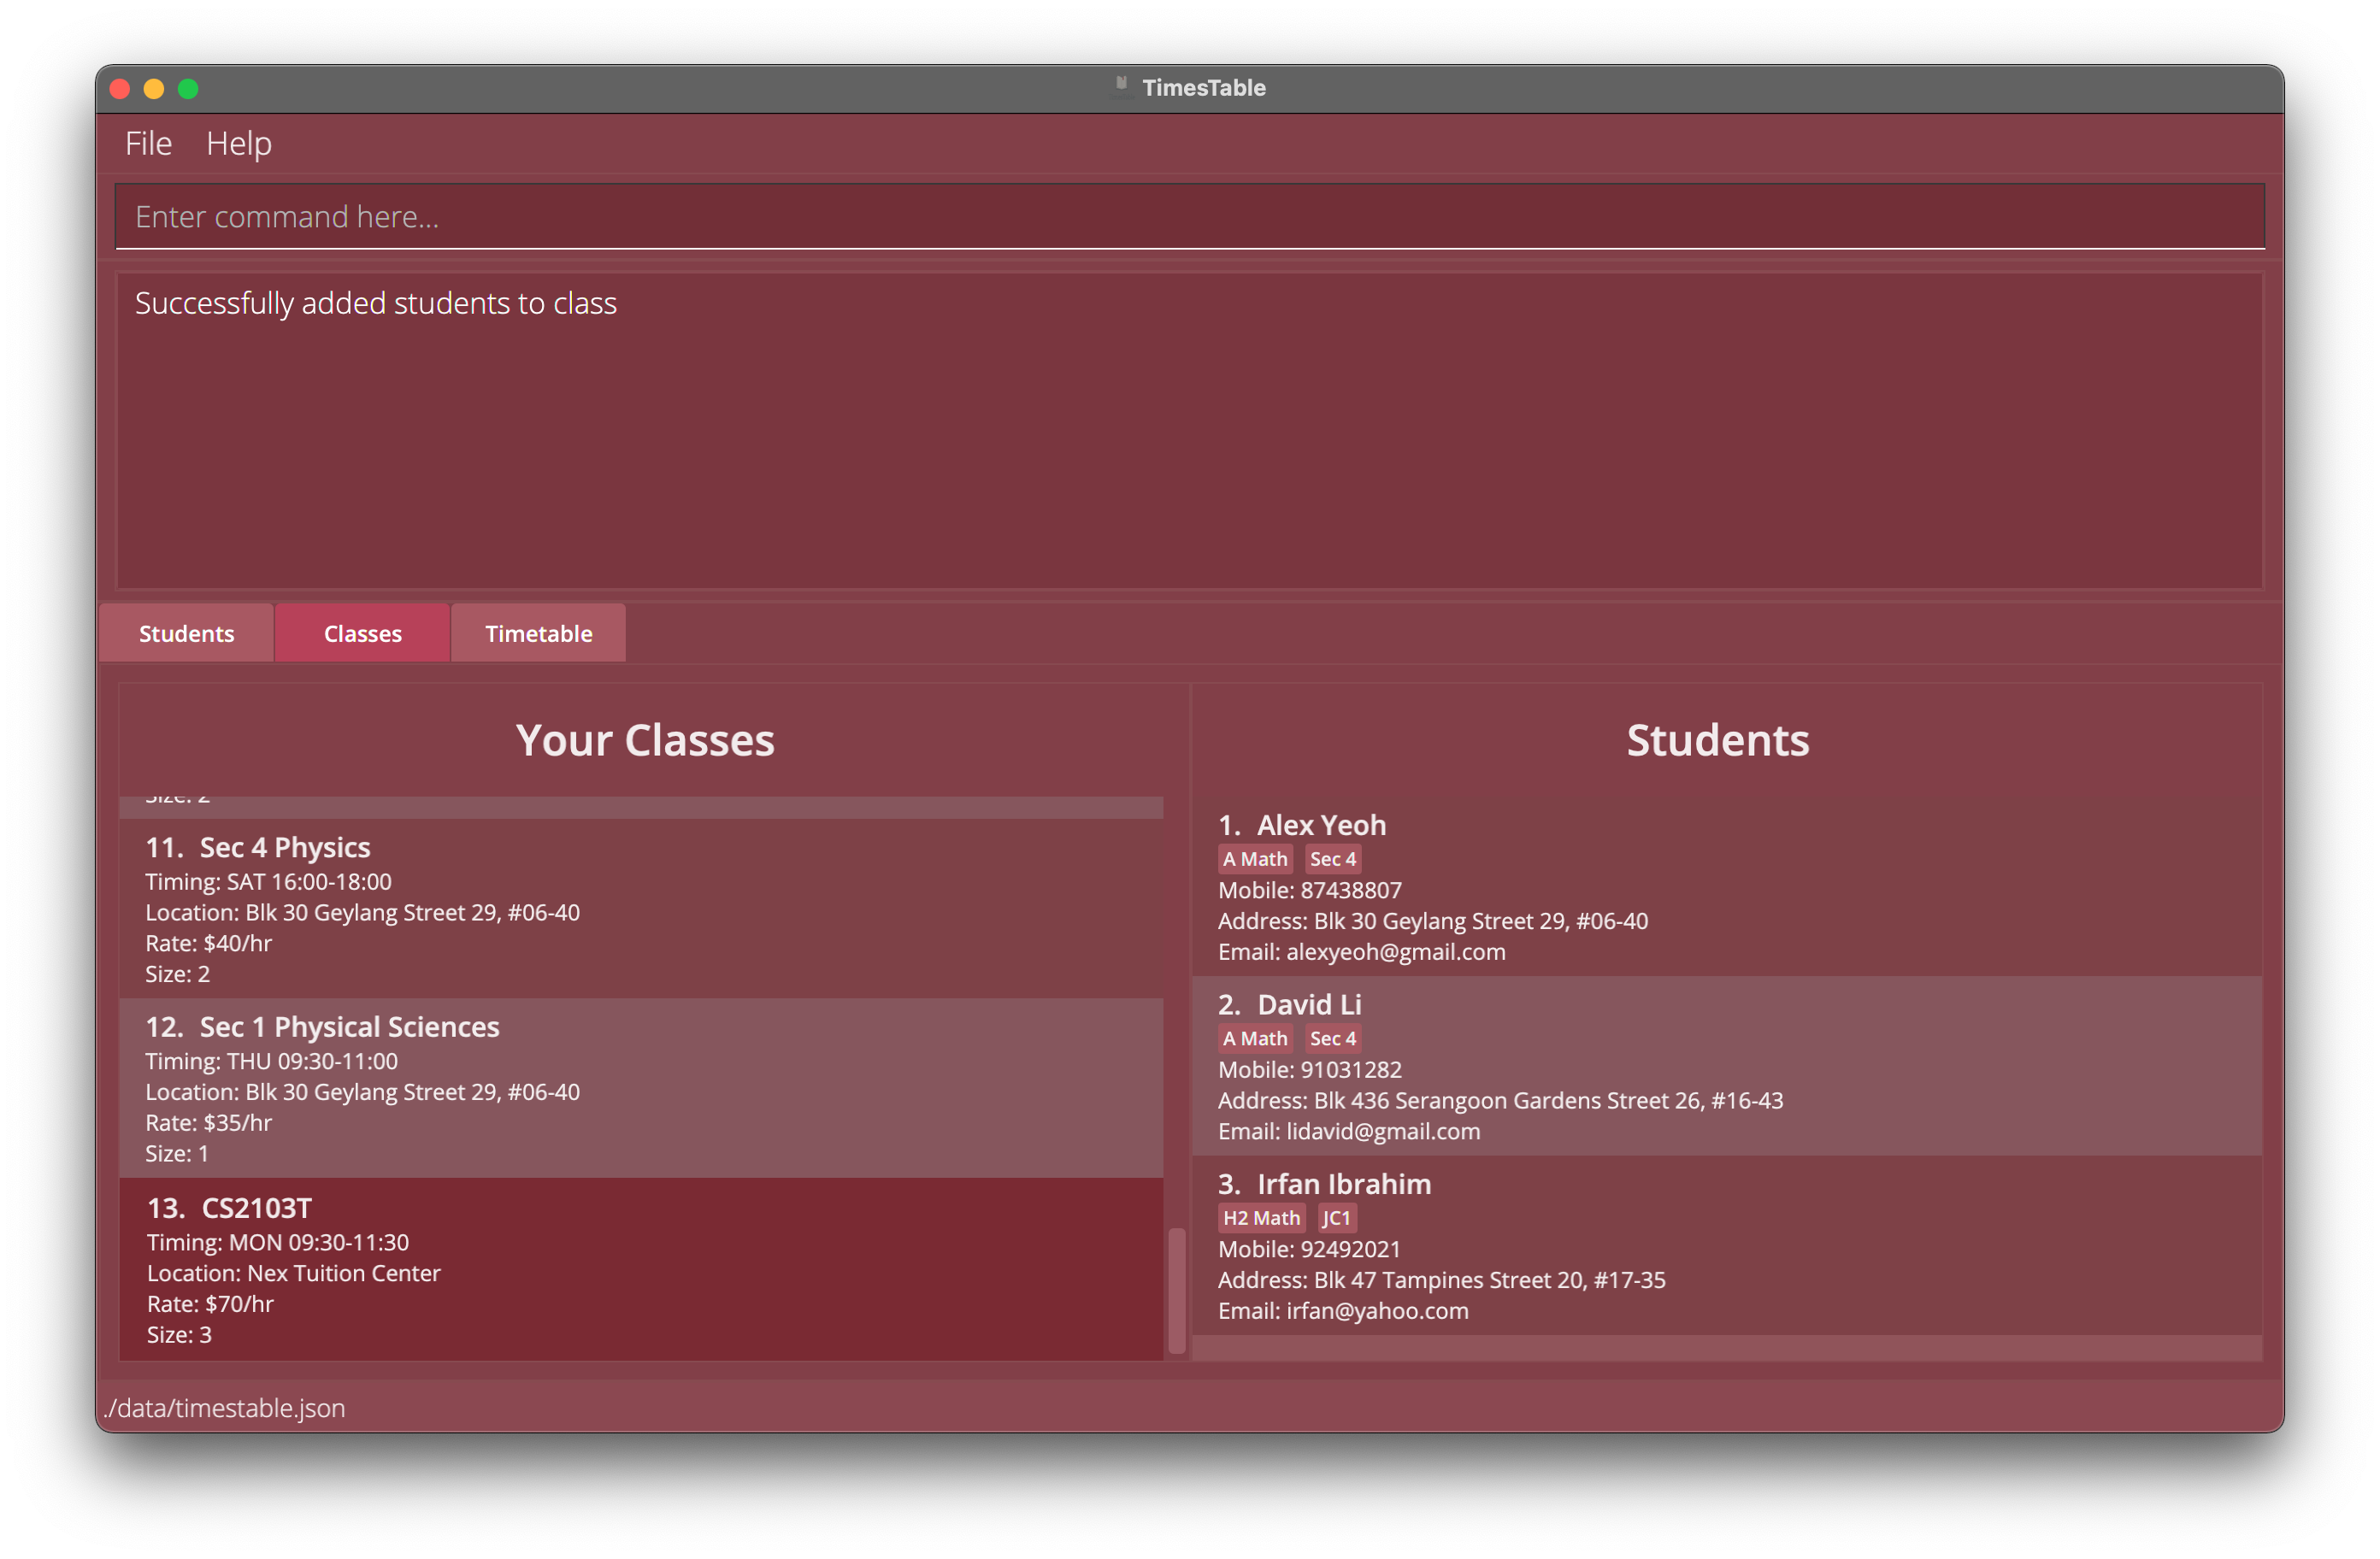
Example 1: Adding students indexed 1, 2 and 3 to class indexed 13
Removing students from a class: removefromclass
Removes a single or multiple students from an existing class.
Format:
removefromclass CLASS_INDEX STUDENT_INDEX...
- Removes a non-zero number of existing students from an existing class.
-
CLASS_INDEXis the index number of the class in the displayed class list in theClassestab to have its students removed from. -
STUDENT_INDEX...are the index number(s) of the students, shown in the displayed student list of the class to be removed from in theClassestab.
Example:
-
removefromclass 13 1 2 3Removes the 1st, 2nd and 3rd student in the displayed student list of the 13th class in theclassestab, causing thesizeof 1st class to decrease by 3.
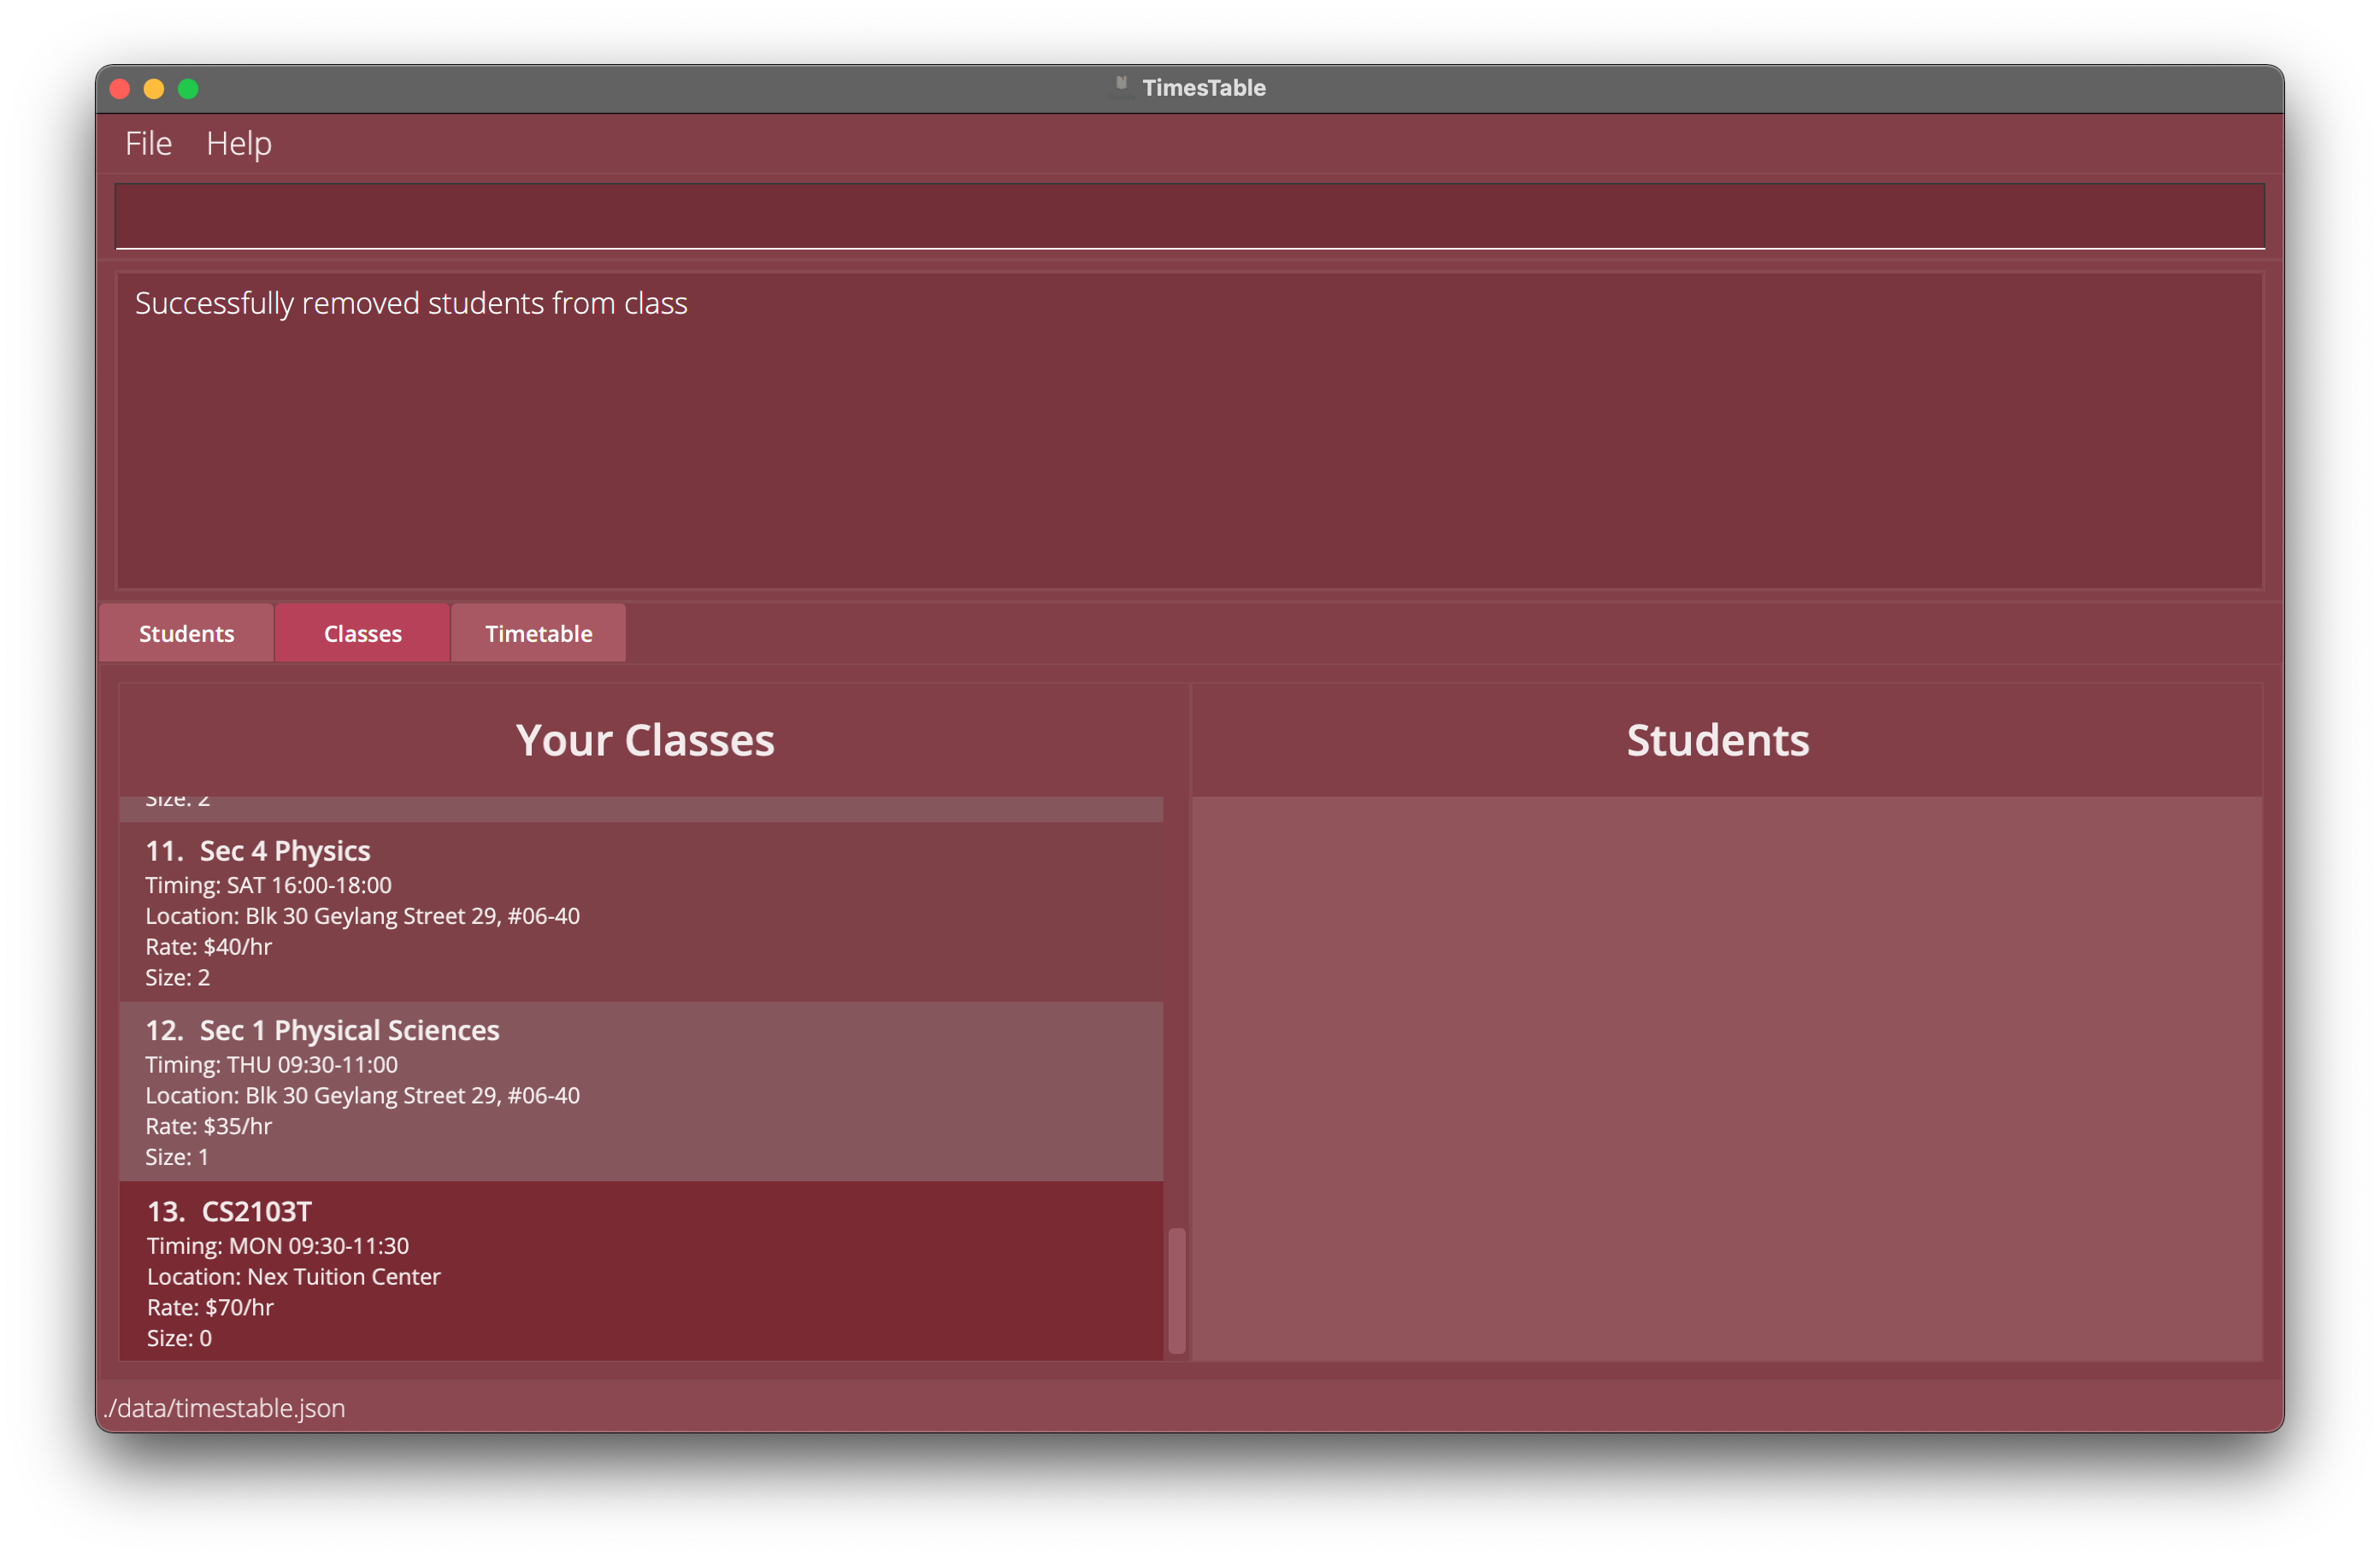
Example 1: Remove students indexed 1, 2 and 3 in class list from class indexed 13
Locating class by class timing : findclass
Finds a class whose CLASS_TIMING matches the given keyword.
Note that if you want to display the list of classes again, run listclass.
Format: findclass CLASS_TIMING
- The valid keywords for
CLASS_TIMINGare limited to the following types:- 3 letter abbreviation for day of the week e.g.
Mon,Tue, etc. - Time expressed in HH:MM-HH:MM format e.g.
11:30-12:30,15:00-16:00, etc.-
CLASS_TIMINGcan only start and end at the hour mark or half hour mark, but can also end at 23:59 hours.
-
- 3 letter abbreviation for day of the week e.g.
- Either a single keyword or two keywords of different types should be provided otherwise no classes would be returned.
- Multiple keywords of the same type (eg Mon Tue) would not return any classes, because the command finds classes which contain both timings (Mon and Tue), and
it is currently not possible to have a class with two different timings (ie a class that occurs on both Monday and Tuesday or both
10:00-12:00and17:00-19:00)- Important clarification: In TimesTable, class refers to a single slot per week in the timetable.
- If two keywords are entered, then the class returned would be the one that match all the keywords (see example below).
Examples:
- Single keyword
1.1.findclass monreturns all classes on Monday.
1.2.findclass 10:00-12:00returns all classes scheduled for10:00 to 12:00no matter which day of the week it belongs to.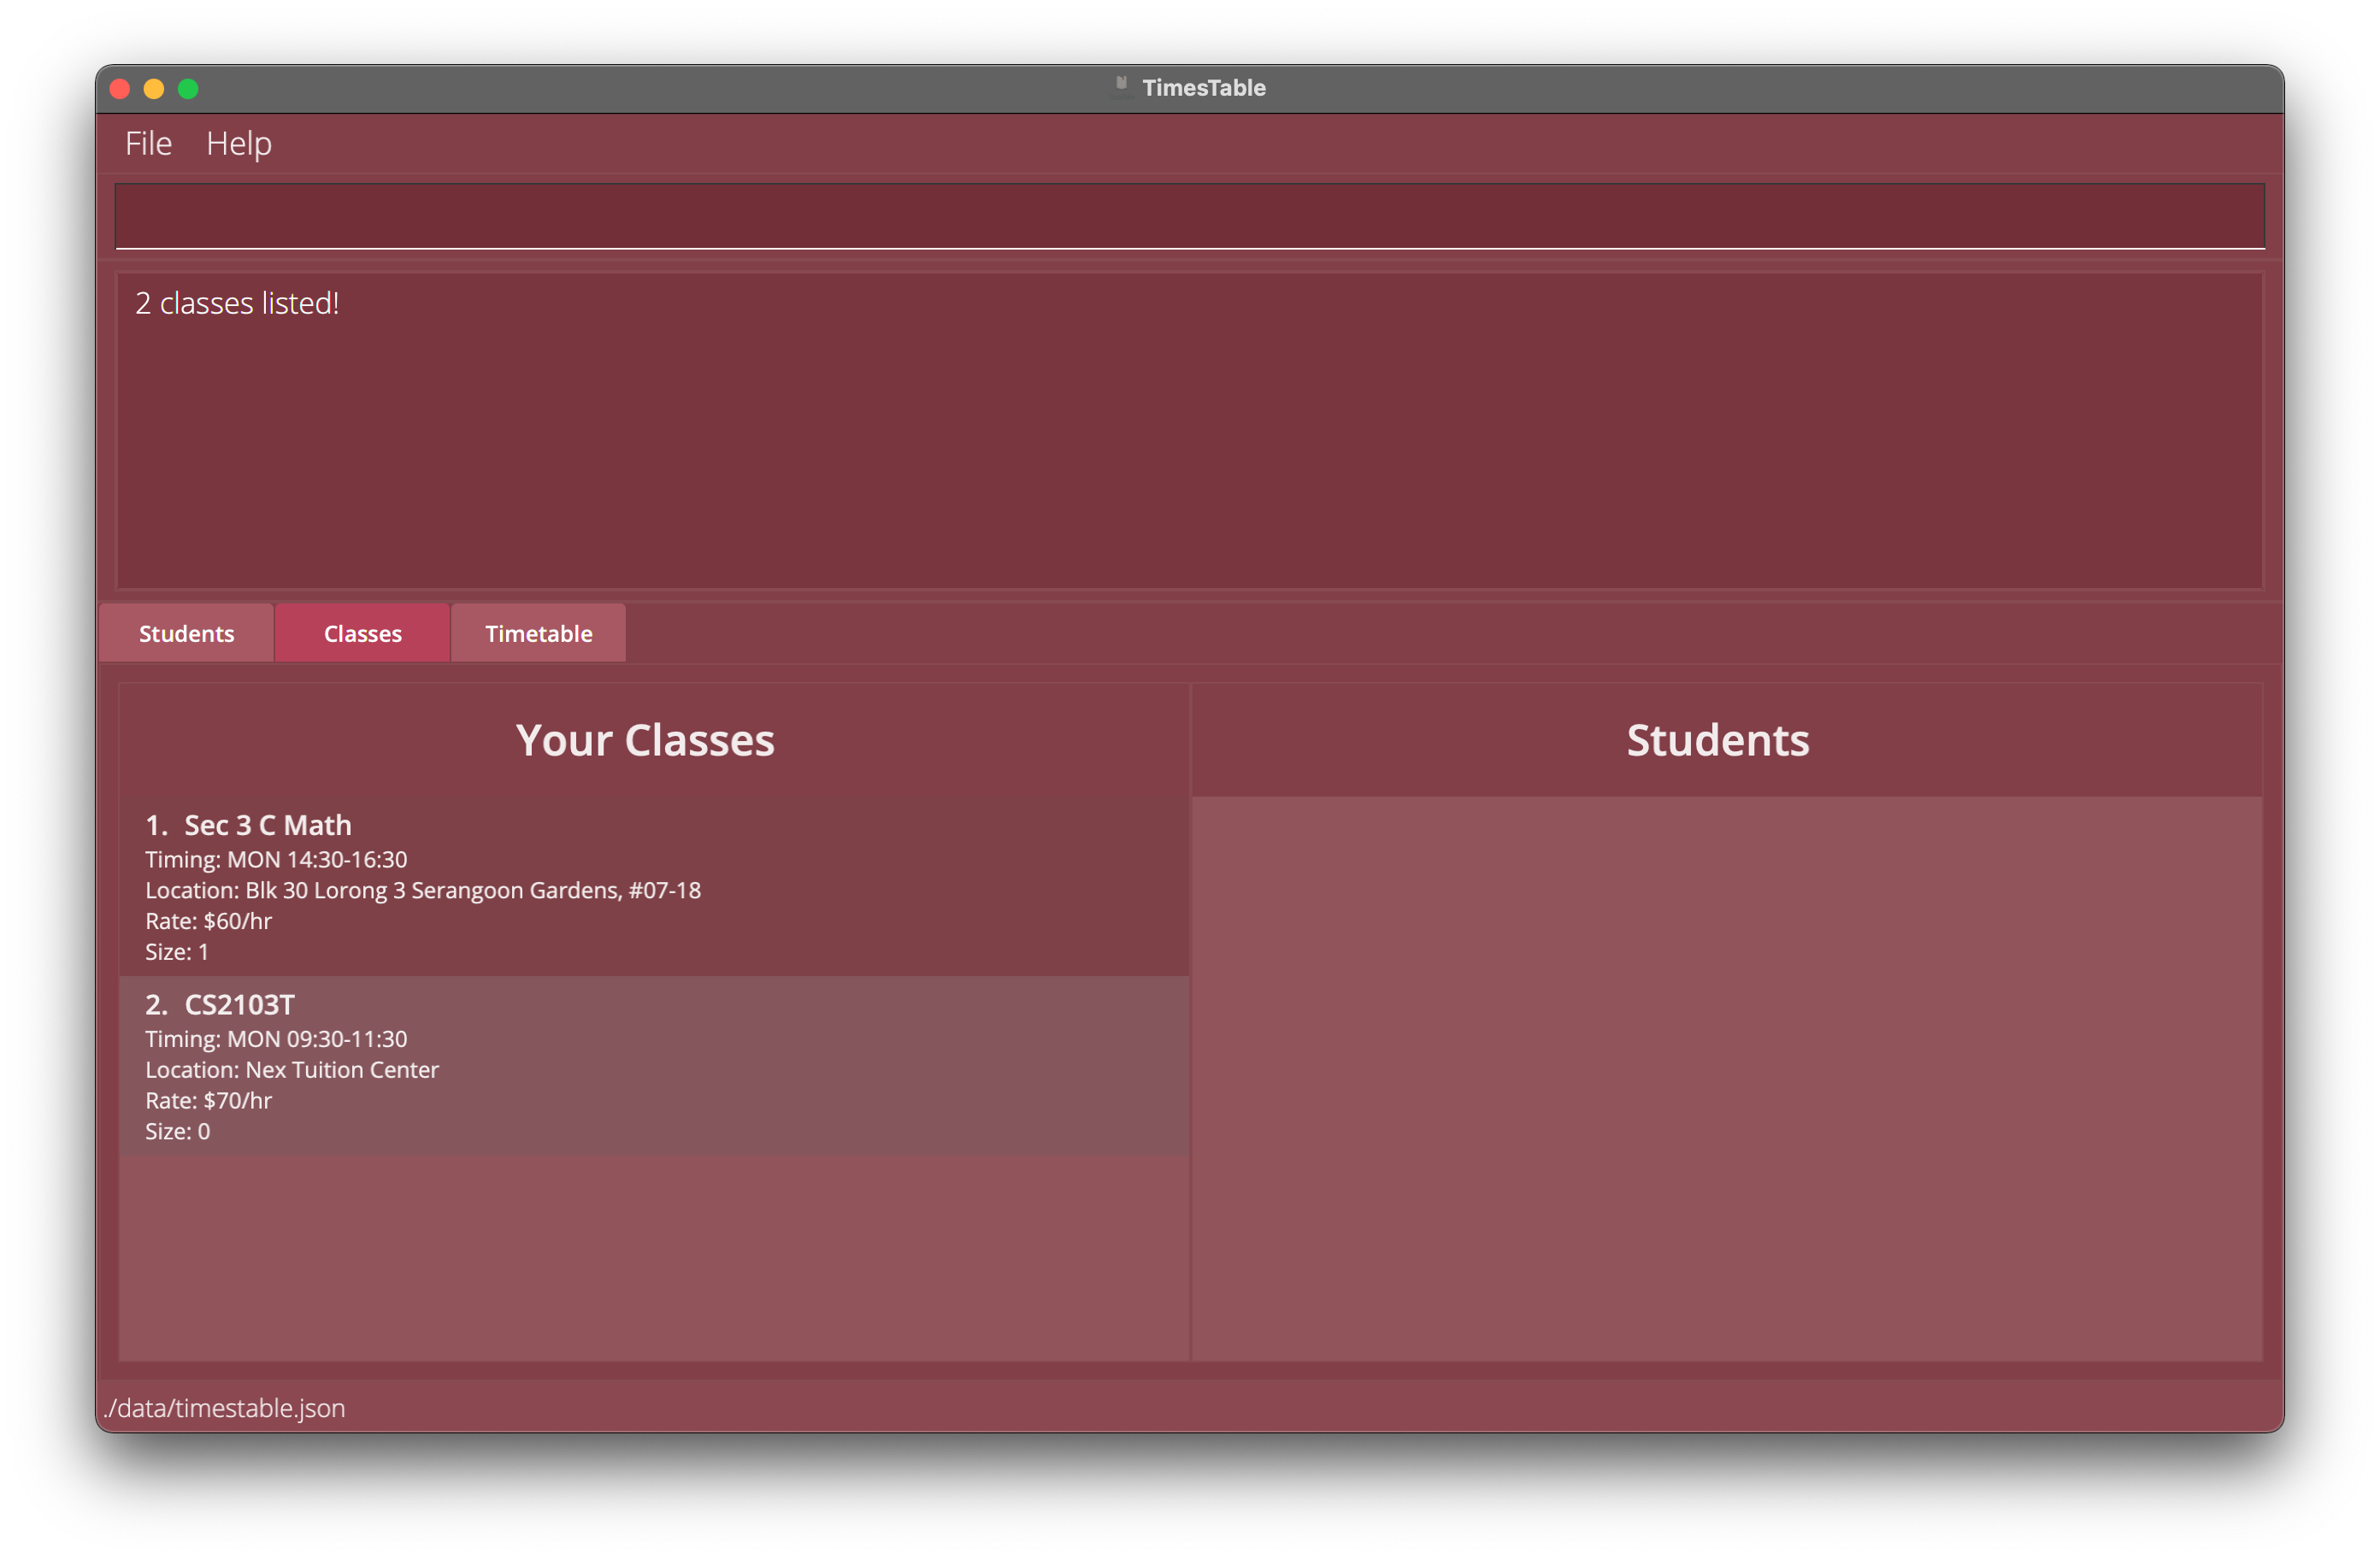
Example 1.1: Find all classes on Monday
- Two keywords
2.1findclass mon 11:30-13:30returns the exact class onMon at 11:30-13:30.
2.2findclass tue 11:00-12:00returns the exact class onTue at 11:00-12:00.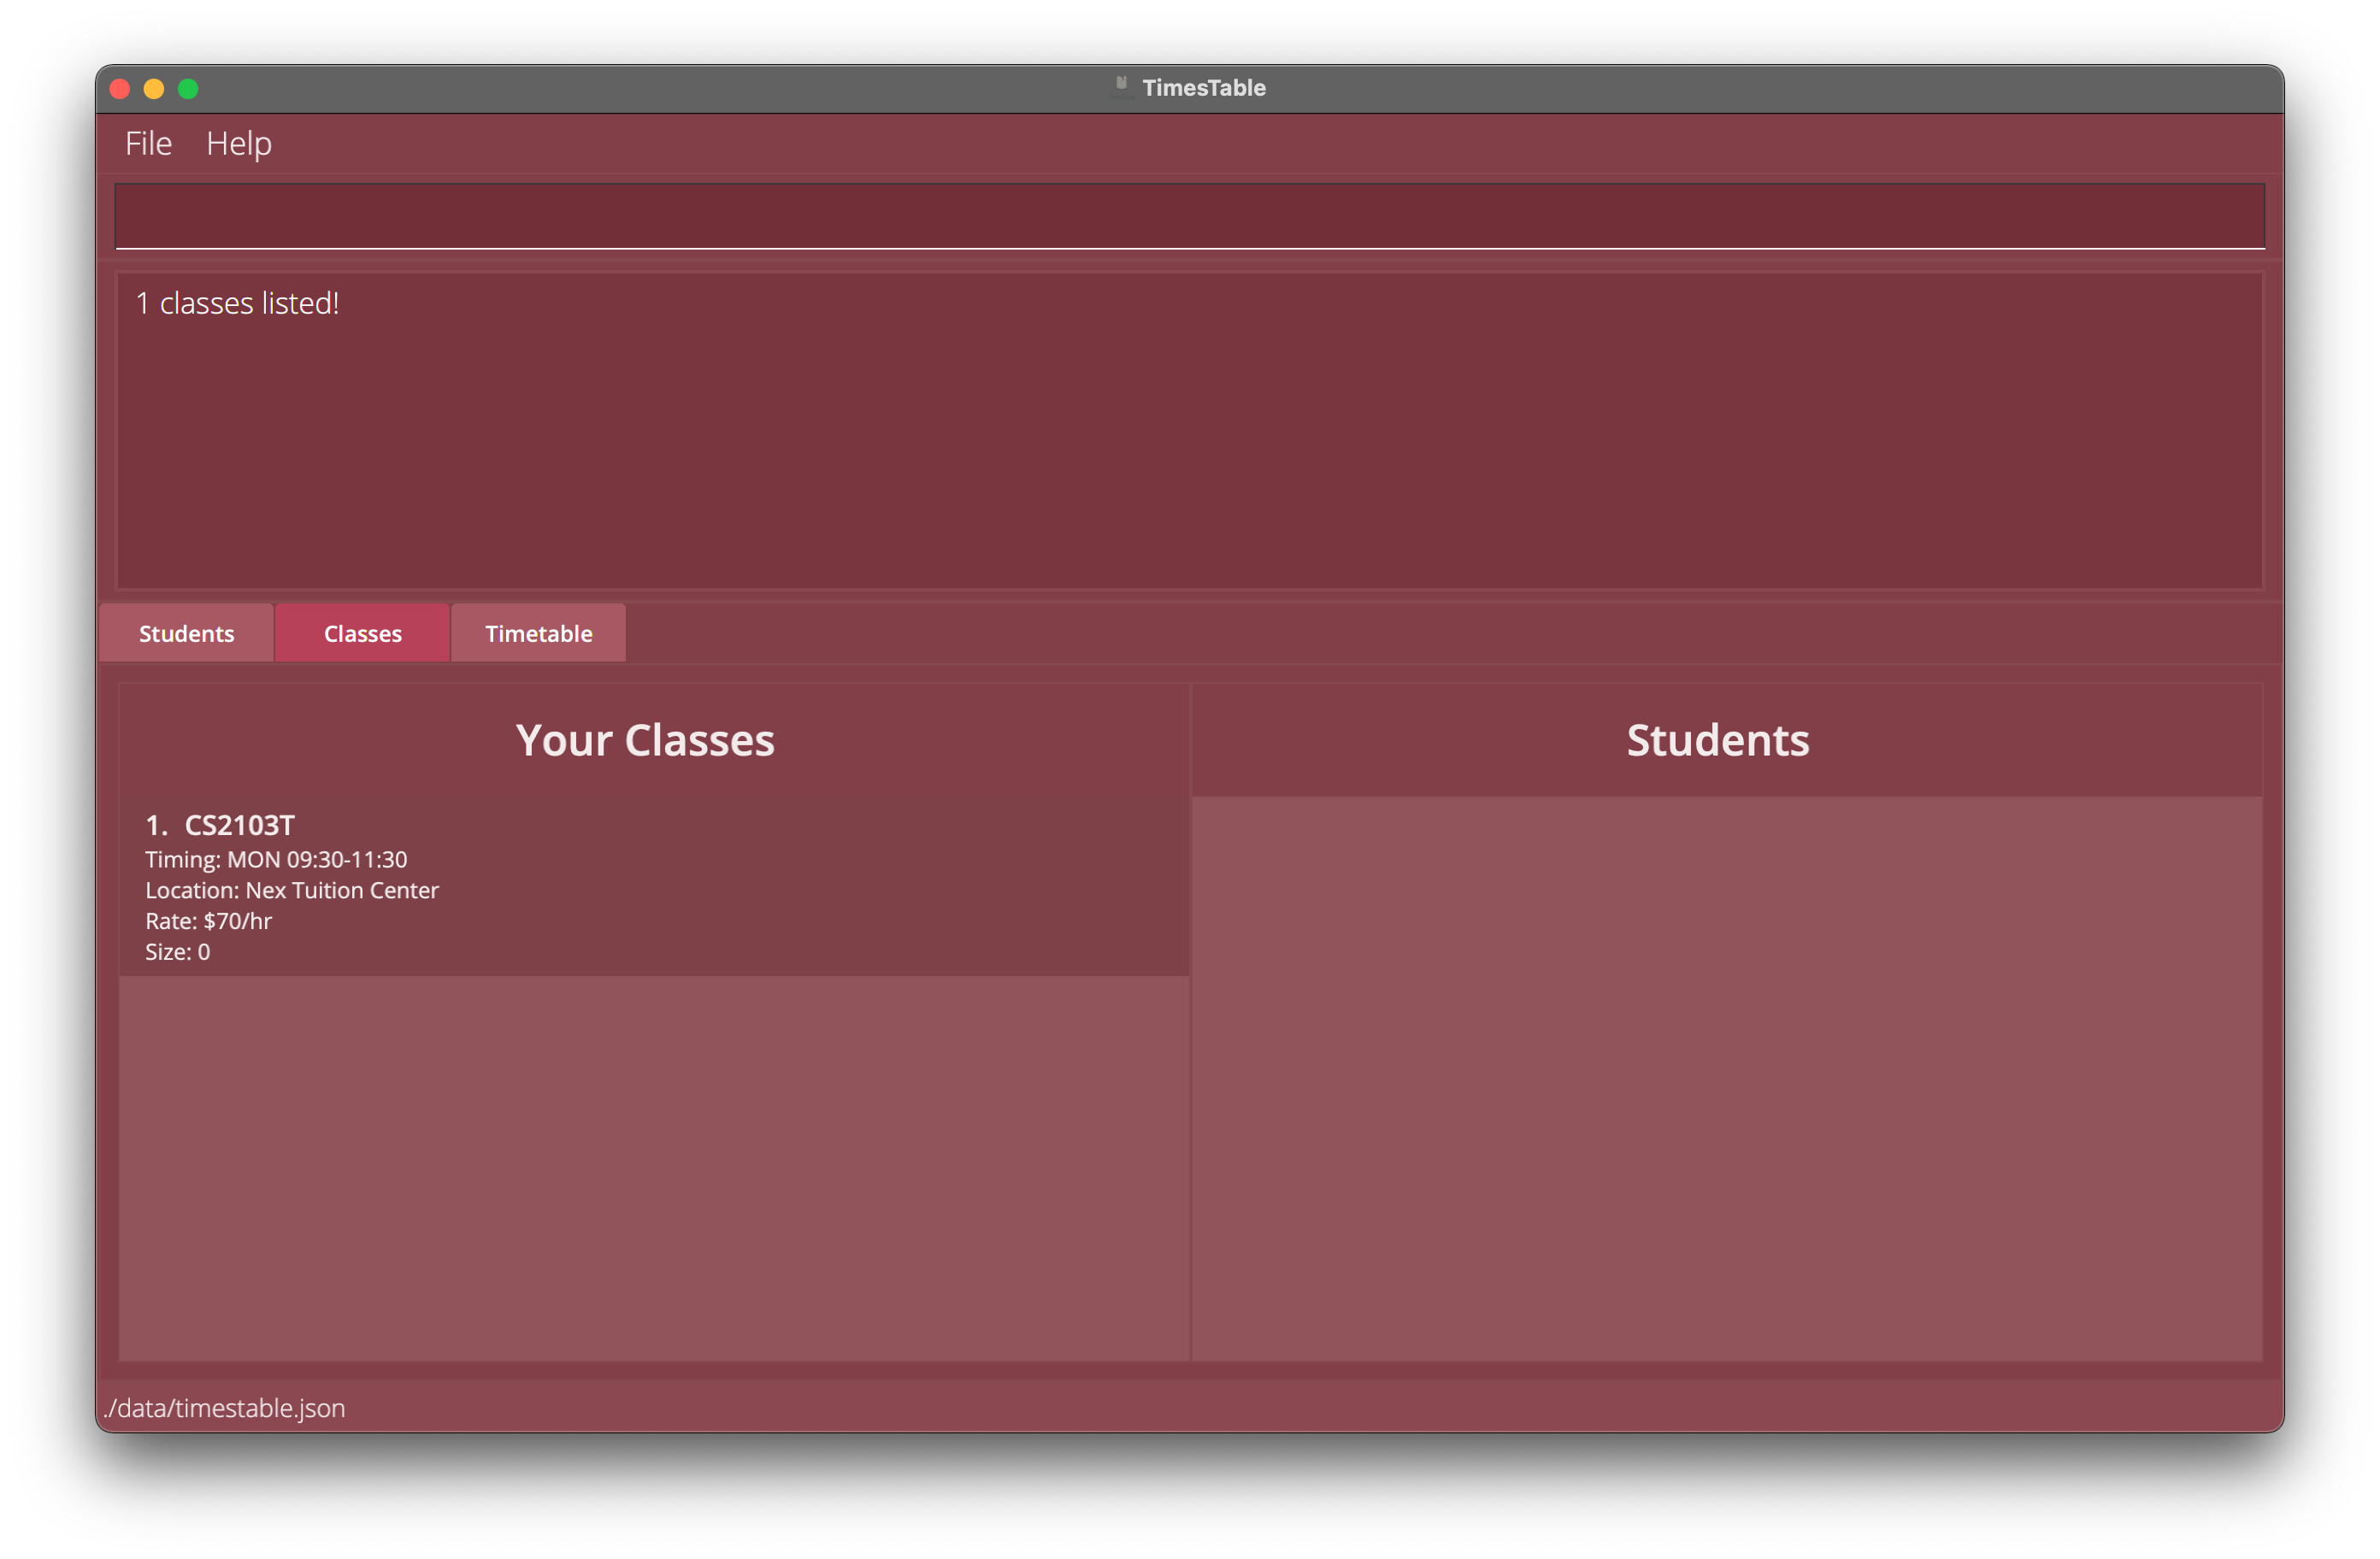
Example 2.1: Find classes on Monday at 11:30-13:30
- Negative examples (Two or more keywords of the same type)
3.1findclass mon tuereturns nothing.
3.2findclass 09:00-10:30 11:00-12:00returns nothing.
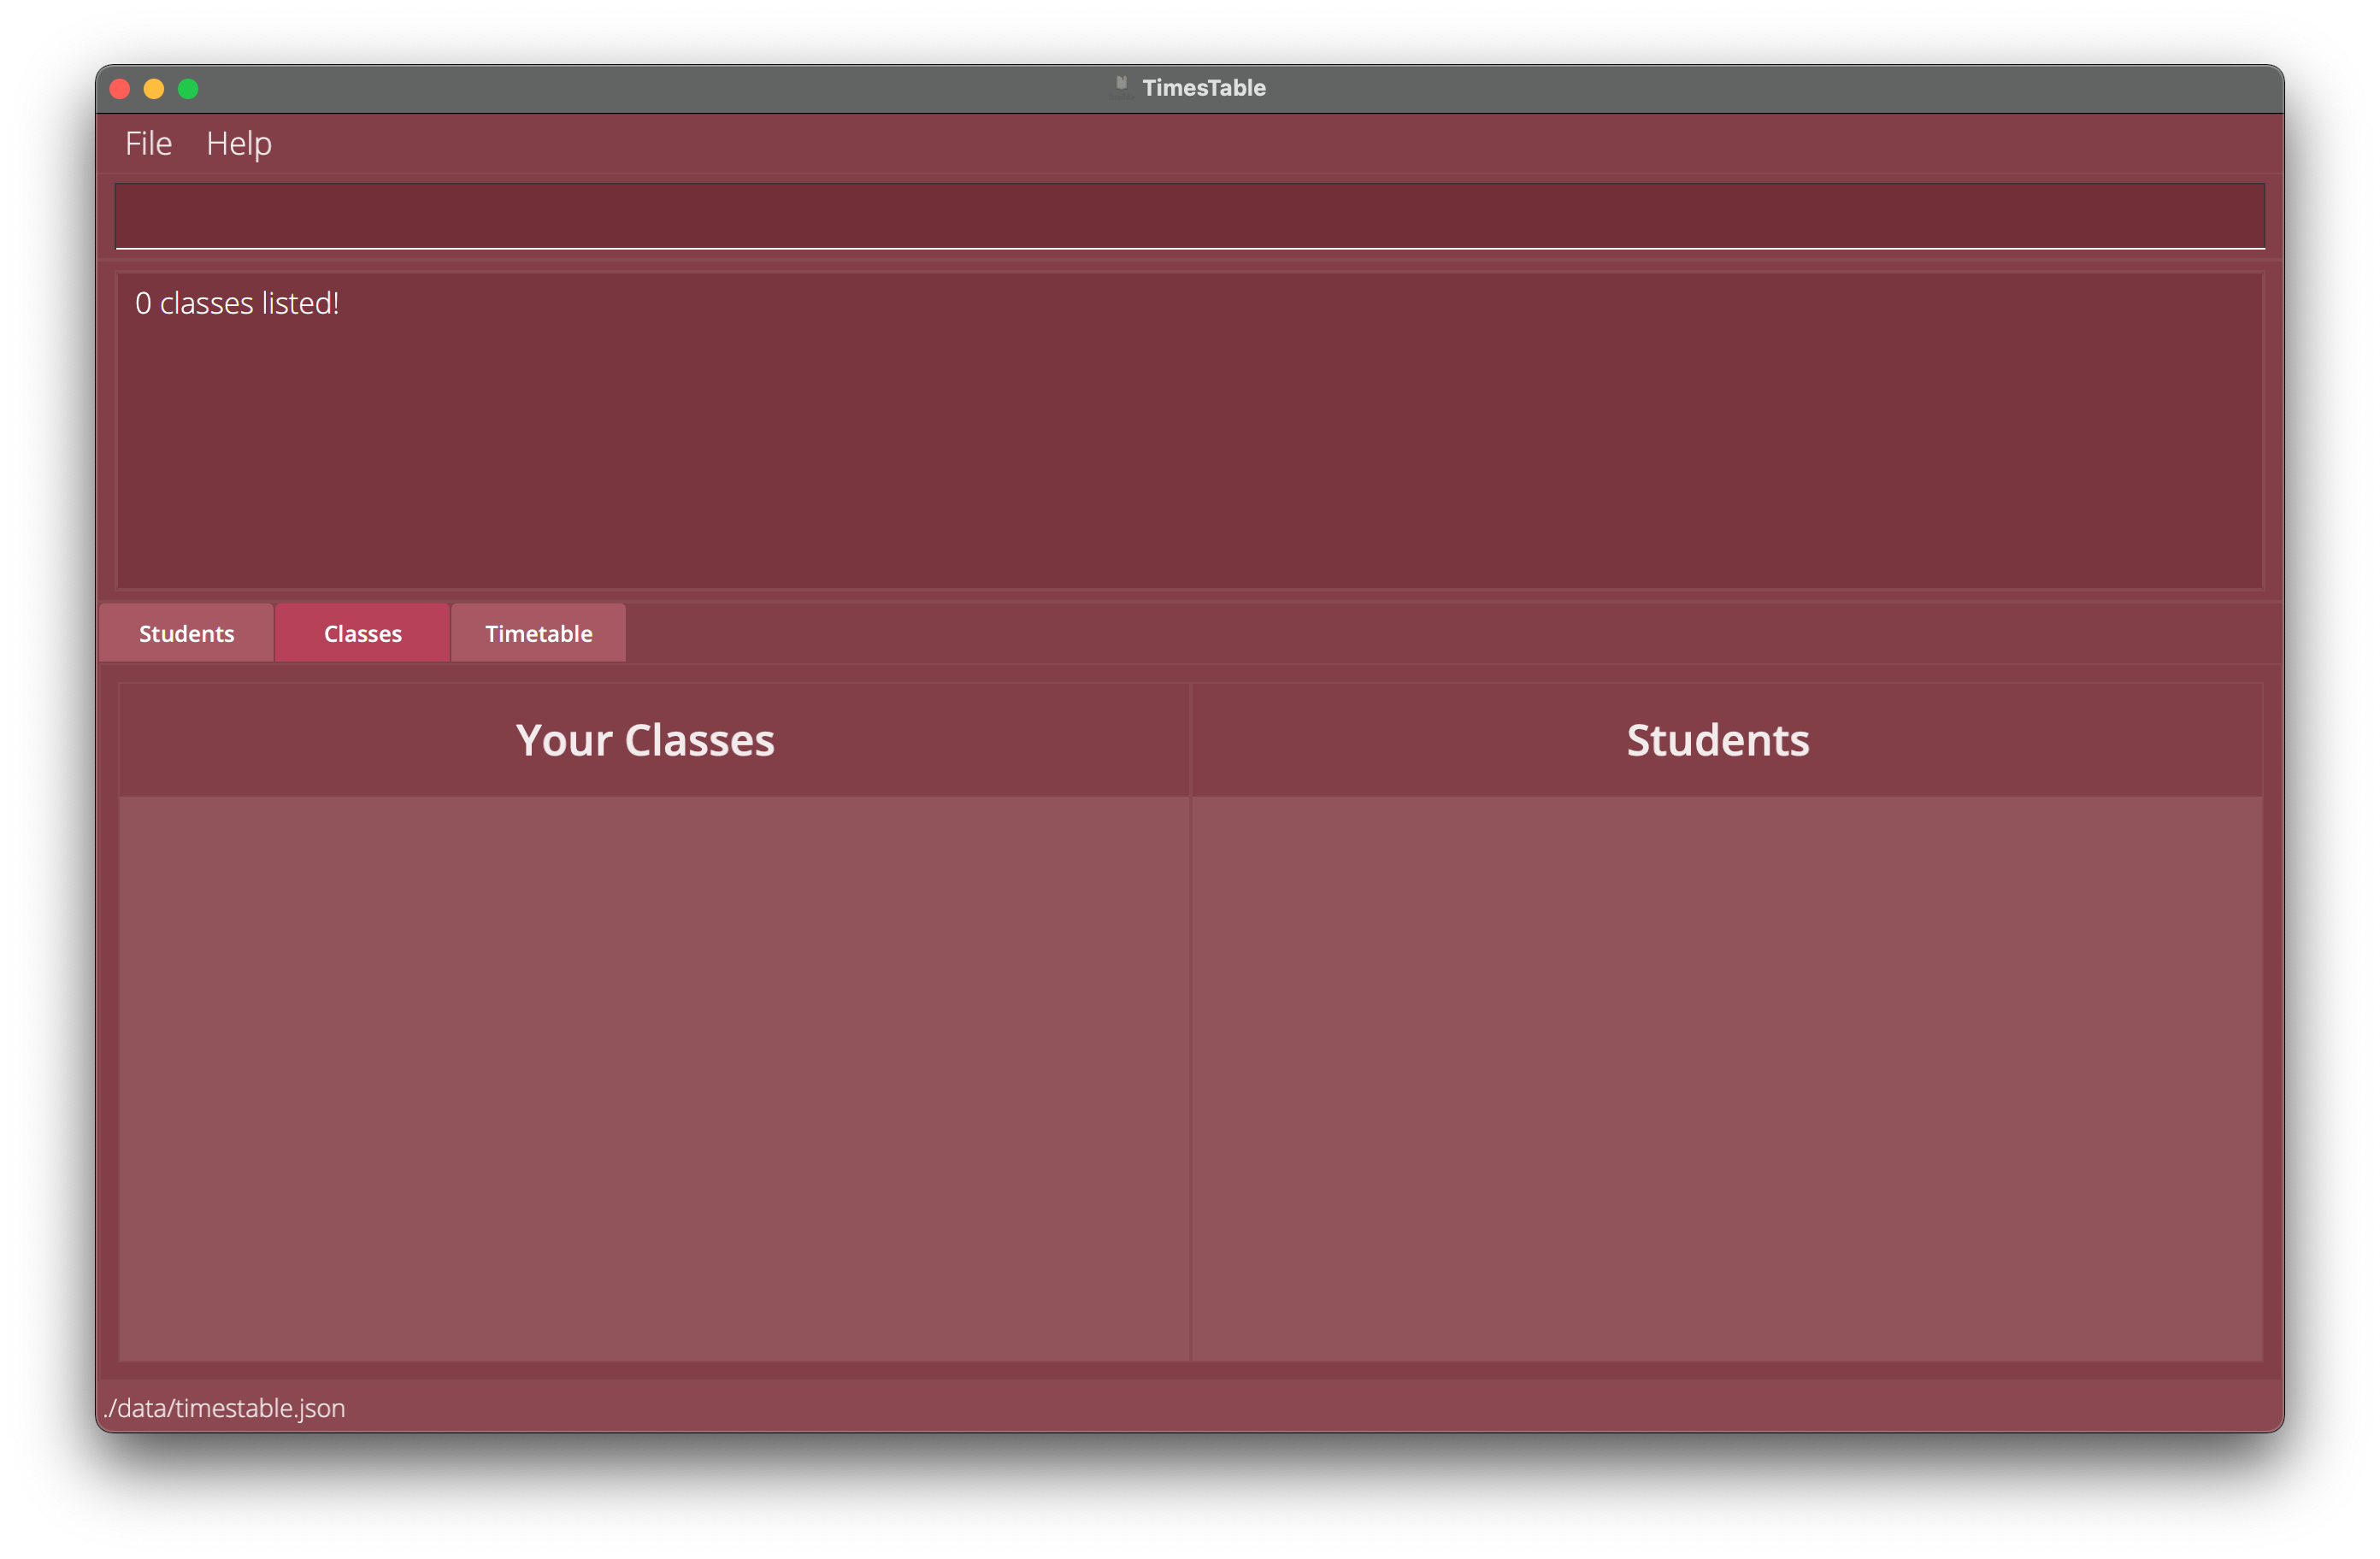
Example 3.1: Find classes with two keywords of the same type
Locating class by class name: findclassname
Finds a class whose class name matches the given keywords.
Note that if you want to display the list of classes again, run listclass.
Format:
findclassname CLASS_NAME [, [CLASS_NAME]...]
- The search is case-insensitive
PHYSICSwill match ‘physics’. - The search terms are split by commas. e.g.
findclassname sec 4 physics, jc math - Only the class’
CLASS_NAMEis searched. - Partial matches will still be matched e.g.
Phywill matchPhysics. - Classes matching at least one search term will be returned (i.e.
ORsearch). e.g.findclassname sec 4 phy, jc mathwill returnsec 4 physics,jc mathematics. - The entire search term is used for matching e.g.
findclassname sec 4 phywill matchsec 4 physicsbut notsec 4 maths
Examples:
-
findclassname mathreturns all the classes with math in the class name. -
findclassname Sec, 4, mathsreturns all the classes withsecor4ormathsin the class name. Hence, class with namesec 4 physicsand class with nameJC mathswould both be returned.
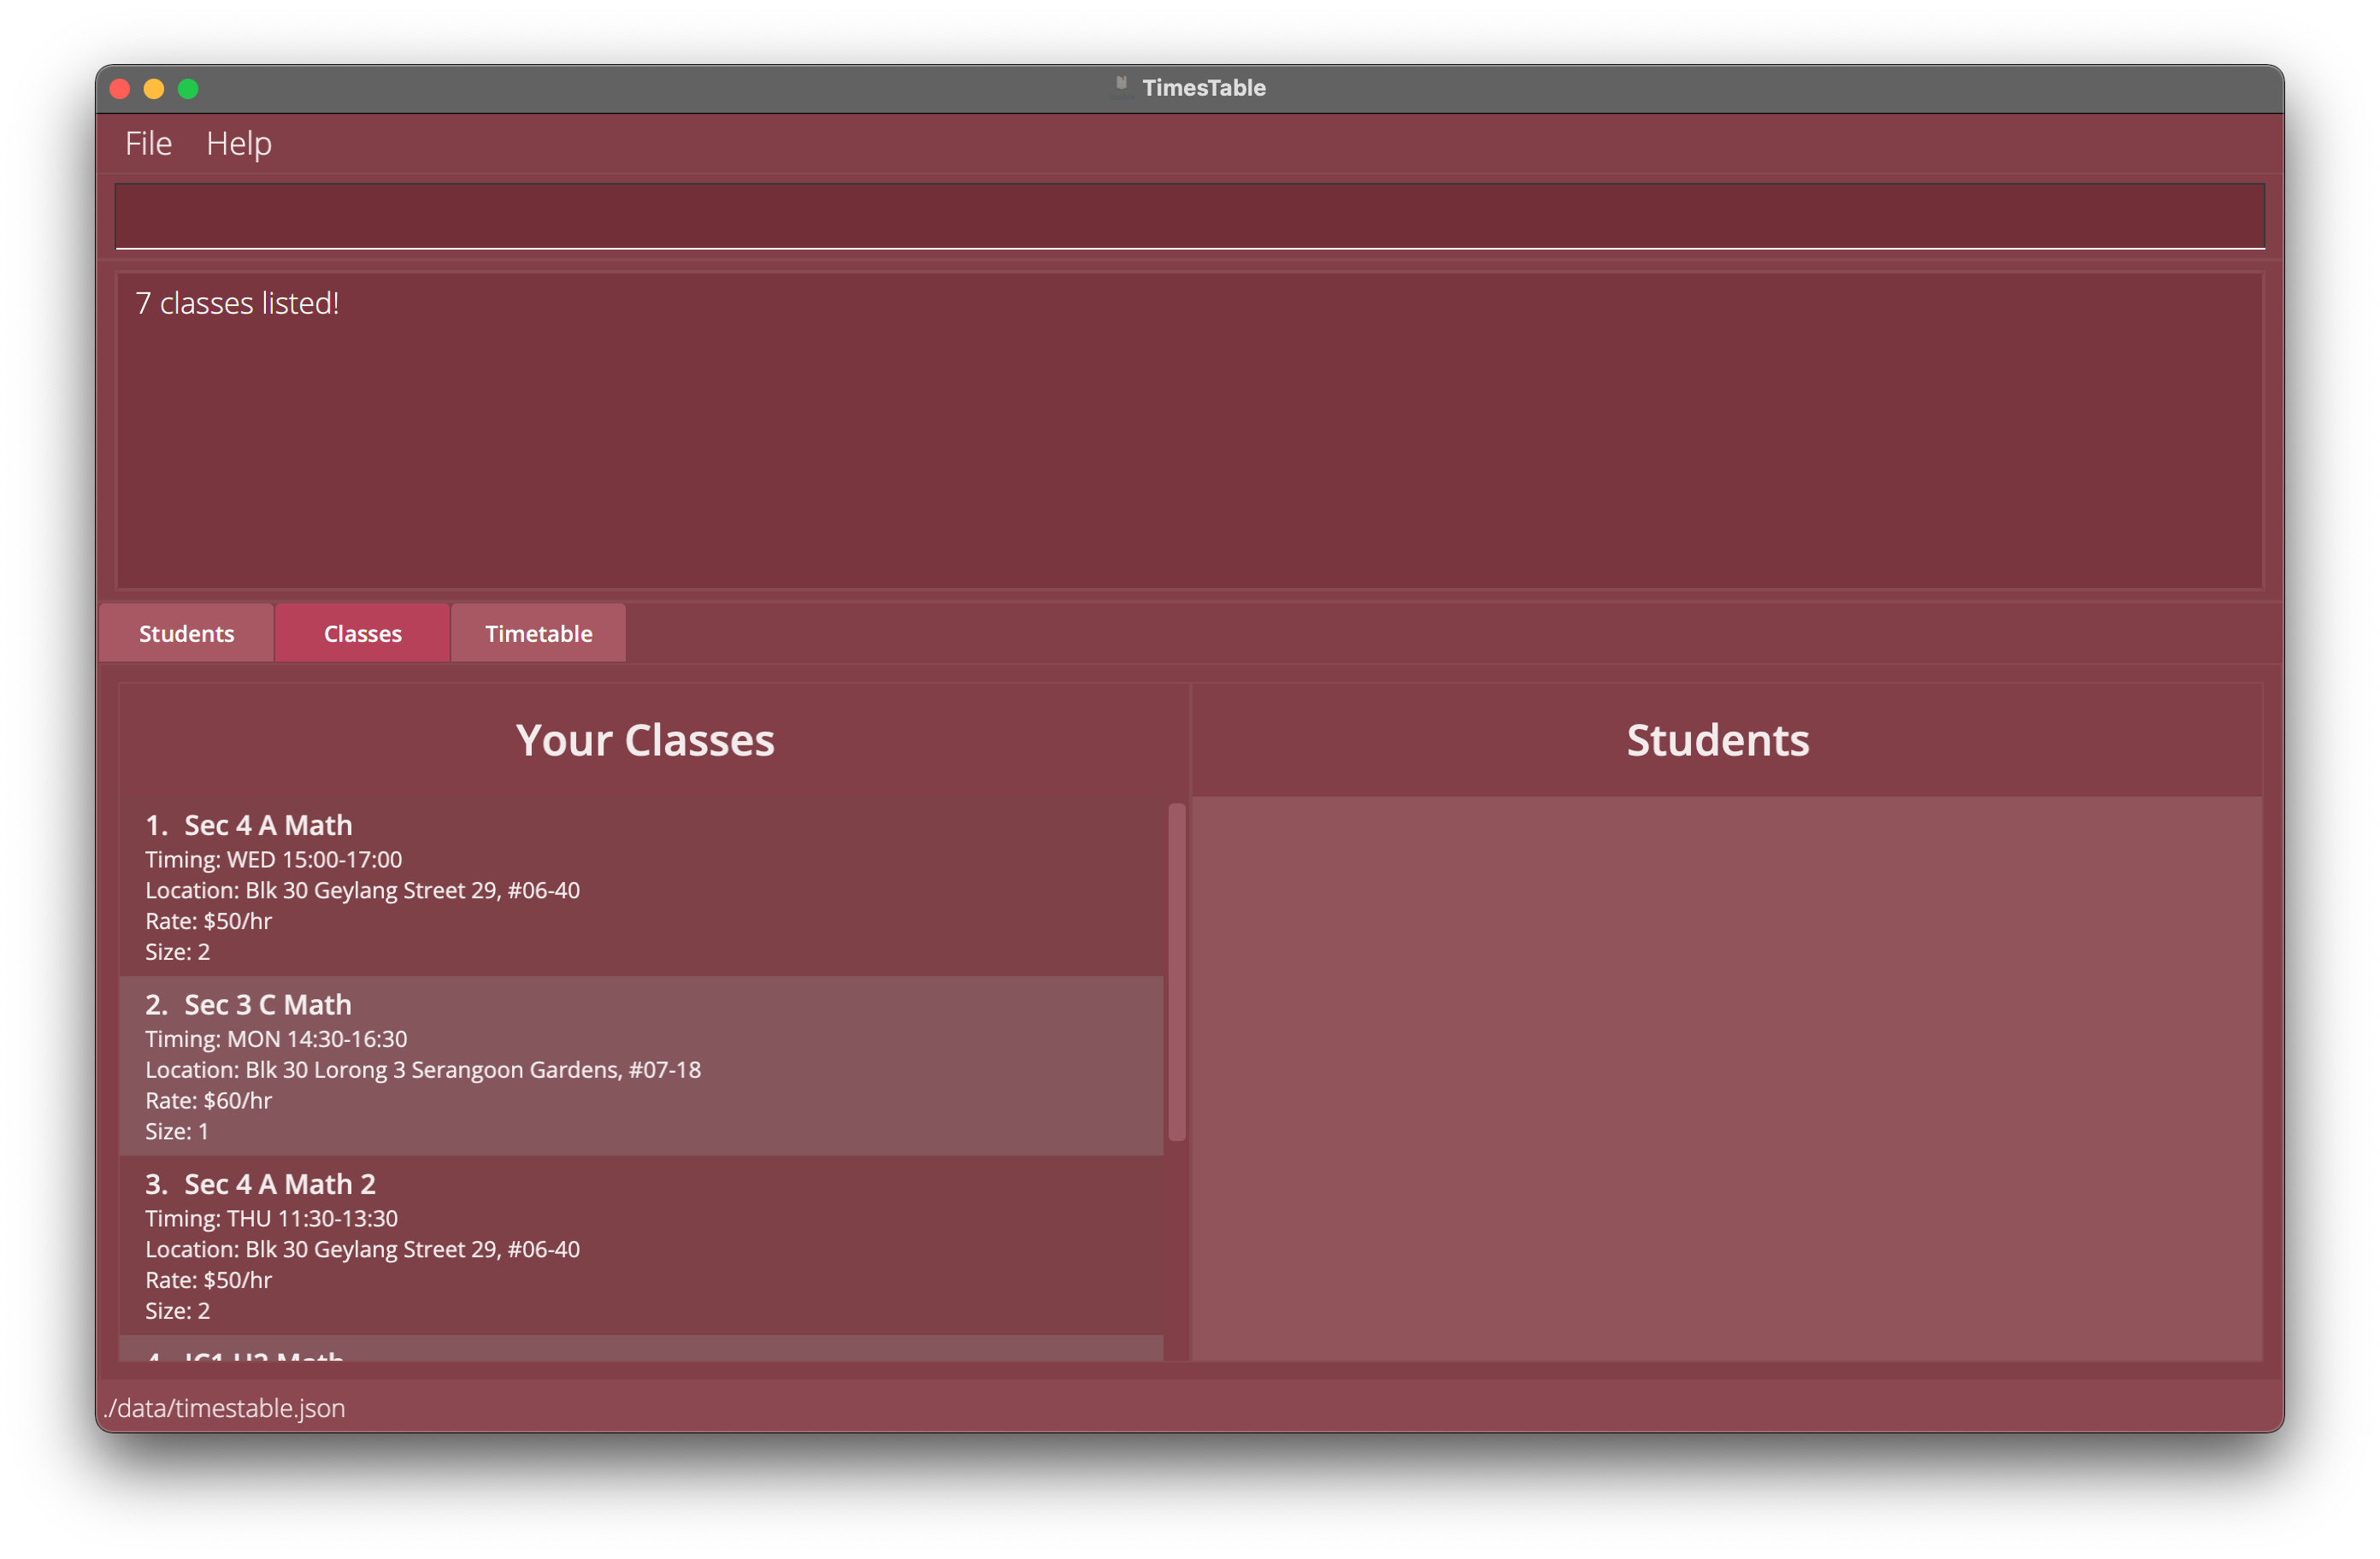
Example 1: Find classes with math in the class name
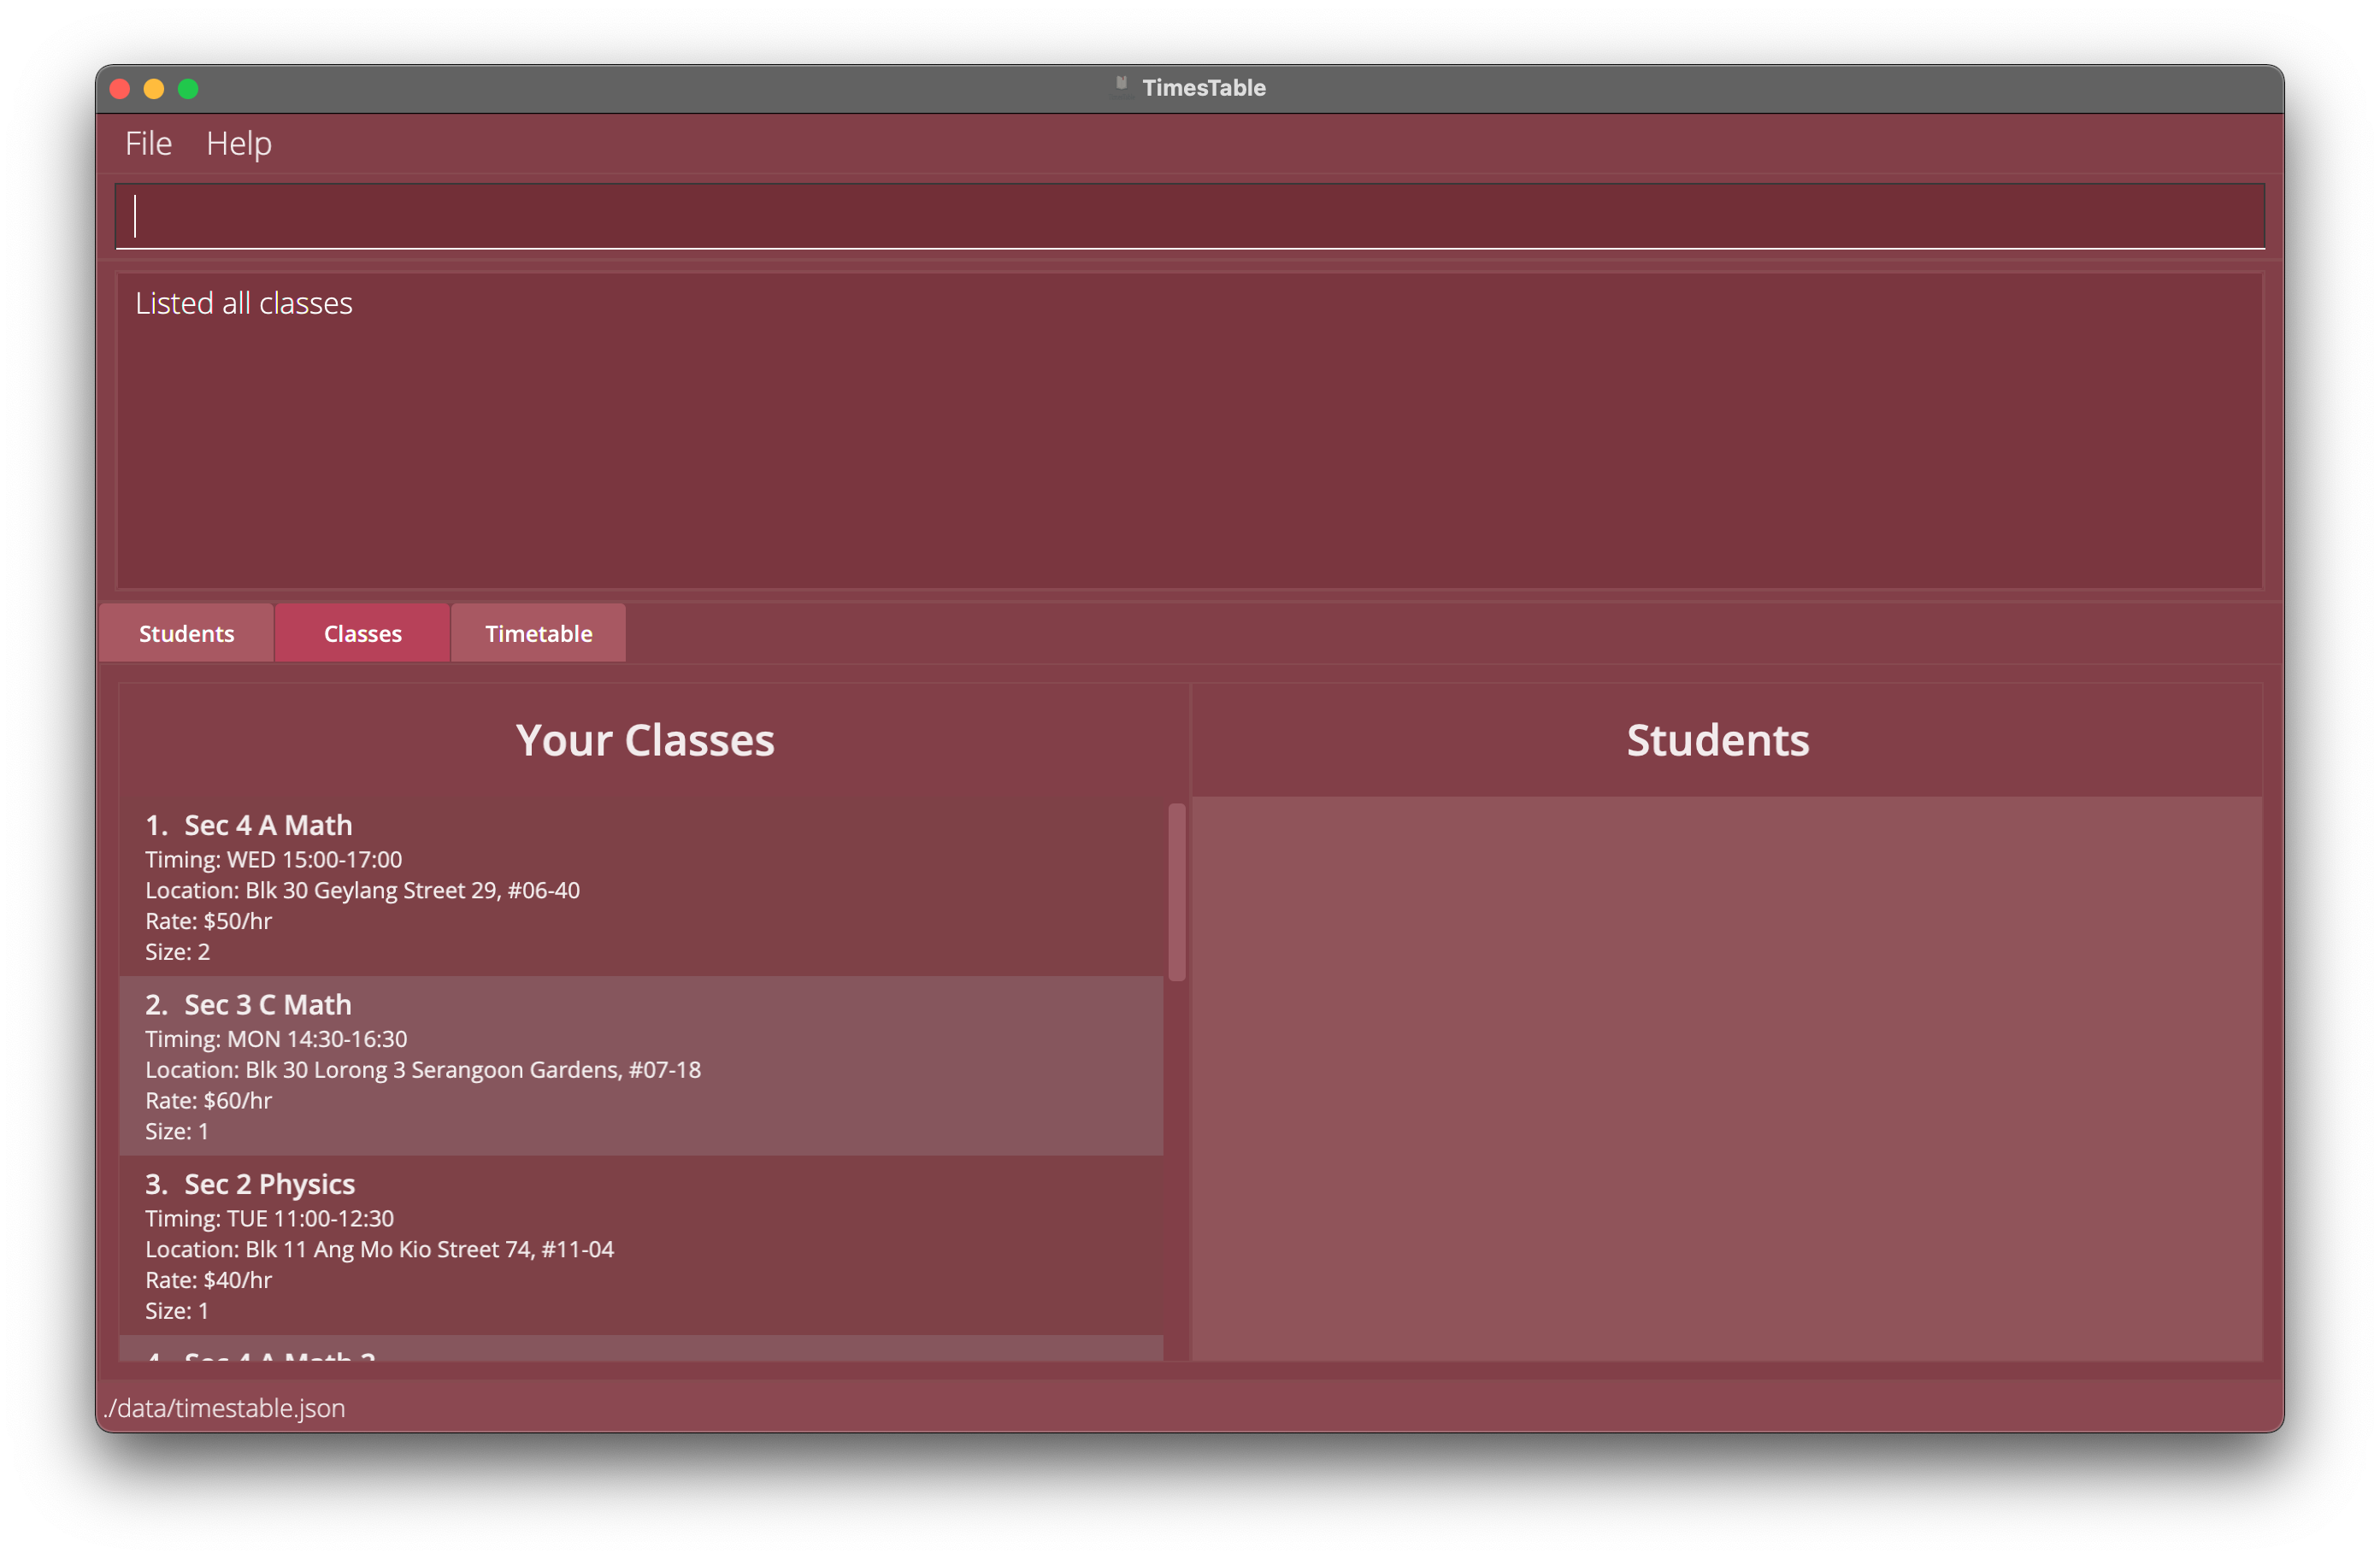
Listing all the classes: listclass
Shows a list of all classes in the Classes tab.
Format: listclass
Selecting of classes: class
Selects a class in the Classes tab and displays its students without the need to use the mouse to double click the respective class.
Format:
class CLASS_INDEX
- Selected class will not be highlighted in the same way as when you click on a class using the mouse.
-
CLASS_INDEXmust be an index of a class that exists in the displayed class list.
Examples:
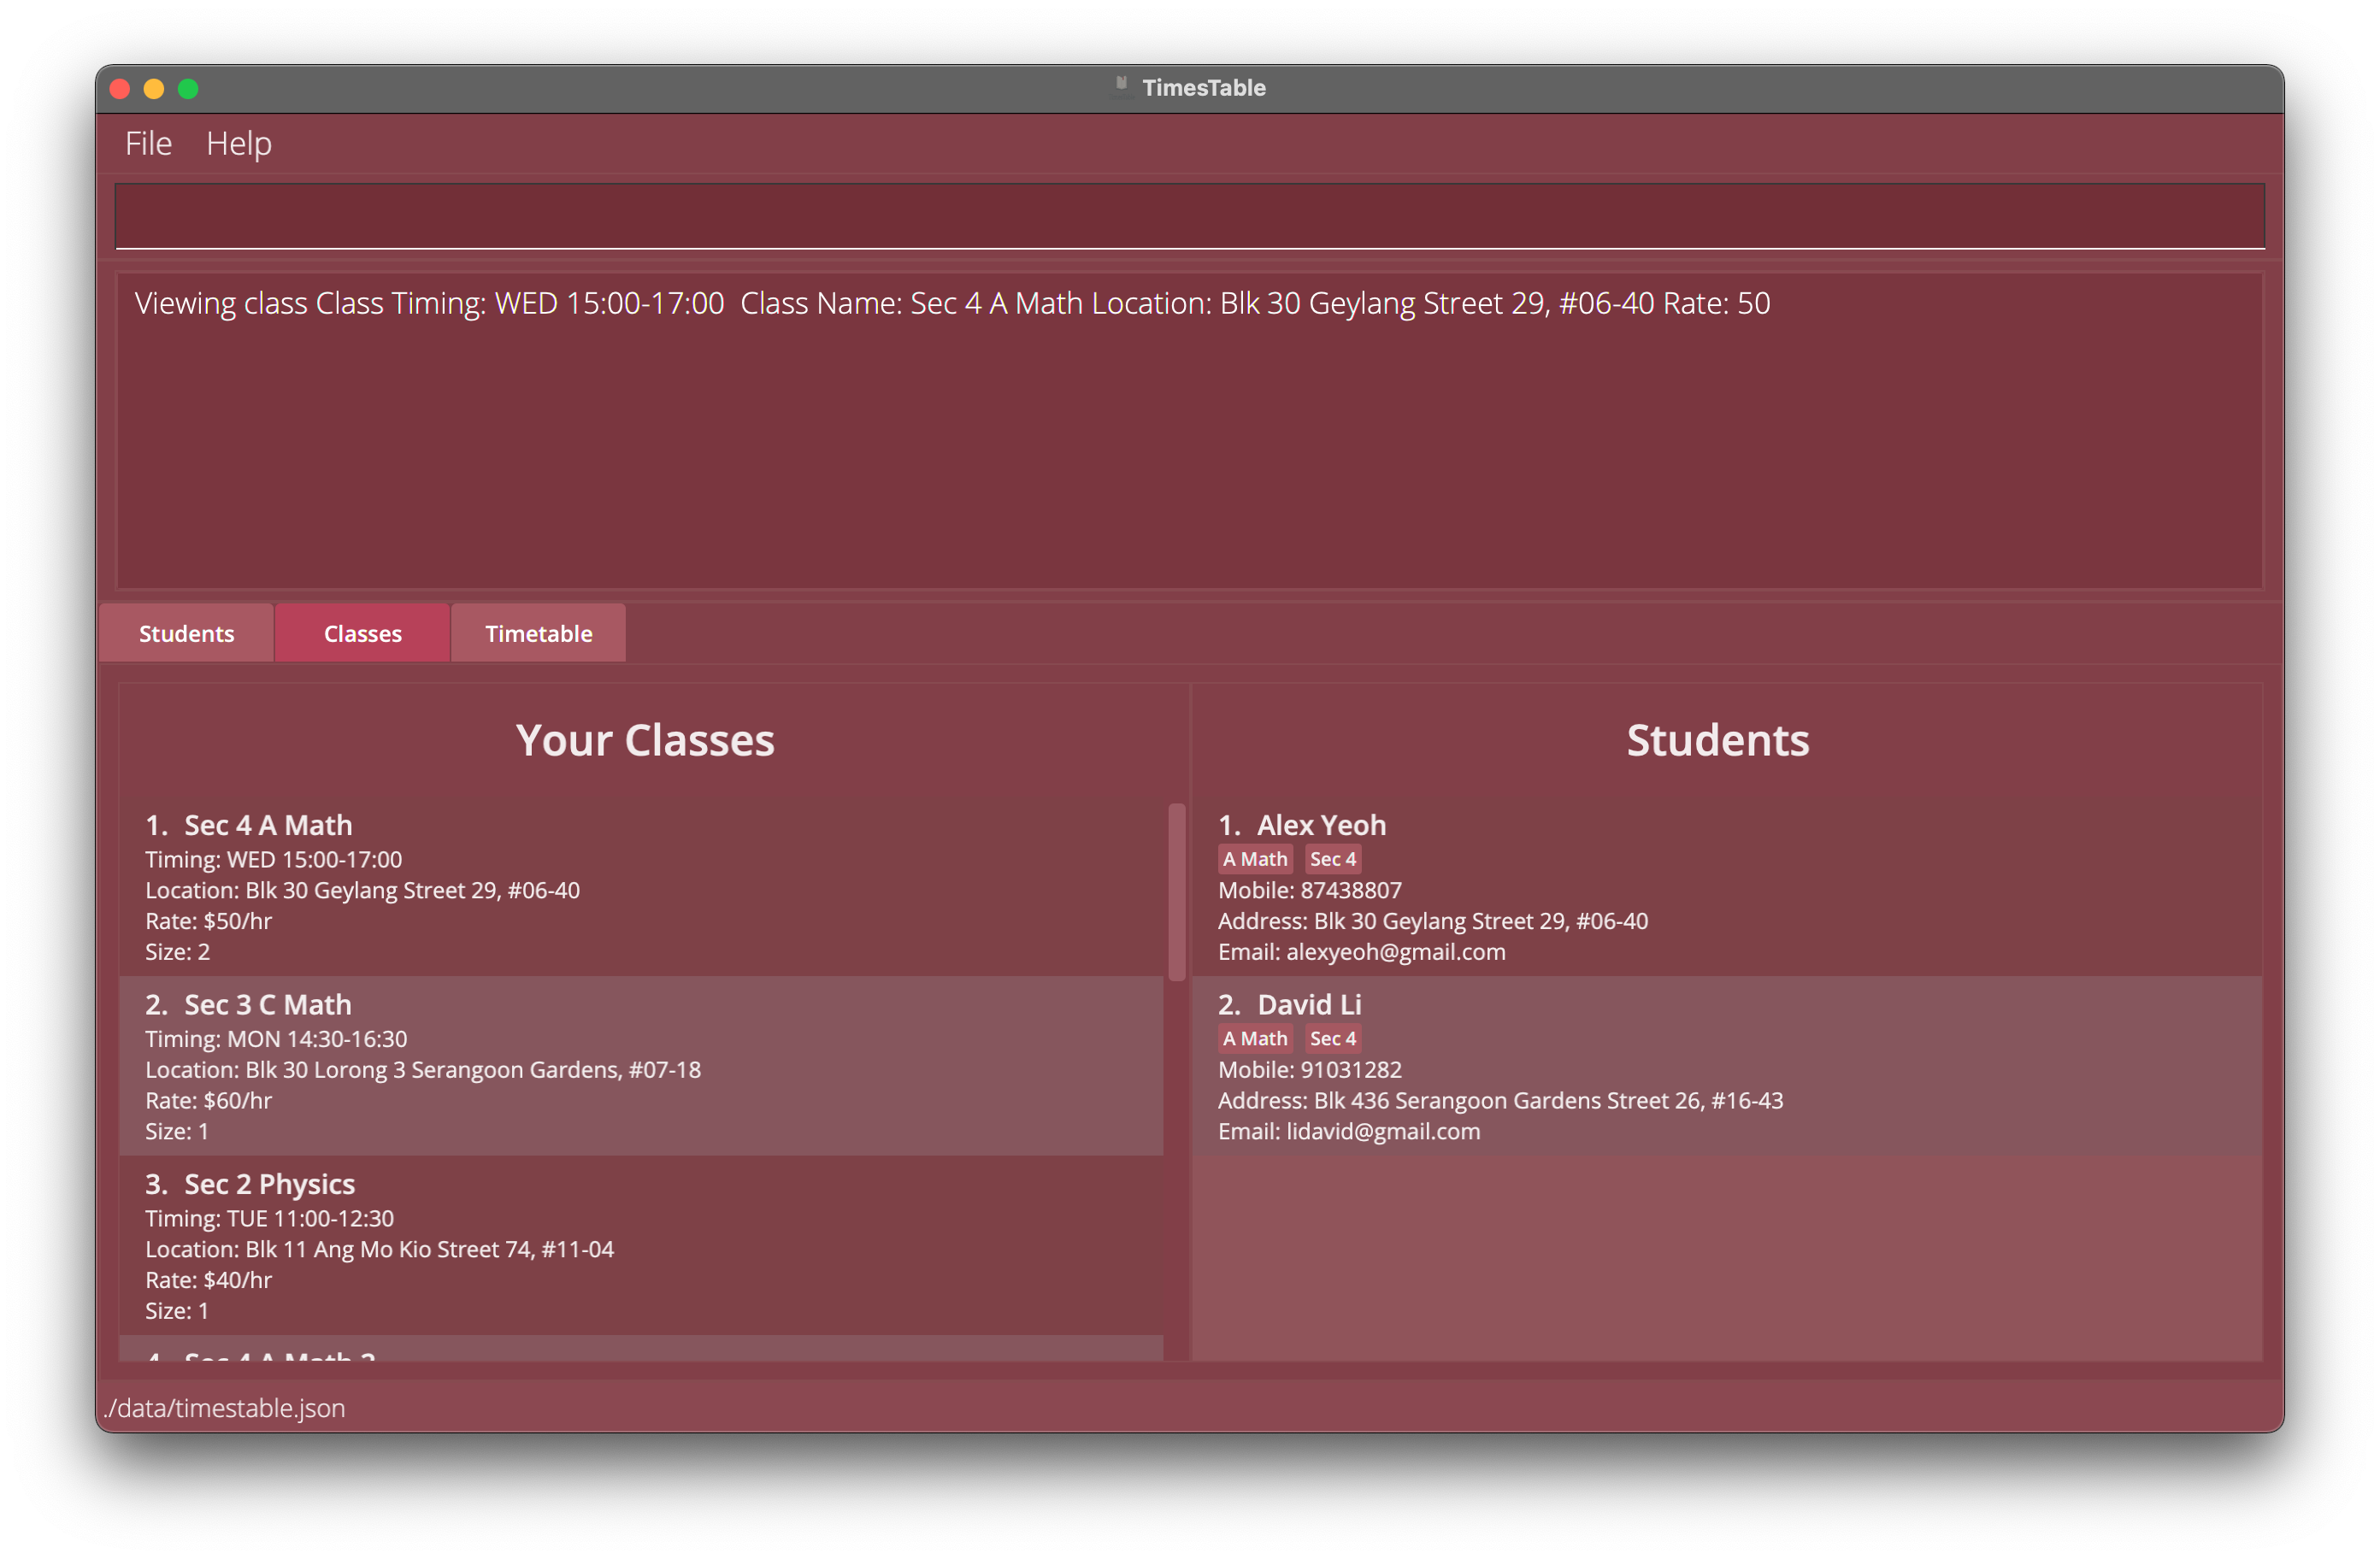
-
class 1selects the class withCLASS_INDEXof1and displays its students in the Classes tab.
Delete a class: deleteclass
Deletes the specified class from the TimesTable.
Format:
deleteclass INDEX
- Deletes the class at the specified
INDEX. - The index refers to the index number shown in the displayed class list in the
Classestab.
Examples:
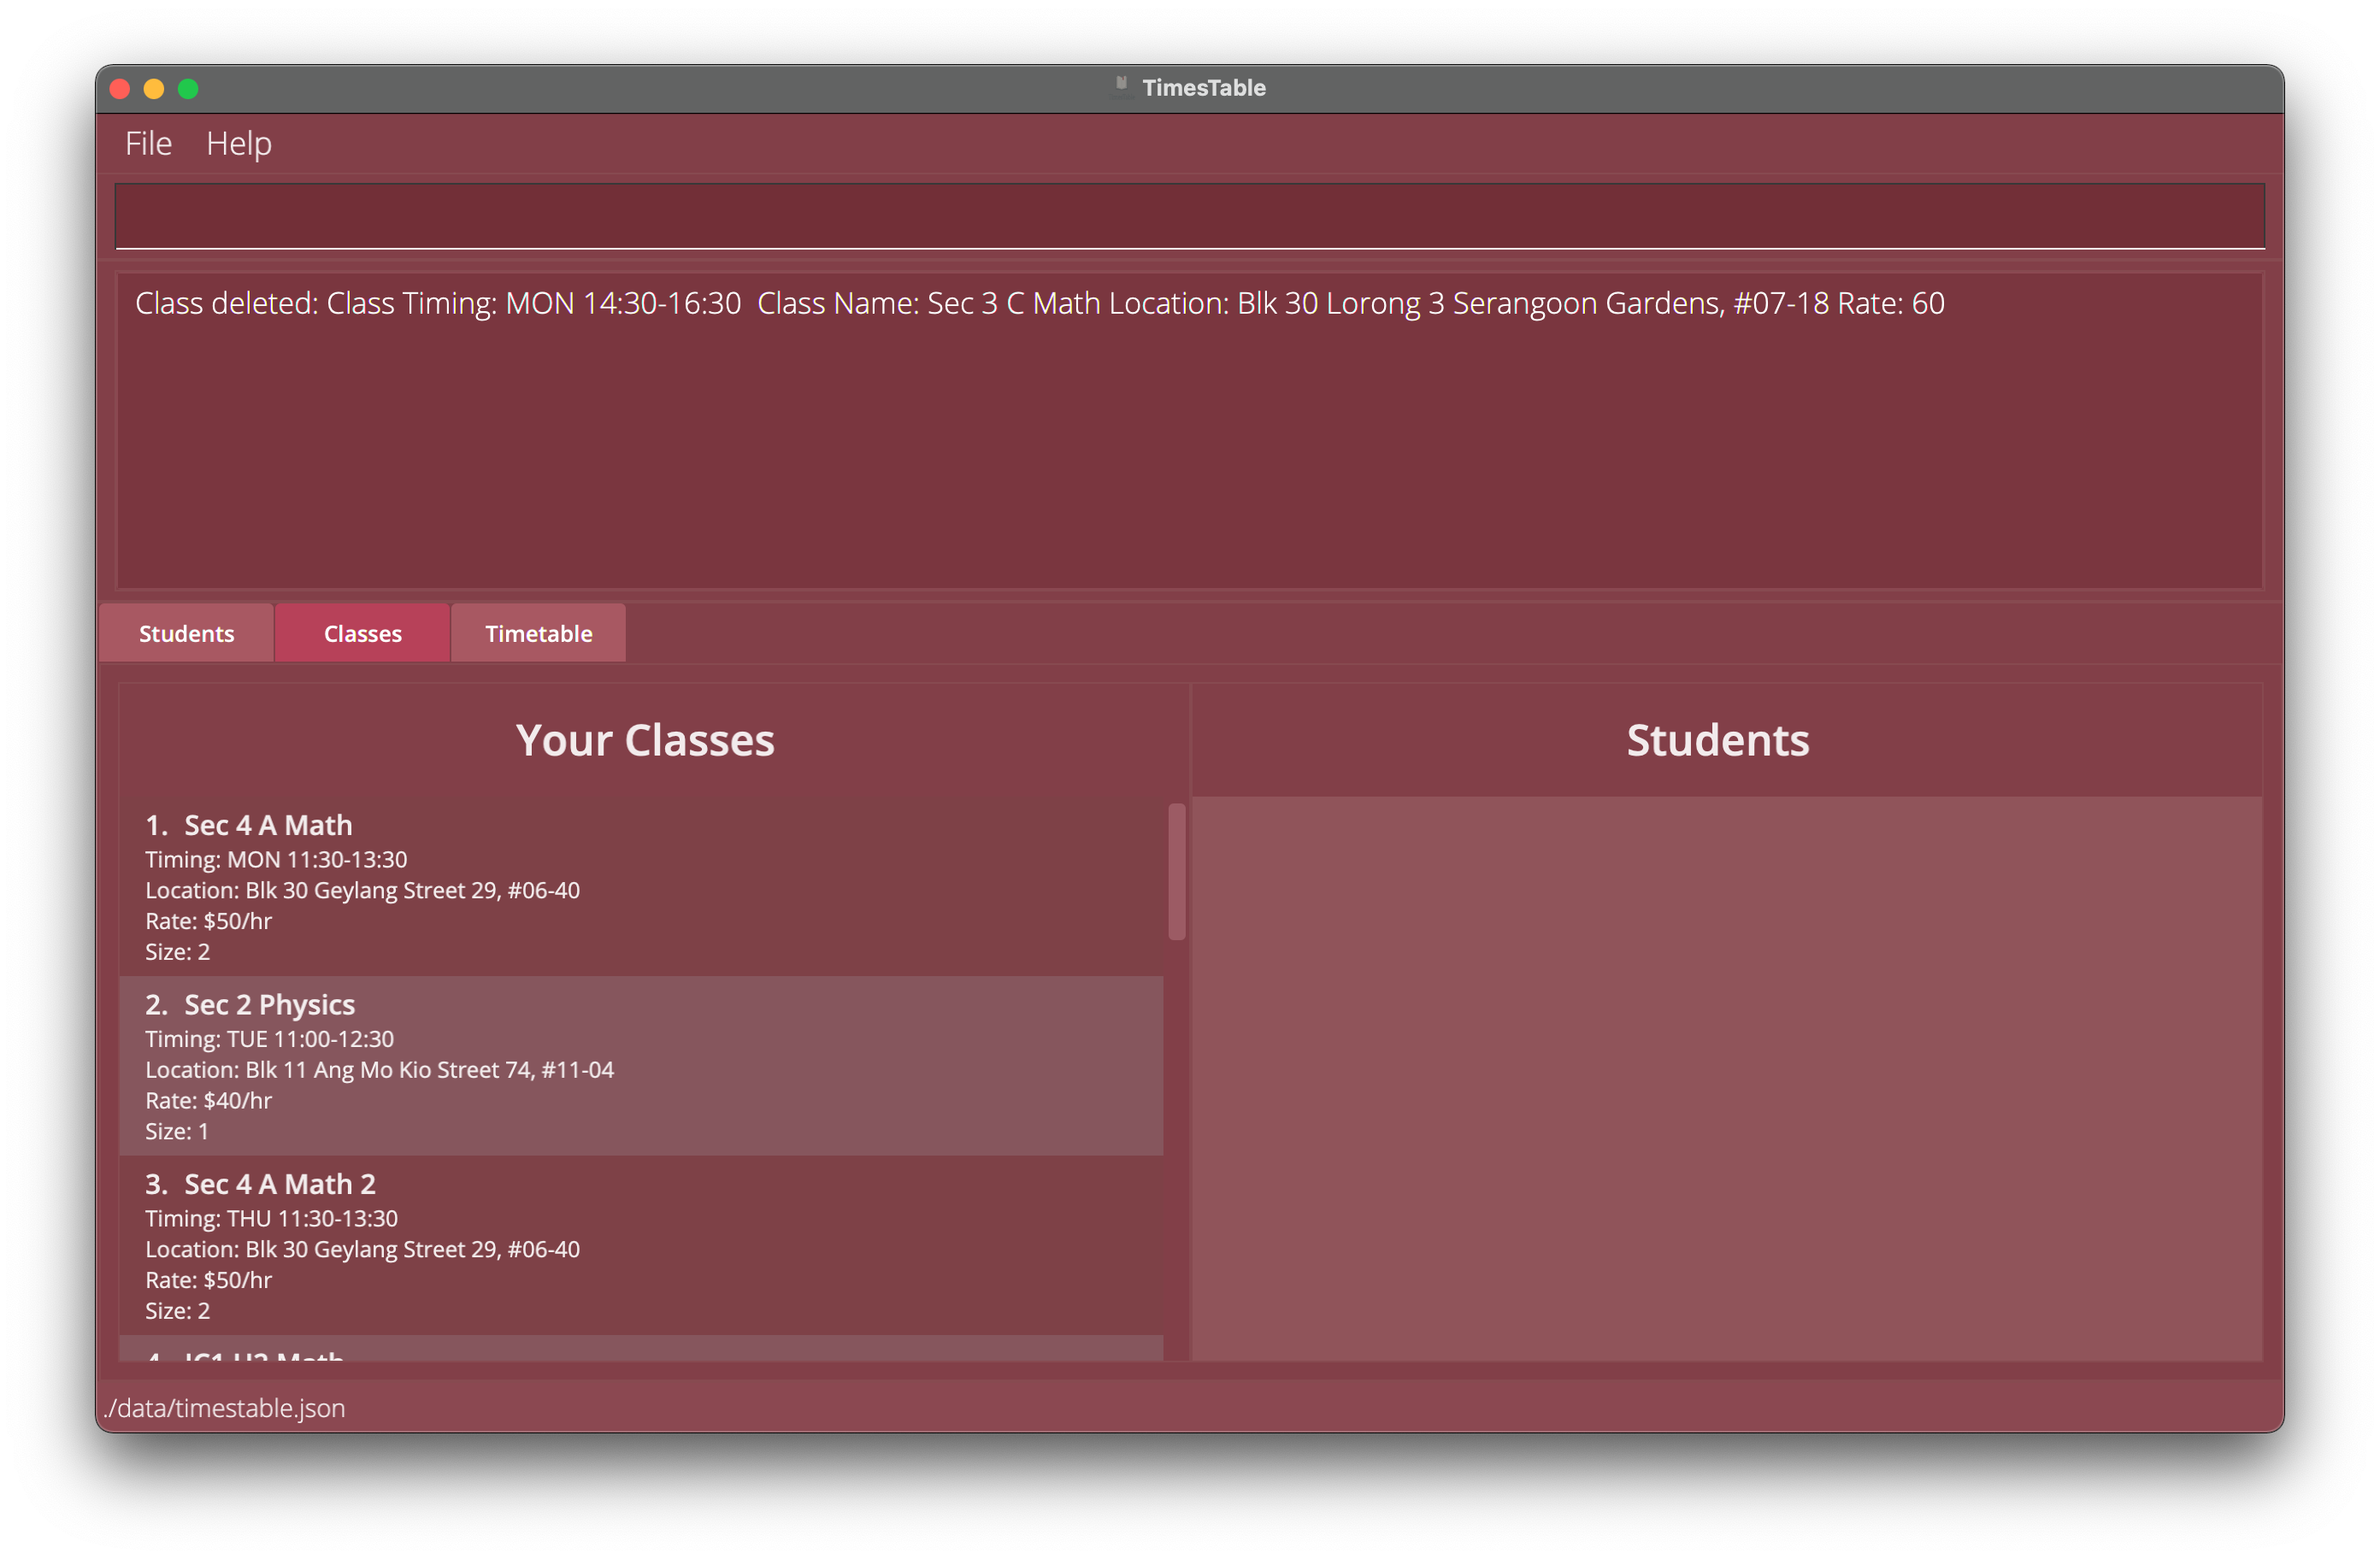
-
listclassfollowed bydeleteclass 2deletes the 2nd class in the TimesTable.
General commands
Sorting students and classes: sort
Sorts the students based on their NAME in alphabetical order,
or classes based on their CLASS_TIMING, in either ascending or descending order.
Format:
sort PARAMETER_TO_SORT_BY DIRECTION_OF_SORT
-
PARAMETER_TO_SORT_BYcan either benameortimingwhich sorts the students and classes respectively. -
DIRECTION_OF_SORTcan either beascordescto represent ascending and descending respectively. - Sorting by
namesorts the students in the Students tab and Classes tab but sorting bytimingonly sorts the classes in Classes tab but not the students in Students tab.
Examples:
-
sort name ascsorts students alphabetically by theirNAMEin ascending order. -
sort name descsorts students alphabetically by theirNAMEin descending order. -
sort timing ascsorts classes based on theirCLASS_TIMINGstarting from the earliest in the week to the latest. -
sort timing descsorts classes based on theirCLASS_TIMINGstarting from the latest in the week to the earliest.
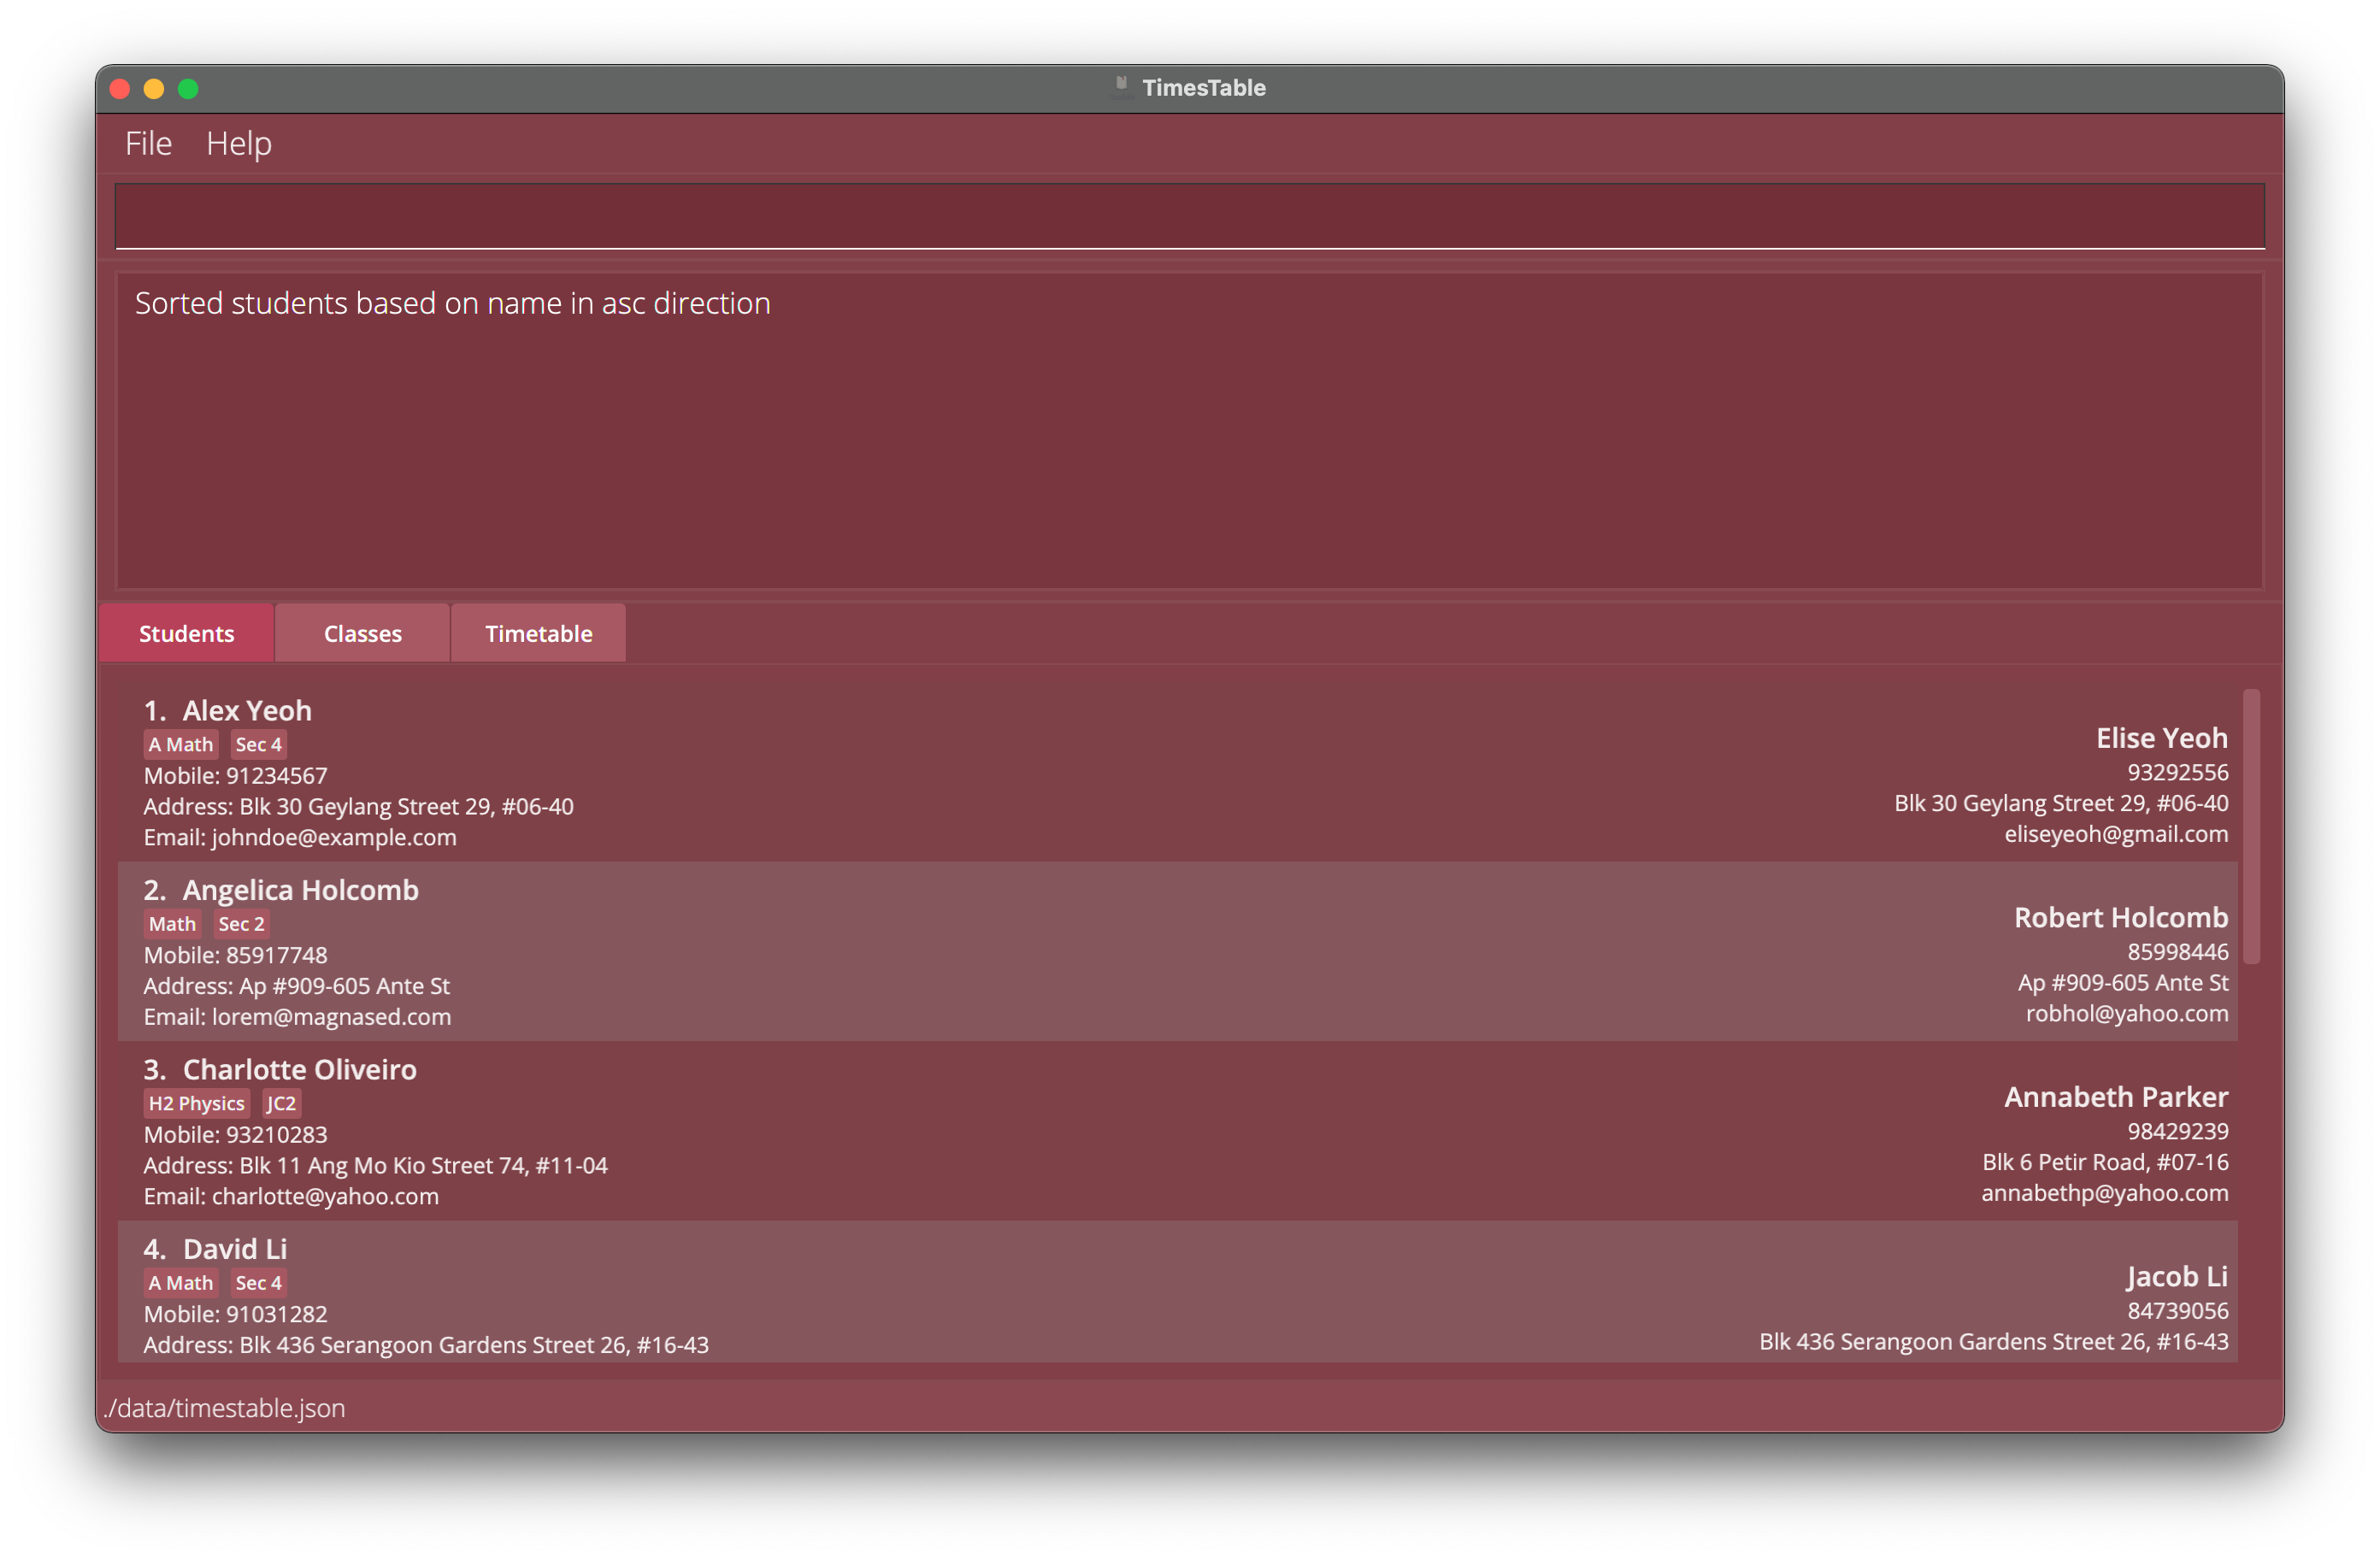
Example 1: Sorts students in alphabetical order
![]() Note:
Note:
-
For commands that alters the list of students (eg.
findname,findtag,sort name asc), the displayed changes for students will be shown in both theStudentstab as well as theClassestab.
This means that when students are filtered by theirnameandtag, they will be filtered by theirnameandtagin theClassestab as well.
Likewise, when students are sorted by their names, they will be sorted in theClassestab as well. -
The
listandlistclasscommands can be used to show the original lists of students and classes respectively. -
Class size will not be affected by filtering students (using FindName or FindTag).
Viewing of different tabs: view
Views an existing tab in the TimesTable without the need to use the mouse to click.
Format:
view TAB_TO_VIEW
-
TAB_TO_VIEWhas to be an existing tab in Timestable (students,classes,timetable).
Examples:
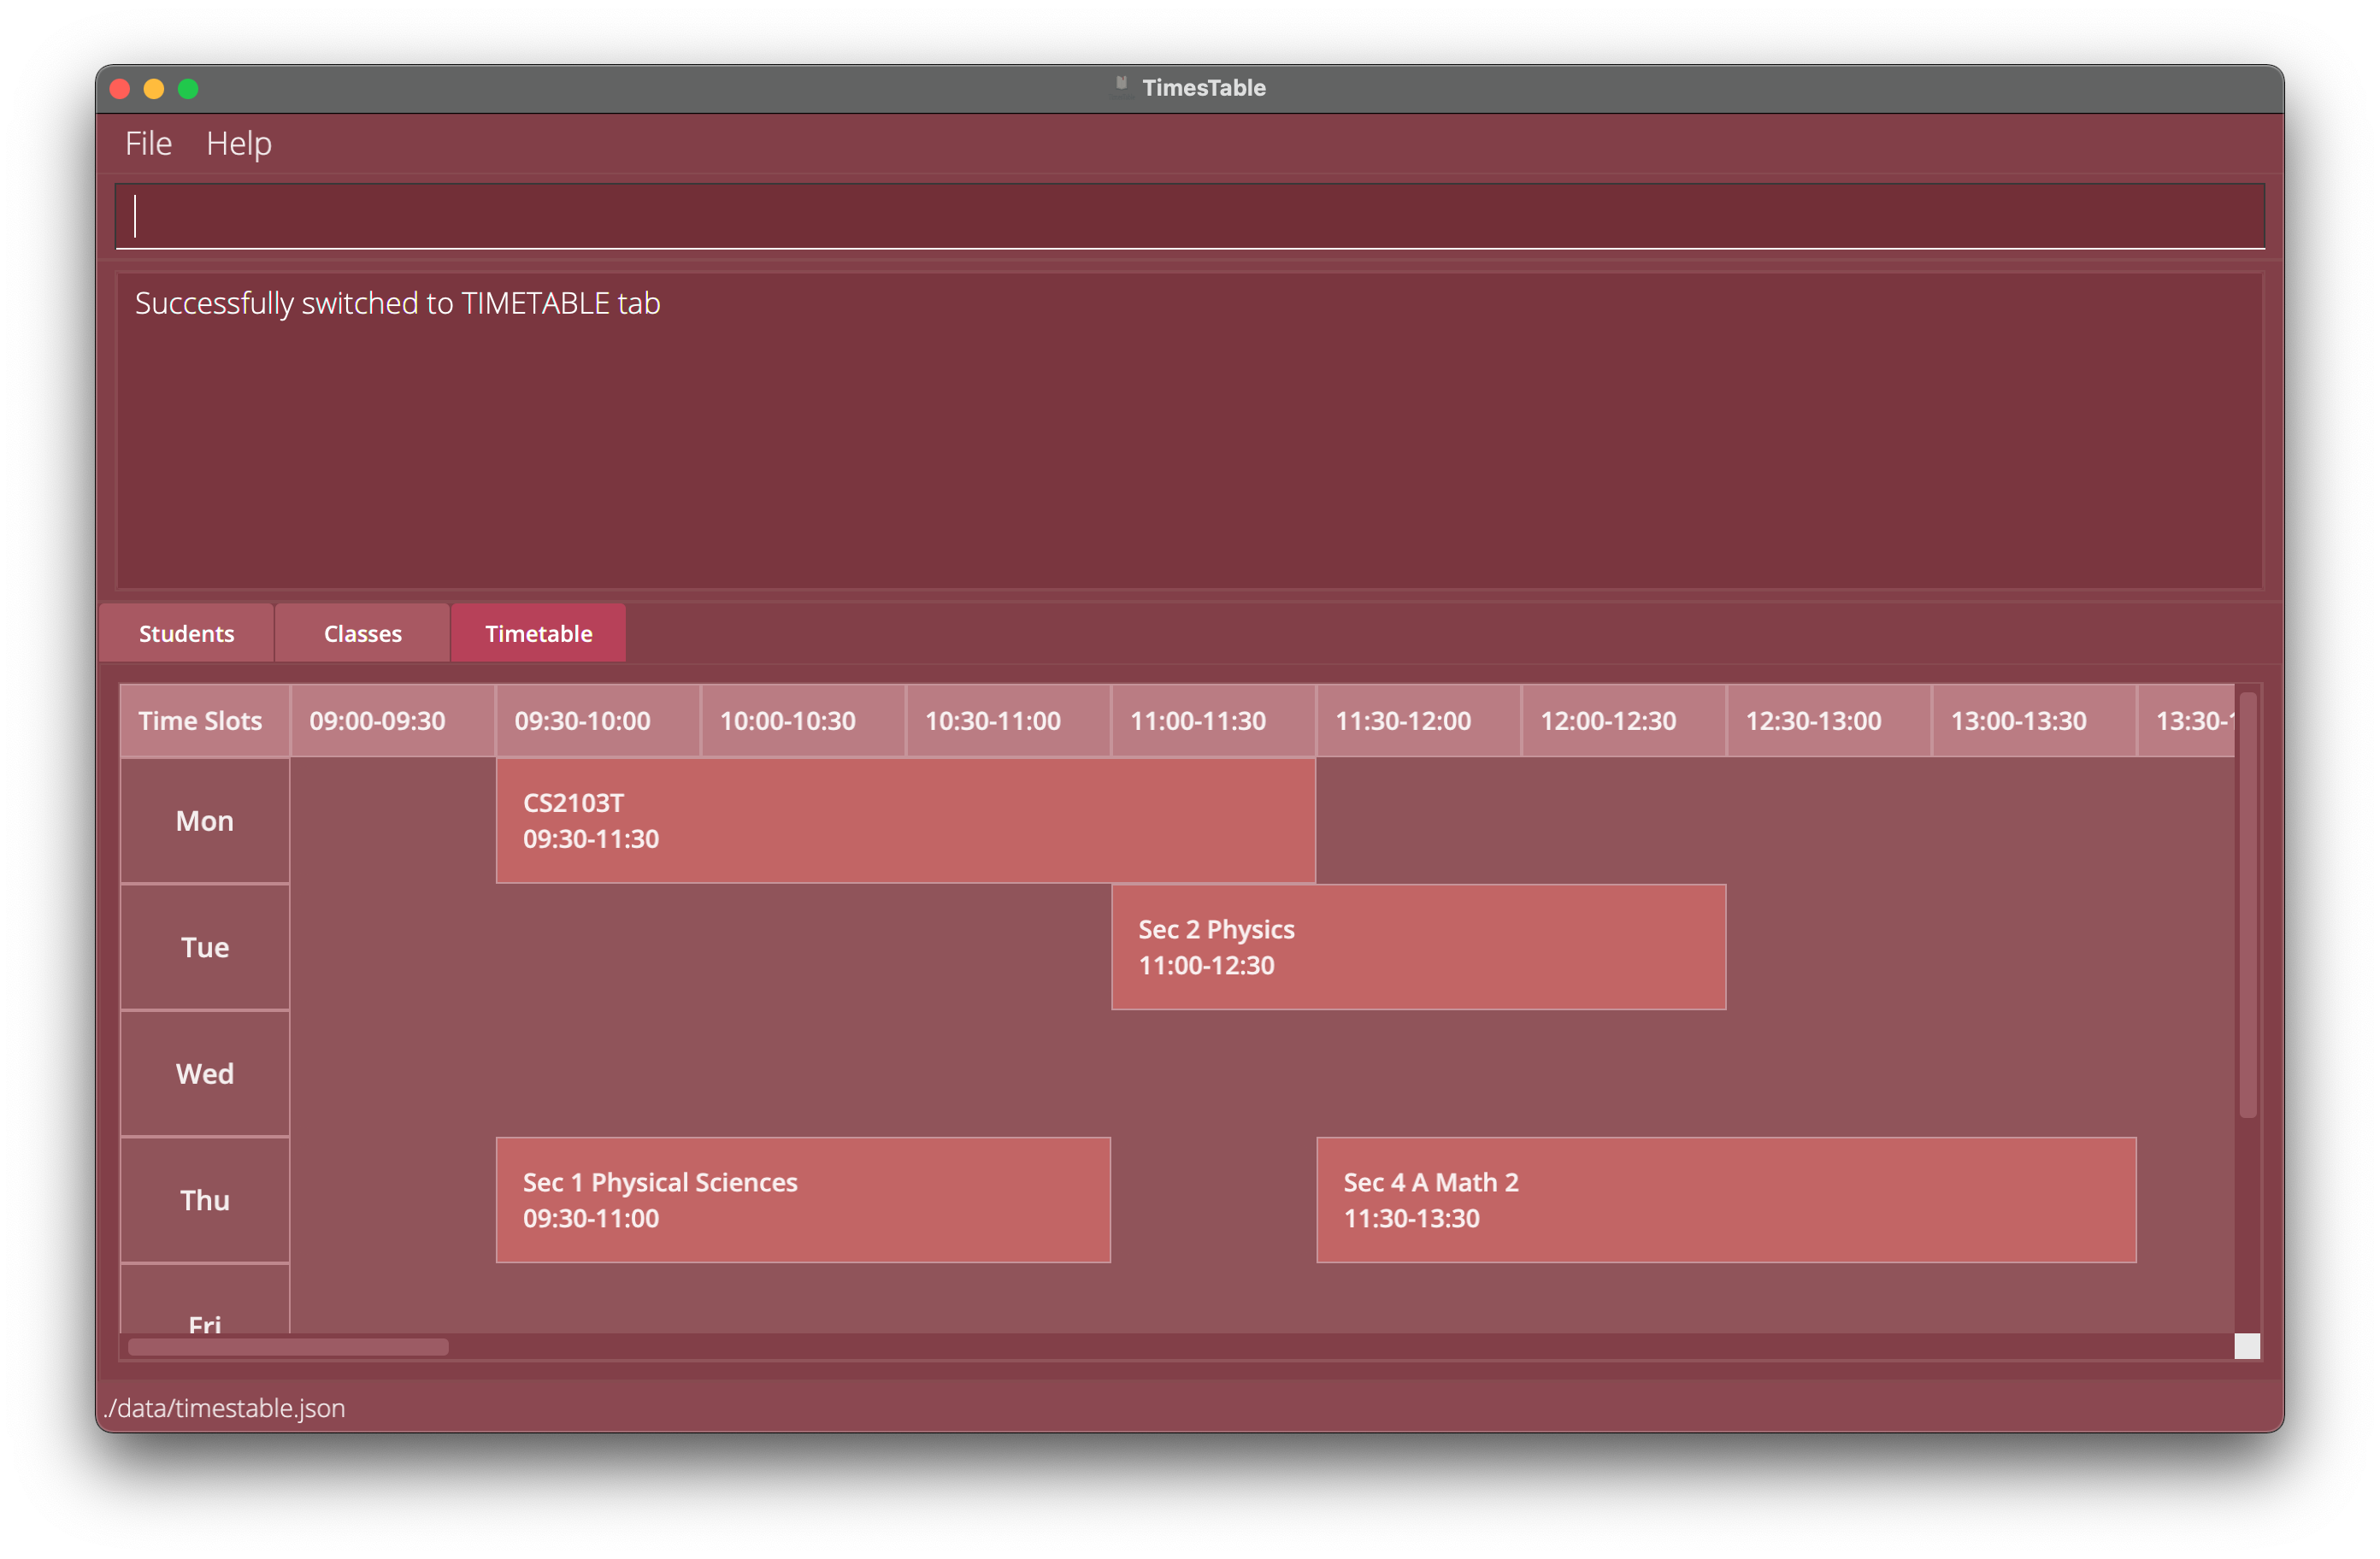
-
view timetableswitches the displayed tab to be thetimetabletab.
Clearing all entries : clear
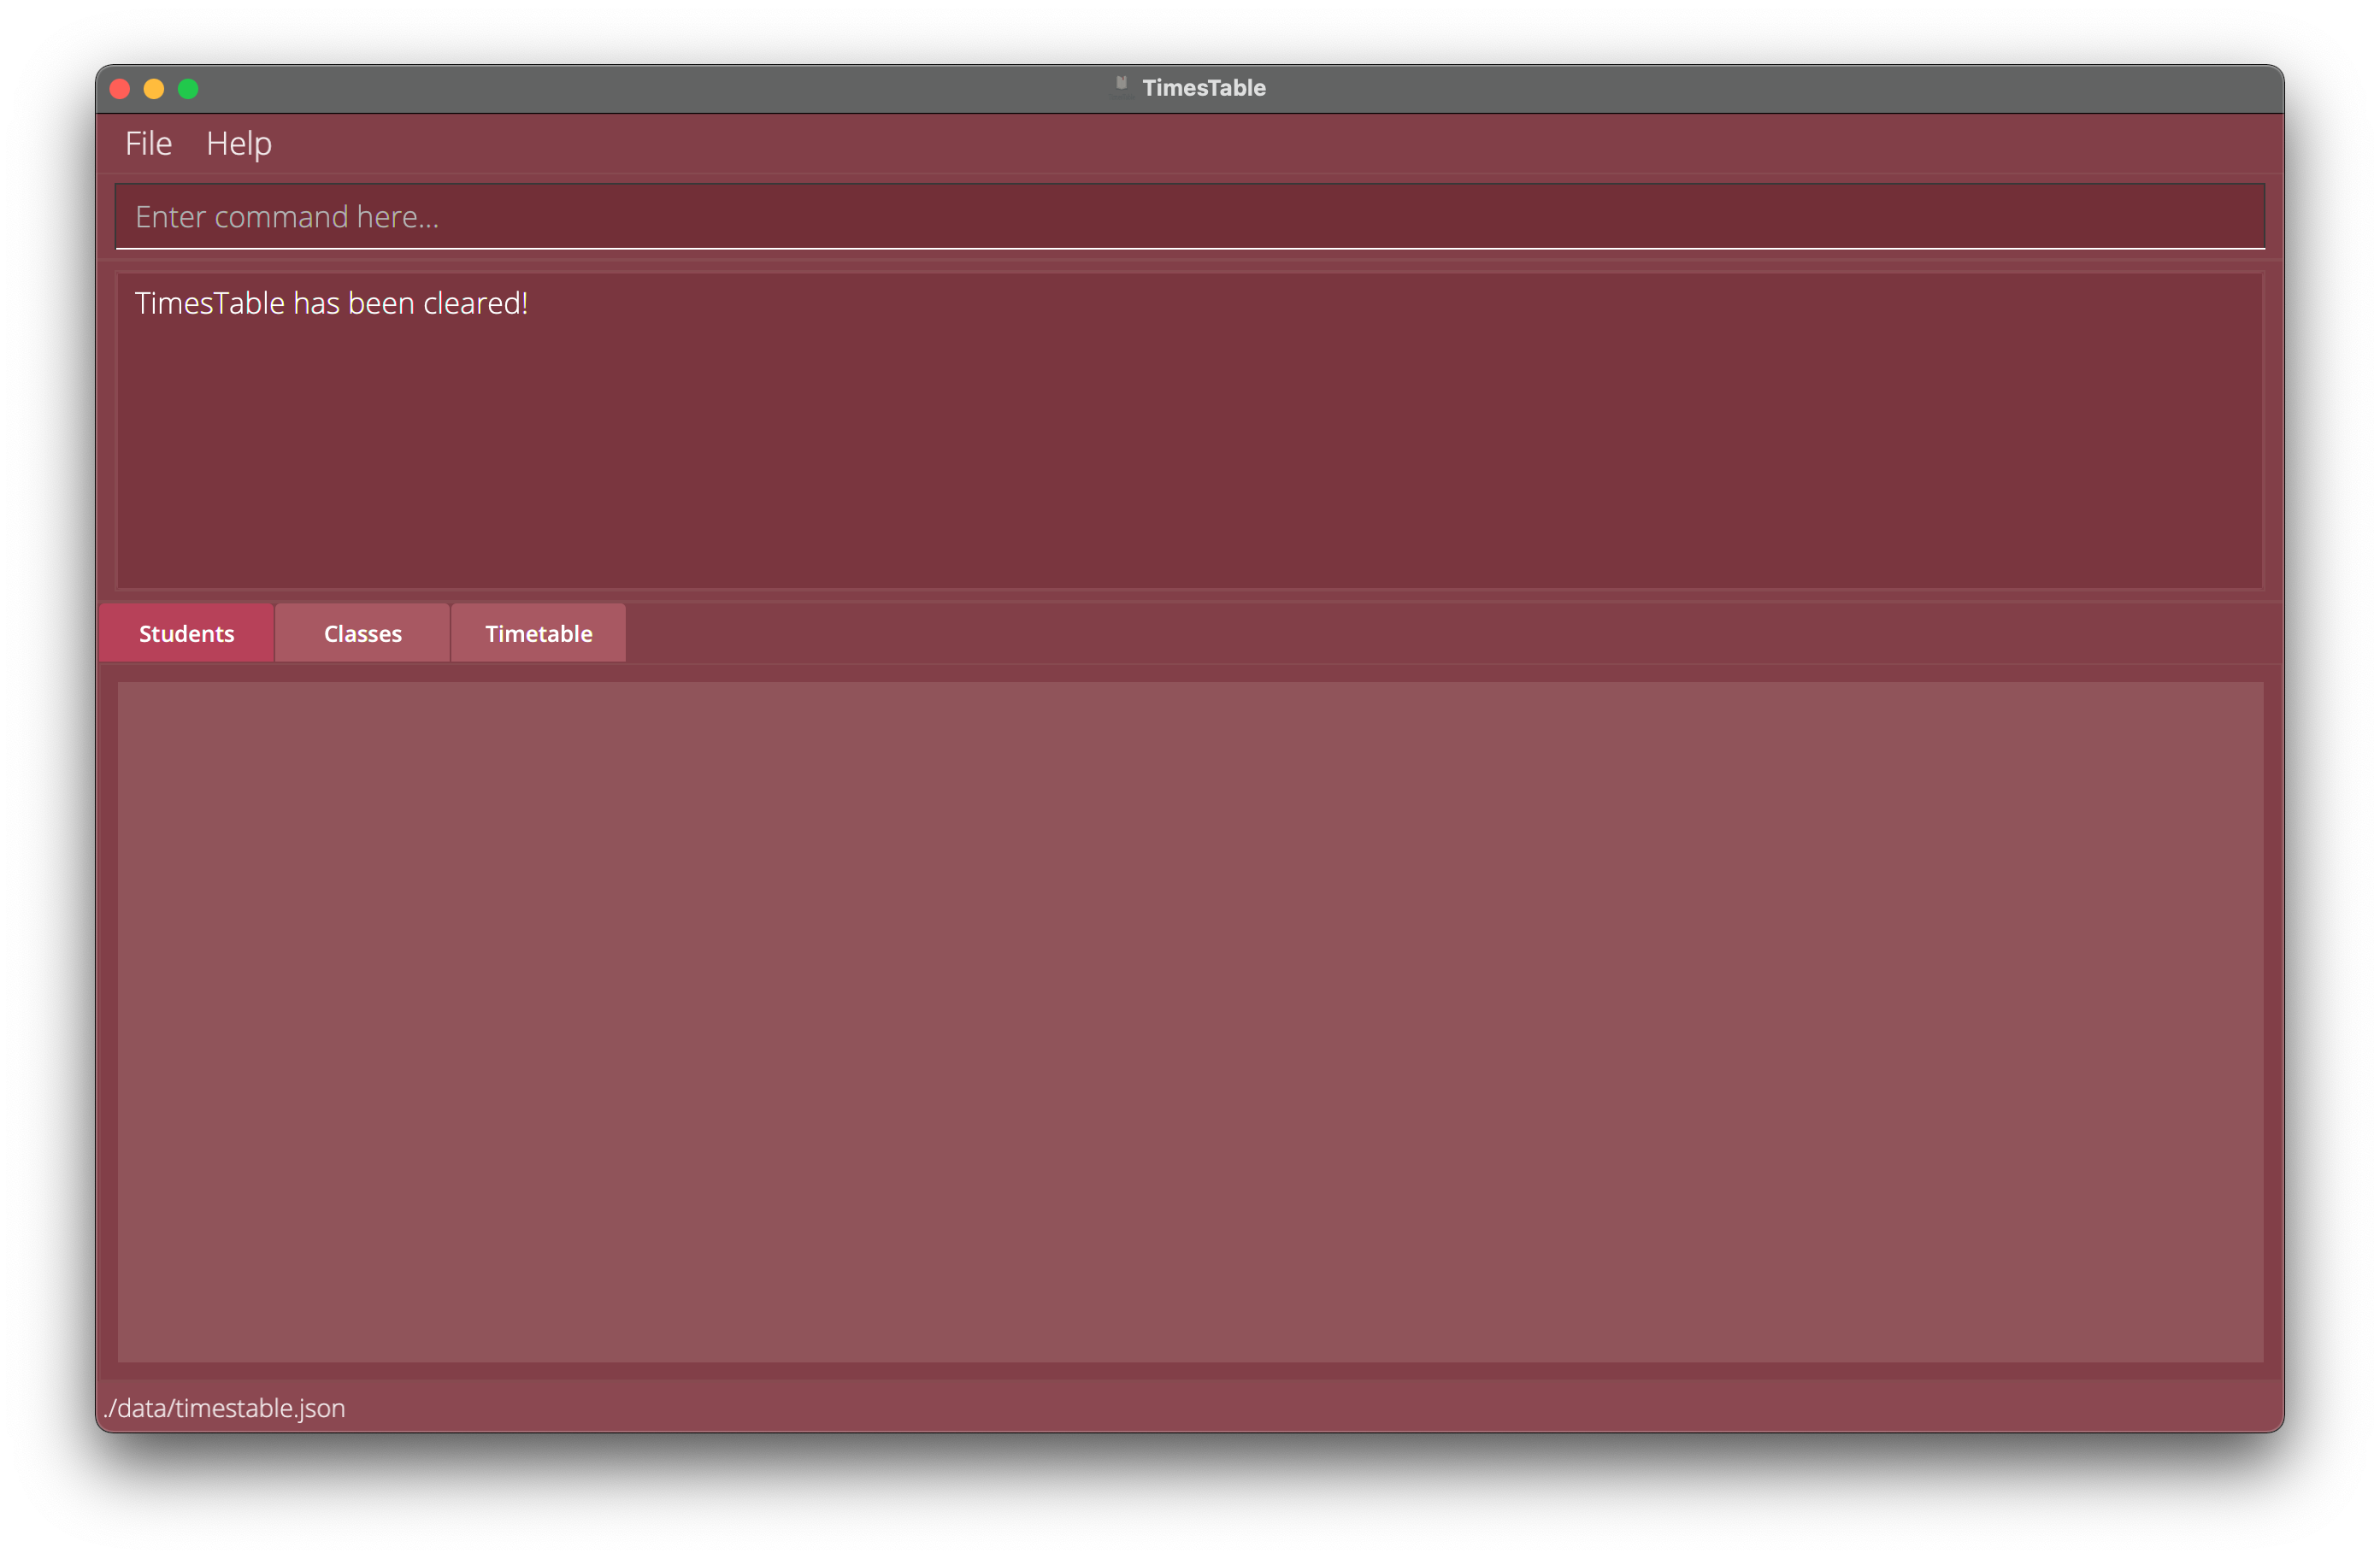
Clears all entries from the TimesTable.
Format: clear
Viewing help : help
Shows a message explaining how to access the help page.
Format: help

Exiting the program : exit
Exits the program.
Format: exit
Saving the data
TimesTable data is saved in the hard disk automatically in the data folder present in the same directory as timestable.jar after any command that changes the data. There is no need to save manually.
Editing the data file
TimesTable data are saved as a JSON file [JAR file location]/data/timestable.json. Advanced users are welcome to update data directly by editing that data file.
FAQ
Q: How do I transfer my data to another Computer?
A: Install the app in the other computer and overwrite the empty data file it creates with the file that contains the data of your previous Timestable home folder.
Q: Are you going to add XXX feature? What features are you planning to add?
A: I’m glad you asked! We’re currently planning to add the following features:
Upcoming Features:
Payment Management with Invoice
Different classes you teach will have different hourly rates, and they will of course have varying lengths and frequencies. Having to keep track of how much someone has to pay and whether they have paid is a major source of stress.
We recognise this demand, and thus are working on this feature for you to easily track required payments to students.
A work in progress sneak peak of the feature is shown below.
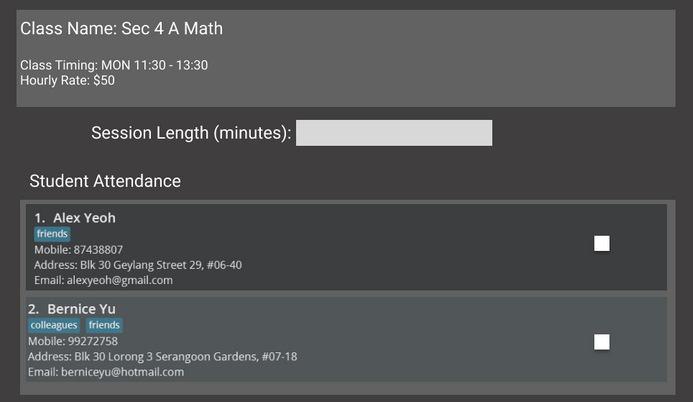
After a class, just input the time taught for that class and mark the attendance of those present.
For each student present, TimesTable will take the hourly rate multiplied by the session length for each person present to calculate the amount that each student has to pay.
The session length field is useful when the class length goes beyond the intended length or when the class cuts short.
This information will then be consolidated in an invoice to be generated.
When you want to generate a new invoice, simply use the ‘createinvoice’ command. Invoices will be generated for all students of the selected class. These invoices will use the session attendances recorded since the last invoice, generating a table with the relevant information such as session date, session length, hourly rate, student name, and so on. You will also be able to set the due date for the invoice.
An example of the invoice generated is shown below.
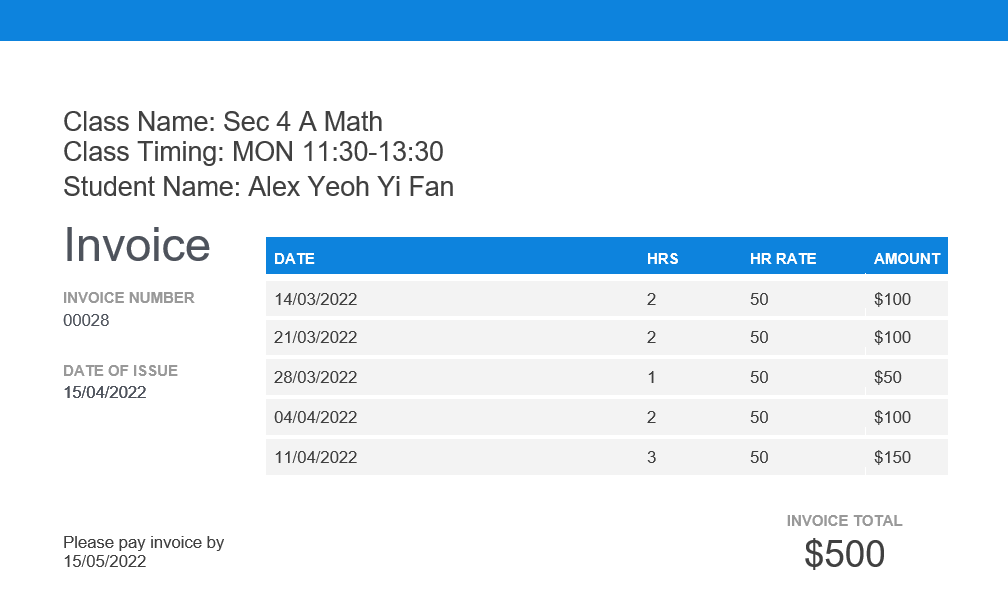
With this invoice generation feature, you will easily be able to charge the correct amount to your clients and you would also not have to worry about providing evidence. TimesTable will take care of it for you.
In addition to invoice generation, we are also working on an invoice management feature that will allow you to track the status of each invoice. You will be able to mark the invoices as paid, and archive them. TimesTable will also alert you once the due date for any invoice has passed. You can simply let TimesTable keep track of all payments for you.
If there are any other proposed features, please submit an issue via our GitHub over here and we’ll look into it!
Command summary
Student Commands Summary
| Action | Format, Examples |
|---|---|
| Add |
add n/NAME p/PHONE_NUMBER e/EMAIL a/ADDRESS [t/TAG]… nok/ n/NOK_NAME p/NOK_PHONE_NUMBER e/NOK_EMAIL a/NOK_ADDRESS e.g., add n/John Doe p/98765432 e/johnd@example.com a/John street, block 123, #01-01 t/ALevels nok/ n/Mary Doe p/93334848 e/mary23@gmail.com a/311, Clementi Ave 2, #02-25
|
| Delete |
delete INDEXe.g., delete 3
|
| Edit |
edit INDEX [n/NAME] [p/PHONE] [e/EMAIL] [a/ADDRESS] [t/TAG]… [nok/ [n/NOK_NAME] [p/NOK_PHONE] [e/NOK_EMAIL] [a/NOK_ADDRESS]]e.g., edit 2 n/James Lee e/jameslee@example.com
|
| Find name |
findname NAME [, [NAME]...] e.g., find Stuart
|
| Find tag |
findtag KEYWORD [, [KEYWORD]...] e.g., findtag math, physics
|
| List | list |
| Sort |
sort PARAMETER_TO_SORT_BY DIRECTION_OF_SORT e.g., sort name asc
|
Class Commands Summary
| Action | Format, Examples |
|---|---|
| Add class |
addclass cn/CLASS_NAME ct/CLASS_TIMING r/HOURLY_RATE l/LOCATION e.g., addclass cn/Sec 4 A Maths ct/mon 11:30-13:30 r/70 l/Nex Tuition Center
|
| Add to class |
addtoclass CLASS_INDEX STUDENT_INDEX… e.g., addtoclass 1 1 2 3
|
| Delete class |
deleteclass INDEX e.g., deleteclass 2
|
| Edit class |
editclass 1 [cn/CLASS_NAME] [ct/CLASS_TIMING] [r/RATE] [l/LOCATION] e.g., editclass 1 ct/wed 15:00-17:00
|
| Find class name |
findclassname CLASS_NAME [, [CLASS_NAME]...] e.g., findclassname math
|
| Find class timing |
findclass CLASS_TIMING e.g., findclass mon 11:00-12:00
|
| List class | listclass |
| Remove from class |
removefromclass CLASS_INDEX STUDENT_INDEX... e.g., removefromclass 1 1 2 3
|
| Select class |
class CLASS_INDEX e.g., class 2
|
| Sort |
sort PARAMETER_TO_SORT_BY DIRECTION_OF_SORT e.g., sort timing asc
|
General Commands Summary
| Action | Format, Examples |
|---|---|
| Clear | clear |
| Exit | exit |
| Help | help |
| View |
view TAB_TO_VIEW e.g., view timetable
|